background image

Inspection Guidelines

DO NOT INSTALL UNIT WITHOUT 

FIRST ADDRESSING QUESTIONS 

WHICH ARISE DURING THE 

INSPECTION!

Installation Guidelines

WARNING!

ADEQUATE ACCESS MUST BE 

PROVIDED AT THE PUMP LOCATION.
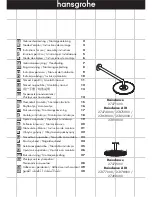


Air Control Knob

(2 per unit)

Factory Connected

On/Of Control Air Hose

On/Off Button 

Jet Supply Line

Suction Line

Factory Mounted

Single-Speed

Pump

Electrical Supply Cable 

With Attachment 

Plug End.

Factory Mounted

Unit Base

Factory Installed

System Piping

Figure 1 - Basic Whirlpool System

(Typical Tub Illustrated)

Figure 2 - Whirlpool System With

In-Line Heater 

(Factory Installed Option)

Jet Supply Line

Factory Mounted

In-Line Heater

Suction Line

Electrical Supply Cable With

Attachment Plug End.

(In-Line Heater)

Electrical Supply Cable With

Attachment Plug End.

(Pump/Motor)

Factory Mounted

Single-Speed Pump

Jet Supply

Line

Bodywrap Whirlpool System 
Assembly And Operation Guide

-2-

10023064

A carelful check of the whirlpool system
should be conducted upon receipt of the
unit. The basic whirlpool configuration is
shown in Figure 1.  A system with an in-line
heater is shown in Figure 2.

If the unit has a factory-fitted:
     Alternate pump location,
refer to the Supplemental Assembly
information packaged with the accessory
items for additional item checks before
continuing. Notify your supplier immediately if 
any questions or problems are encountered 
during this process.

Basic Whirlpool System Check

>  Check to be certain the air hose is 
    secured to the on/off button and to the
    whirlpool pump. It is possible that during
    shipping and handling this air hose may
    become loose. This hose must be
    firmly in place on both the on/off button
    and pump-motor, otherwise the pump
    will not start.

Whirlpool System with Mounted In-Line
Heater Check

>  Check for factory installed in-line heater
    option mounted on pump.

Framing and Installation Requirements

Framing and dimensional requirements for
clearance of whirlpool fittings are included in
the installation guidelines with the basic unit. 
Refer to clearance information for optional 
components if present. This information is
provided in supplimental documents 
provided with the whirlpool packaging.

>  Check system to ensure all trim is in
    place and for finish color ordered.

The basic whirlpool system is produced with
the pump secured to the unit base and the
complete system assembled at the factory.

Summary of Contents for AKER

Page 1: ...dures and any referenced publications before starting is important in avoiding unnecessary problems resulting in an improper assembly or operation It is the sole responsibility of the installer to determine prior to installation the requirements necessary for compliance with all codes involving the unit and the installation All paperwork packaged with the unit and any associated options or accesso...

Page 2: ...own in Figure 2 If the unit has a factory fitted Alternate pump location refer to the Supplemental Assembly information packaged with the accessory items for additional item checks before continuing Notify your supplier immediately if any questions or problems are encountered during this process Basic Whirlpool System Check Check to be certain the air hose is secured to the on off button and to th...

Page 3: ...pleting all water supply drain and electrical connections use the following procedure to test the system and all fittings for leaks Close the drain and fill to the top of trim ring on the highest jet Start the whirlpool and operate continuously for 20 minutes 1 complete timer cycle During the cycle adjust the air controls Figure 5 and the control Figure 10 through the complete range and check each...

Page 4: ...ow Adjust center internal jet cartridge counterclockwise for removal Have pump to jet supply line checked for blockage Call installer or supplier Clean and service whirlpool system See Whirlpool System Care and Cleaning section Confirm pump motor is plugged in Confirm air hose from on off switch to the pump motor is securely in place and is not crimped Close the drain and fill tub to desired water...

Page 5: ...tion as shown in Figure 7 To change the whirlpool action during the system operating cycle adjust air control knobs Opening turning counterclockwise the air control allows more air to be mixed with the water coming out of the jet nozzle for increased whirlpool action Closing turning counter clockwise the air control reduces air at the jet for less whirlpool action See Figure 5 The micro pulse back...

Page 6: ...ESTING NAHB Certain models are pending approval Certification may be ended by MAAX or certification agencies without notice MAAX AKER BODYWRAP SYSTEM are regestered trademarks of MAAX Bath INC SELECTAFLOW s a trademark of MAAX Bath Inc This warranty shall not apply following incorrect operating procedures breakage or damages caused by fault carelessness abuse misuse misapplication improper mainten...

Reviews: