32
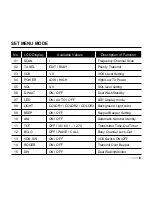
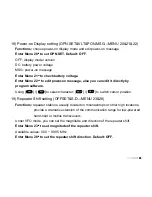
7) LED Display Mode (LED---MENU 7)
Function:
select the LED/Keypad Lamp mode.
Enter Menu 7
th
to select LED display mode. Default: AUTO.
ON: LED display lights all the time.
AUTO: Illuminates the LED when any key is pressed and after 3s the light is off.
OFF: Disable the LED lamp.
8) Background Light Collor (LIGHT---MENU 8)
Functions:
choose LED background light color.
Enter Menu 8
th
to select background light collor. Default: COLOR1.
COLOR1: Purple.
COLOR2: Blue.
COLOR3: Orange.
9) Keypad Beeper setting (BEEP---MENU 9)
Functions:
enable/disable the keypad beeper.
Enter Menu 9
th
to set keypad beeper. Default: ON.
10) Automatic Number Identity (ANI---MENU 10)
Functions:
sending ID code when AHT-9-UV transmits, the others can receive it directly
on the display if they also have ANI function.
Enter Menu 10
th
to set ANI. Default: OFF.
33
11) Transmitter Time-Out Timer (TOT---MENU 11)
Functions:
the TOT feature provides a safety switch which limits transmission to a
pre-programmed value. This will promote battery conservation by not
allowing you to make excessively-long transmissions, and in the event of
a stuck PTT switch it can prevent interference to other users as well as
battery depletion.
Enter Menu 11
th
to set TOT. Default: OFF.
12) Busy Channel Lock-Out (BCLO---MENU 12)
Functions:
the BCLO feature prevents the radio’s transmitter from being activated if a
signal strong enough to break through the “noise” squelch is present. On a
frequency where stations using different CTCSS or DCS codes may be
active, BCLO prevents you from disrupting their communications
accidentally (because your radio may be muted by its own tone decoder).
Enter Menu 12
th
to set BCLO. Default: OFF.
OFF: Disable BCLO feature.
WAVE: the radio’s PTT will be prevented only if the frequency is busy used.
CALL: the radio’s PTT will be prevented only the frequency and tone coder is the same.
13) Transmit Over Beeper (ROGER---MENU 14)
Functions:
sending a beeper to inform the receiver TX is over.
Enter Menu 14
th
to set ROGER. Default: OFF.
Summary of Contents for AHT-9-UV
Page 2: ......
Page 4: ......
Page 6: ......
Page 7: ...Professional FM Transceiver User s Manual USING TIPS UNPACKING AND CHECKING EQUIPMENT...
Page 8: ......
Page 10: ......
Page 11: ...05 05 AHT 9 UV 1500 7 4V CHARGING BATTERY PACK Charging Precaution...
Page 12: ......
Page 14: ......
Page 15: ...09 Picture 5 Picture 6 Installing Belt Clip PUSH PUSH...
Page 16: ......
Page 17: ...Professional FM Transceiver User s Manual GETTING FAMILIAR...
Page 18: ......
Page 20: ......
Page 22: ......
Page 24: ......
Page 26: ......
Page 28: ......
Page 30: ......
Page 32: ......
Page 34: ......
Page 36: ......
Page 38: ......
Page 40: ......
Page 42: ......
Page 44: ......
Page 46: ......
Page 48: ......
Page 50: ......
Page 52: ......
Page 54: ......
Page 56: ......
Page 58: ......
Page 60: ......
Page 62: ......
Page 64: ......
Page 66: ......
Page 68: ......
Page 70: ......
Page 72: ......

