background image

English   

- 19 -

If  you  have  inserted  a Top  Up TV  smart  card  then 

further options may become available, if so, follow the 

instructions provided with your Top TV smart card.

Note: 

The smart card is provided separately by Top Up 

TV. Once inserted always keep the card in the smart 

card slot as new update to the Top Up TV service will 
be saved onto it.”

Loader Version

You can display  loader  version  by  using this  menu 
option.

Con

guring Language 

Preferences

• You can operate the TV’s language settings using 

this menu.

• Select 

Language

 from Setup menu and press 

OK


to continue. 

Menu

: shows the language of the system.

Preferred

These settings will be used if available. Otherwise current 
settings will be used.
• 

Audio

: Sets the preferred audio language.

• 

Subtitle

: Sets the subtitle language. Selected language 

will be seen in subtitles.
•  

Guide

 : Sets guide language.

Current (*)

(*) These settings can be changed if only the broadcaster 
supports.  Otherwise,  settings  will  not  be  available  to 
be changed.

• Audio

: Changes the  audio language for the current 

channel.

•  Subtitle

:  Sets  the  subtitle  language  for  the  current 

channel.


 Installation & Retune

 • Installation menu will help you to retune your set-top-

box in order to store new services or stations. 

• Select 

Installation

 from Setup menu by using “ ” 

or “ ” buttons and press 

OK

 to continue. 

• Installation menu   includes the following items:  

  Automatic Channel Scan  / Retune

 • Select 

Automatic Channel Scan / Retune

 by using 

“ ” or “ ” button and press 

OK

 button. 

  •  Then  the  following  message  will  be  displayed  on 

the screen: 


 • Highlight 

Yes

 or 

No

 by using “ ” or “ ”  buttons and 

press 

OK

 button to con

rm.

• If 

Yes

 is selected, automatic search starts.

• Selecting 

No

 cancels automatic search.

• After the scanning is completed, your set-top-box will 

store all the available channels. 
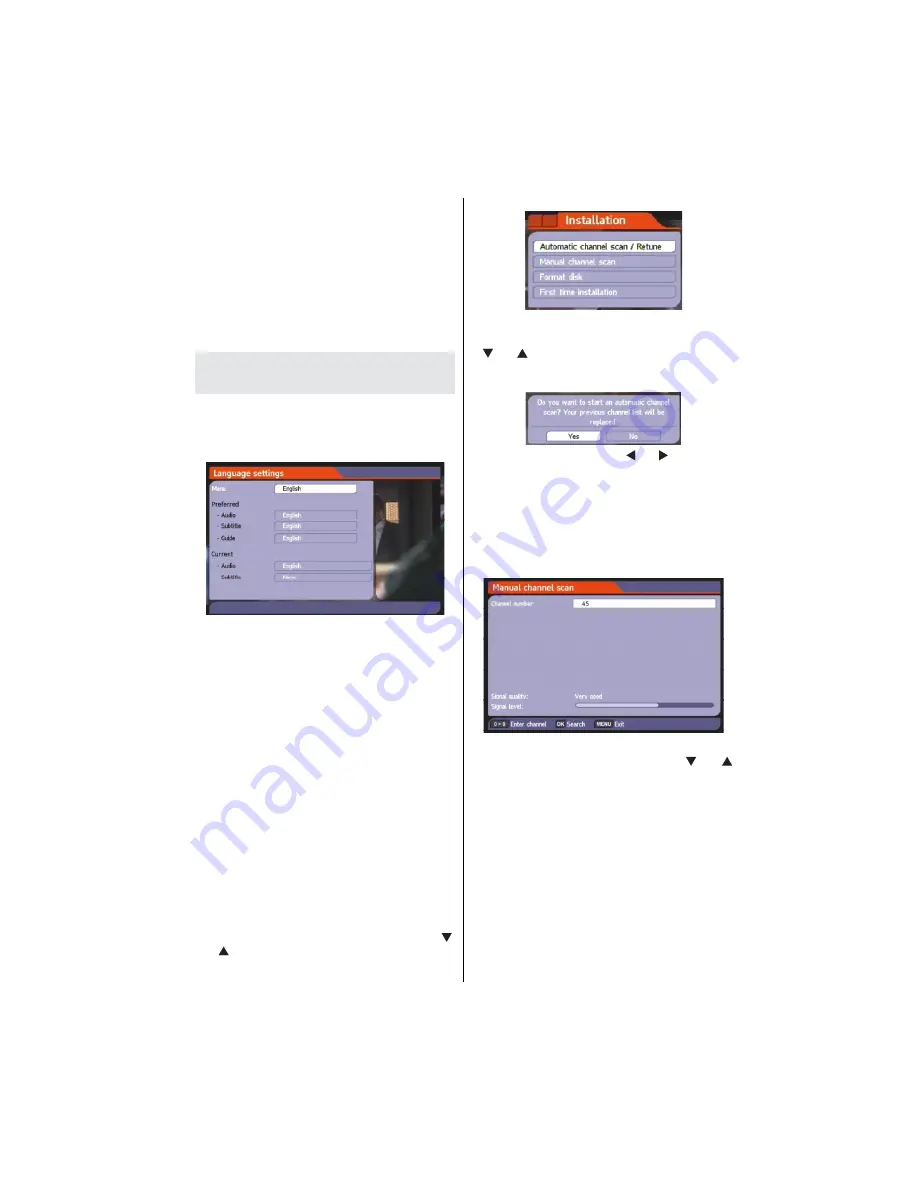


 Manual Channel Scan 

 • This feature can be used for direct broadcast entry.
• Select 

Manual Channel Scan

 by using “ ” or “ ” 

button and press 

OK

 button. 

• In manual channel scan, the number of the multiplex is 

entered manually and only that multiplex is searched for 
the channels. 

• For each valid channel number, signal level and  signal quality 

are shown on the screen.

• In both manual and auto search, any existing channel in 

the database is not re-stored to avoid duplicates of that 
channel. 

Format Disk

If you want to format the internal hard disk, you can 
use 

Format Disk

 option. 

ALL the data stored on the 

hard disk will be lost in such a case

Summary of Contents for LUX-TUTV-500GB

Page 1: ...LUX TUTV 500GB Digital TV Recorder USER MANUAL...

Page 2: ...el List 12 Deleting Channels 12 Deleting Multiple Channels 12 Renaming Channels 12 Adding Locks to Channels 12 Locking Multiple Channels 12 Setting Favourites 12 Event Options 13 Select Channel Exit 1...

Page 3: ...i language audio support up to 10 Audio mute and volume control Record programmes using 8 day EPG DVB T Compliant UHFIV and UHFV 470 862 MHz 8MHz bandwith Supports 16 64 QAM modulations VIDEO OSD Vide...

Page 4: ...to be stepped on A damaged power cord can cause re or give you an electrical shock Check the power cord once in a while When you nd it damaged ask closest service agent for help When the AC power cor...

Page 5: ...English 4 Overview of the Remote Control...

Page 6: ...this connector to output the digital audio to an external device See your audio system instruction book for further information 5 TV SCART If your TV has a scart connector you can connect the box to...

Page 7: ...can still use the local buttons of the receiver You can replace batteries after they are exhausted Please use only the leak proof batteries Note Remove the batteries from the remote control when it is...

Page 8: ...that supplies 220 240V AC 50Hz After unpacking allow the set top box to reach the ambient room temperature before you plug in to the mains for the rst time Antenna Connection This illustration shows...

Page 9: ...activated unit will be initialized in a couple of seconds Active standby mode Although it is not recommended for enviromental reasons you may disable low power mode in your product at setup con gurati...

Page 10: ...the con guration menu to discard the recordings You can choose between three options Deleting 1 Oldest recordings 2 Largest recordings 3 Smallest recordings When the HDD is out of space it will opera...

Page 11: ...up or down to the next available channel Note You can press OK button to display the channel list Adjusting the Volume Mute You can press to mute the sound of your set top box The sound will be muted...

Page 12: ...ess PLAY PAUSE or OK button The paused recording can be watched in different speeds by means of or keys To terminate the timeshifting press STOP button Menu System Viewing the Main Menu Press the MENU...

Page 13: ...use GREEN key Renaming Channels Select the channel that you want to rename and select Edit Name option using button Press OK button to continue Pressing button moves to the previous next character Pr...

Page 14: ...red channel directly via numeric buttons OK Options Displays programme options including Select Channel option Scrolls page left Scrolls page right Text Search Displays Guide Search menu Now Shows the...

Page 15: ...d be broadcasted by the broadcaster Multiple Alternative Timer Record It is possible to record or set recording timers for two individual events at the same time interval If you set more than two reco...

Page 16: ...recordings press the MENU button to display the main menu and use the or button to highlight the Recordings Library line and press the OK button Recordings Library will then be displayed with availabl...

Page 17: ...If not select Skip By selecting Skip the options below will be disabled TEXT After you select the Include option in the Main Title menu you can edit the main title DURATION Set the duration of the ap...

Page 18: ...ngs to change the watershed time period Press MENU button to exit Any recording which is made during the watershed period will have Playback set to Disallowed when it appears in the library You can on...

Page 19: ...rch for new software by selecting Scan for upgrade Menu Locking This setting con gures menu locking Select Menu Locking option by using buttons Press OK button to enter the menu To display parental lo...

Page 20: ...l Installation Retune Installation menu will help you to retune your set top box in order to store new services or stations Select Installation from Setup menu by using or buttons and press OK to cont...

Page 21: ...e displayed Highlight No by using or button to cancel installation Highlight Yes by using or button and press OK button to start rst time installation After you select Yes factory settings will be loa...

Page 22: ...it lls the whole width of the screen but the top and bottom are cropped off With a standard format TV displaying a widescreen programme the WIDE key switches between displaying the picture with black...

Page 23: ...l is not working The set top box is in standby Remote control is out of range Batteries are exhausted Press the STANDBY button Check that the remote control range is clear Replace the batteries with n...

Page 24: ...MPEG2 DEMODULATION COFDM with 2K 8K FFT mode FEC for all DVB Modes Automatically found VIDEO ALL MPEG 2 MP ML Video Decoder Aspect Ratio 4 3 16 9 with pan vector RGB analogue outputs BW 5MHz at 0 5 t...

Page 25: ...D DISK Hard Disk capacity 320 GB FRONT PANEL Display 7 segment led display Remote Control Keys On Off AUDIO Output 2 Vrms 0 dBfs Z 10 kohm DIGITAL AUDIO Output Optical SPDIF A V DATA IN OUT Scart TV s...

Page 26: ...osed of correctly you will help prevent potential negative consequences for the environment and human health which could otherwise be caused by inappropriate waste handling of this product For more de...

Reviews: