


User Manual of Network Video Recorder
124
Password
: The password of sender’s Email for SMTP server authentication.
SMTP Server:
The SMTP Server IP address or host name (e.g., smtp.263xmail.com).
SMTP Port No.:
The SMTP port. The default TCP/IP port used for SMTP is 25.
Enable SSL (optional):
Click the checkbox to enable SSL if required by the SMTP server.
Sender:
The name of sender.
Sender’s Address:
The Email address of sender.
Select Receivers:
Select the receiver. Up to 3 receivers can be configured.
Receiver:
The name of user to be notified.
Receiver’s Address:
The Email address of user to be notified.
Enable Attached Pictures:
Check the checkbox of
Enable Attached Picture
if you want to send email with
attached alarm images. The interval is the time of two adjacent alarm images. You can also set SMTP port
and enable SSL here.
Interval:
The interval refers to the time between two actions of sending attached pictures.
E-mail Test:
Sends a test message to verify that the SMTP server can be reached.
6.
Click
Apply
button to save the Email settings.
7.
You can click
Test
button to test whether your Email settings work.
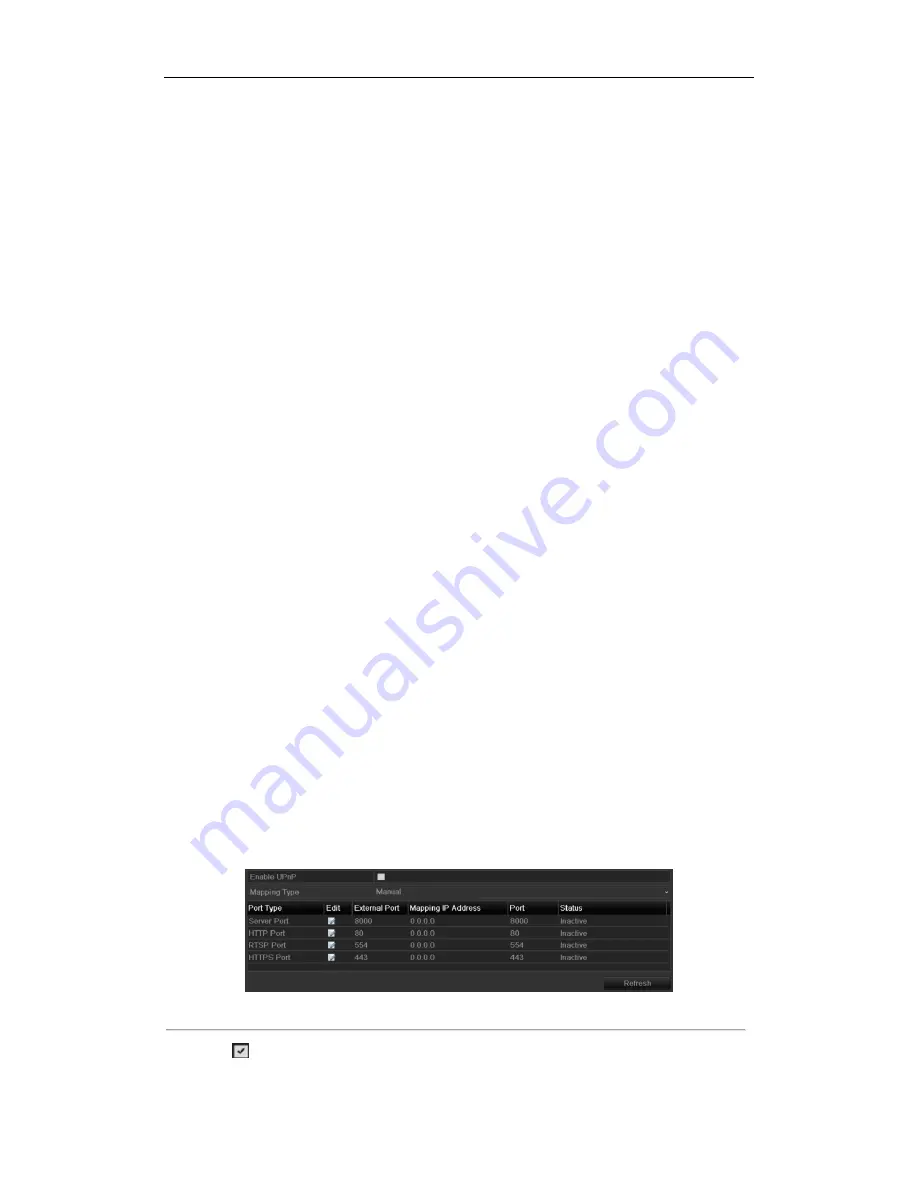
11.2.8
Configuring NAT
Purpose:
Two ways are provided for port mapping to realize the remote access via the cross-segment network, UPnP™ and
manual mapping.
UPnP
TM
Universal Plug and Play (UPnP™) can permit the device seamlessly discover the presence of other network devices
on the network and establish functional network services for data sharing, communications, etc. You can use the
UPnP™ function to enable the fast connection of the device to the WAN via a router without port mapping.
Before you start:
If you want to enable the UPnP™ function of the device, you must enable the UPnP™ function of the router to
which your device is connected. When the network working mode of the device is set as multi-address, the
Default Route of the device should be in the same network segment as that of the LAN IP address of the router.
Steps:
1.
Enter the Network Settings interface.
Menu > Configuration > Network
2.
Select the
NAT
tab to enter the port mapping interface.
Figure 11. 21
UPnP™ Settings Interface
3.
Check
checkbox to enable UPnP™.
4.
Select the Mapping Type as Manual or Auto in the drop-down list.
Summary of Contents for LTN07256
Page 1: ...Network Video Recorder User Manual...
Page 14: ...User Manual of Network Video Recorder 13 Chapter 1 Introduction...
Page 19: ...User Manual of Network Video Recorder 18 Chapter 2 Getting Started...
Page 33: ...User Manual of Network Video Recorder 32 Chapter 3 Live View...
Page 40: ...User Manual of Network Video Recorder 39 Chapter 4 PTZ Controls...
Page 50: ...User Manual of Network Video Recorder 49 Chapter 5 Recording Settings...
Page 70: ...User Manual of Network Video Recorder 69 Chapter 6 Playback...
Page 83: ...User Manual of Network Video Recorder 82 Chapter 7 Backup...
Page 94: ...User Manual of Network Video Recorder 93 Chapter 8 Alarm Settings...
Page 106: ...User Manual of Network Video Recorder 105 Chapter 9 VCA Alarm...
Page 111: ...User Manual of Network Video Recorder 110 Chapter 10 VCA Search...
Page 113: ...User Manual of Network Video Recorder 112 Chapter 11 Network Settings...
Page 130: ...User Manual of Network Video Recorder 129 Chapter 12 RAID...
Page 138: ...User Manual of Network Video Recorder 137 Chapter 13 HDD Management...
Page 150: ...User Manual of Network Video Recorder 149 Chapter 14 Camera Settings...
Page 154: ...User Manual of Network Video Recorder 153 Chapter 15 NVR Management and Maintenance...
Page 161: ...User Manual of Network Video Recorder 160 Chapter 16 Others...
Page 169: ...User Manual of Network Video Recorder 168 Chapter 17 Video Wall Configuration and Operation...
Page 183: ...User Manual of Network Video Recorder 182 Appendix...


