background image

Recording

9

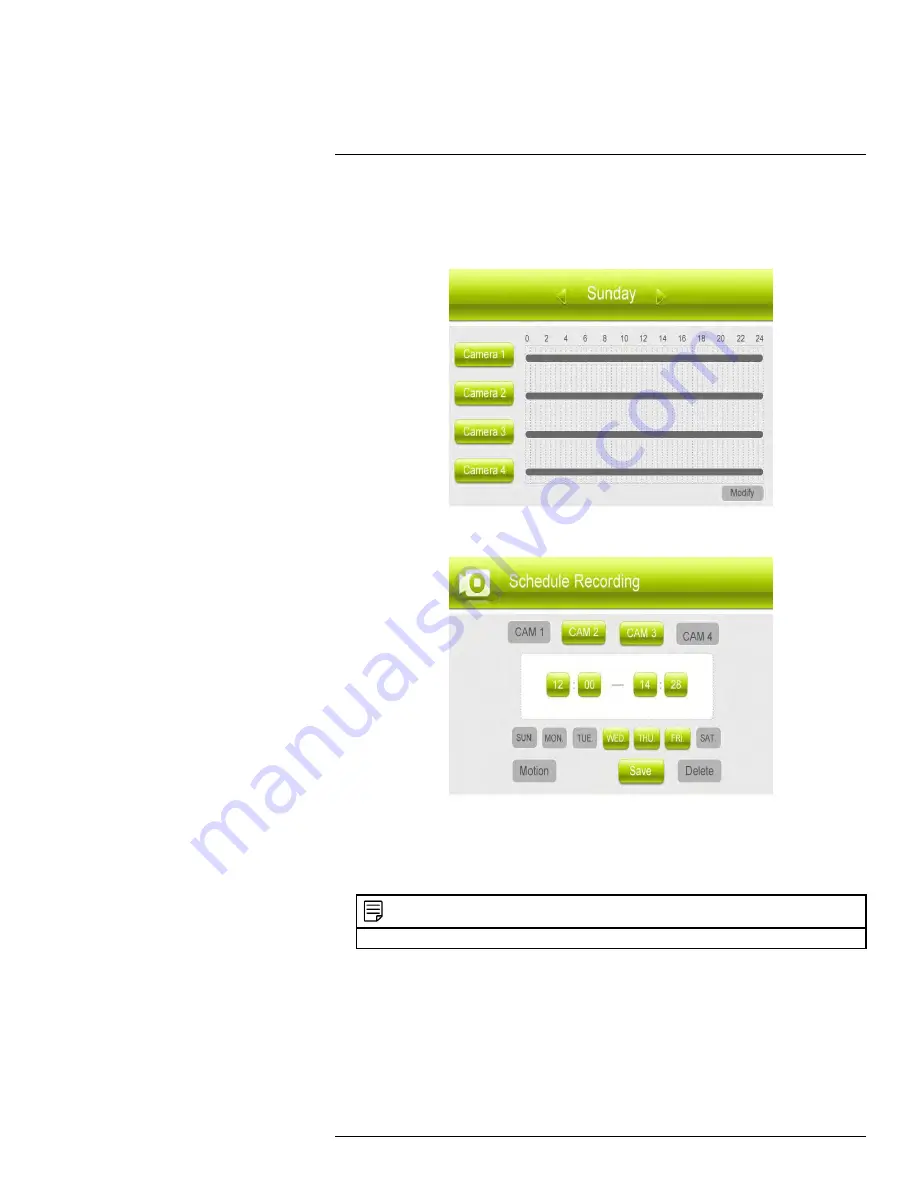
2. Select

Schedule Recording

and push the joystick to confirm.

3. Move the joystick left / right to view existing recording schedules for each day of the

week. Continuous recording schedules appear as green bars, while motion recording
schedules appear as yellow bars.

4. Push the joystick to create a new recording schedule.

5. Select the channels that will use this recording schedule. Move the joystick left / right

to move the cursor and push the joystick to include or dismiss the channel.

6. Select the start time and end time for schedule recording by moving the joystick left /

right to move the cursor, then up / down to change the values.

NOTE

The time uses a 24-hour clock.

7. Select which days to apply the recording schedule to by moving the joystick left /right

to move the cursor, then push the joystick to include or dismiss a day.

8. Move the joystick left / right to select

Save

, then push the joystick to create a continu-

ous recording schedule.

OR

Move the joystick left / right to select

Motion

and push the joystick to enable the re-

cording schedule for motion recording only. Select

Save

when finished to save your

settings.

#LX400077; r.43964/43966; en-US

23

Summary of Contents for LW2760 Series

Page 1: ...USER S GUIDE LW2760 Series...

Page 2: ......

Page 3: ...USER S GUIDE LW2760 Series LX400077 r 43964 43966 en US iii...

Page 4: ...NG TO QUALIFIED SERVICE PERSONNEL The lightning flash with arrowhead symbol within an equilateral triangle is intended to alert the user to the presence of uninsulated dangerous voltage within the pro...

Page 5: ...om Two way Audio 18 7 6 Intercom Volume 18 8 Setting the Time 19 9 Recording 21 9 1 Format Memory 21 9 2 Scheduled Recording 22 9 2 1 Creating a Recording Schedule 22 9 2 2 Stopping Scheduled Recordin...

Page 6: ...deo Quality 48 17 2 7 Sharing Snapshots 49 17 3 Lorex SD Pro for Android Devices 50 17 3 1 Getting Started 50 17 3 2 Live Viewing 51 17 3 3 Event Log 51 17 3 4 Modify Password 54 17 3 5 Viewing Snapsh...

Page 7: ...an internal battery that will keep the product running in the event of a power outage CAUTION Maintain electrical safety Power line operated equipment or accessories connected to this product should b...

Page 8: ...ar the UL listing mark or CSA certification mark 10 Ventilation Slots and openings in the case are provided for ventilation to ensure reli able operation of the product and to protect it from overheat...

Page 9: ...dicates a need for service 3 Replacement Parts When replacement parts are required have the service techni cian verify that the replacements used have the same safety characteristics as the orig inal...

Page 10: ...amera s SD memory card Cat5e Ethernet cable Mounting Hardware kit s Quick Start Guide Configuration may vary by model NOTE Camera configuration memory card size and the number of accessories may vary...

Page 11: ...ermanently installed It is recommended to ensure a clear line of sight between the camera and receiver and to limit the amount of obstructions such as walls and tree branches between the cam era and r...

Page 12: ...wall or ceiling See the images below for recommended configurations of the camera stand and antenna Wall Ceiling NOTE For ceiling installation position the antenna as high as the ceiling allows See t...

Page 13: ...n the power cable through the mounting surface connect power before attaching the camera to the wall If you run the power cable along the mounting surface the cable must go through the cable notch on...

Page 14: ...tlet or surge protector NOTE Power cables are only weatherproof when fully inserted at the connection point Power cables may not be submerged in water 5 Remove the protective film from the front of th...

Page 15: ...cation that will have a clear reception to your camera Try to maintain line of sight and minimize the number of obstructions between the camera and receiver Adjust the antenna on the receiver as neces...

Page 16: ...Installing the Receiver 4 NOTE The receiver is compatible with most major brands of SD cards up to 64 GB For recording times on SD cards see page LX400077 r 43964 43966 en US 10...

Page 17: ...For more details see 15 Pairing Additional Cameras page 41 7 Antenna Removable wireless antenna SMA type NOTE This camera includes an Auto Mechanical IR Cut Filter When the camera changes between day...

Page 18: ...ng mode when the camera s resolution is set to VGA Delete File Delete highlighted files in Playback mode Menu Open Main Menu Return to previous menu exit menus Joystick Move left right up down to move...

Page 19: ...to a 64GB SD card 5 USB Port Used for service purposes only 6 Receiver Stand 7 Ethernet Port RJ45 Connect the receiver to your router using the included Ethernet cable to enable smartphone tablet con...

Page 20: ...ameras before powering on the receiver 7 1 Understanding the On screen Display With camera 1 properly connected and powered on the system displays a full screen live view of the camera With more than...

Page 21: ...hows that an SD card with available recording space is inserted in the receiver A red icon indicates the SD card is full 4 Network status indicator icon The receiver is connected to the Internet The r...

Page 22: ...s to configure settings Press to open the Main Menu Use the joystick to move the cursor left right up and down Push the joystick to open sub menus and confirm save menu selections Press to exit menus...

Page 23: ...ameras are connected to the receiver use Quad mode for a split screen view half Quad mode that only shows the two channels being used Quad Mode Half Quad Mode 7 4 Digital Zoom VGA only The digital zoo...

Page 24: ...the Intercom To use the Intercom 1 Select the desired camera in full screen mode press to change the displayed channel 2 Press and hold on the top panel of the receiver The talk icon appears on the re...

Page 25: ...set the time 1 Press to open the main menu Move the joystick left right to select Settings and push the joystick to confirm 2 Select Date Time and push the joystick to confirm 3 Move the joystick left...

Page 26: ...ect for your area For details see 13 2 Time Zone page 36 NOTE You can also synchronize the system time with an Internet time server Ensure there is a check mark next to Synchronize with an Internet ti...

Page 27: ...hours 32 GB 128 hours 75 hours 64 GB 256 hours 150 hours NOTE The storage capacity of the SD card sizes listed above is estimated and will vary according to the record ing type selected NOTE The syst...

Page 28: ...tically record continuously between a selected start and stop time NOTE Auto Sequence Viewing mode and Quad mode are available during schedule recording without affecting the recording files Prerequis...

Page 29: ...s the channel 6 Select the start time and end time for schedule recording by moving the joystick left right to move the cursor then up down to change the values NOTE The time uses a 24 hour clock 7 Se...

Page 30: ...art time and end time for the modification This could be a span of time you wish to add to or subtract from an existing schedule Move the joystick left right to move the cursor then move the joystick...

Page 31: ...or emergencies NOTE Manual recording will override schedule recording The system checks for active recording schedules every half hour and will eventually resume schedule recording after manual record...

Page 32: ...r and so on and triggers the system to record The system also uses video motion detection which looks for changes in video images frames to detect motion Video motion detection allows for motion detec...

Page 33: ...il all menus are closed The system supports 5 second pre event recording which is added onto the dura tion value specified in the menu For example if you set the duration to 15 seconds your motion rec...

Page 34: ...uad mode the channel using VGA resolution will appear larger than the channel using HD resolution HD recordings are saved in 720p resolution The resolution of the receiver is limited to 800x480 pixels...

Page 35: ...month and the channels to display on the calendar push the joystick the refresh the display Dates that have recordings available for playback are highlighted in green 5 Move the joystick left right to...

Page 36: ...stick The Recording File List opens 2 Move the joystick up down to change the displayed month 3 Move the joystick left right to select the channel numbers and move the joystick up down to show or hide...

Page 37: ...s instruction manual for more details 10 3 1 PC NOTE You can view ASF files natively in Windows Media Player as well as other media players such as VLC VLC is an open source software application avail...

Page 38: ...n the SD card The card will eject 2 Insert the SD card into an SD card reader not included connected to your Mac Your Mac should load the SD card as a new disk on your desktop 3 Double click the disk...

Page 39: ...off again You can configure how much motion is needed to turn the display on in Scan mode by changing a camera s video motion detection settings See 9 4 3 Configuring Video Motion Detection page 27 To...

Page 40: ...e joystick up down to select the camera you wish to configure brightness for 4 Move the joystick to the right to increase the brightness level for the selected camera or left to decrease brightness Ca...

Page 41: ...Time DST Firmware Upgrade Upgrade the system s firmware Network View and configure network settings used for remote connection You can al so reset the remote access password using this menu 13 1 Defa...

Page 42: ...to select 2 Select Time Zone and push the joystick to confirm 3 Move the joystick up down to change the time zone 4 Push the joystick to save your settings The system time will be automatically updat...

Page 43: ...5 Press until all menus are closed To update firmware from SD card 1 Insert the SD card into the SD card reader not included on your PC or Mac 2 Download the latest firmware from www lorextechnology c...

Page 44: ...IP address is not required for remote access to the system You may have to configure your router settings if the DHCP server is enabled 1 Press Move the joystick left right to highlight Settings and p...

Page 45: ...rocess for the Subnet Mask and Default Gateway fields 8 Select OK then push the joystick to confirm 9 A screen appears prompting to reboot the system press Yes The system takes few minutes to restart...

Page 46: ...ult the volume of the buzzer is turned off To increase decrease alert volume 1 Press then select Alert Push the joystick to confirm 2 Move the joystick right to increase the alarm volume or left to de...

Page 47: ...e channel you would like the cameras to be assigned to You can also use the steps below to reassign your existing cameras to dif ferent channels NOTE Accessory cameras model LW2770HAC1 are available f...

Page 48: ...do not press the Pair button on the camera during the 30 second pairing window repeat steps 2 5 to try the pairing process again If the speaker begins squealing move the camera and receiver away from...

Page 49: ...nnel using the pairing function To show hide channels 1 Press then select Camera Push the joystick to confirm 2 Select Camera On Off 3 Move the joystick up down to select the desired camera and left r...

Page 50: ...Internet using your iPhone or iPad 1 Connect the included Ethernet cable from the Ethernet port on the LCD receiver to your wireless router The network icon on the receiver turns green You may need to...

Page 51: ...video from the camera s appears on your smartphone or tablet 17 2 2 Live Viewing 1 Network status 2 Viewing resolution Streaming resolution for the video feed 3 Video quality Speed of video decoding H...

Page 52: ...our smartphone or tablet and not the receiver To open the event log 1 Tap 2 Tap the UID for the system A list of events appears from the last half day If you wish to view an event which took place pri...

Page 53: ...ing to preview it on your device 6 Use the buttons to control video playback Tap to start pause playback Tilt your smartphone or tablet to view in landscape mode or hold upright to view in portrait mo...

Page 54: ...nt to increase the interval length to decrease the fre quency of alerts on your smartphone tablet or even turn smartphone tablet alerts off By default the alert interval is set to 3 minutes 1 Ensure t...

Page 55: ...which requires a high speed connection Reduce quality if video is choppy 17 2 7 Sharing Snapshots Share snapshots with friends and family via e mail 1 Tap 2 Tap the name of the system you wish to sha...

Page 56: ...roid device for details 3 Download the free Lorex SD Pro app from the Google Play Store 4 Tap the Lorex SD Pro icon 5 Tap Click here to add device NOTE You can add up to four devices 6 Tap Scan to sca...

Page 57: ...rent video display See 17 3 5 Viewing Snapshots page 54 9 Mute Tap to mute or unmute sound from the current camera 10 Intercom Tap to enable two way audio with the currently selected camera Tap again...

Page 58: ...feature detailed below 2 Tap an event to preview the video recording 3 Use the buttons to control video playback Tap to start pause playback Tilt your smartphone or tablet to view in landscape mode o...

Page 59: ...to begin the search A list of recordings that meet the specifications of your search appears 5 Tap any recording to preview it on your device 6 Use the buttons to control video playback Tap to start...

Page 60: ...n Old Enter the current password for the system New Enter a new password Confirm Reenter the new password 5 Tap OK Tap OK repeatedly to save your changes and go back to the device list To revert to th...

Page 61: ...hone tablet has push notifications enabled See the instruc tion manual provided with your mobile device for details 2 Tap next to the system name 3 Tap Edit Device 4 Tap Advanced 5 Tap the drop down m...

Page 62: ...r Low High video quality results in greater bandwidth consump tion which requires a high speed connection Reduce quality if video is choppy 6 Tap OK repeatedly to save your changes and go back to the...

Page 63: ...AES Speed 1 30 1 25 1 1000s Night Vision Range 65ft 20m 45ft 14m PIR Range 16ft 5m Lens Lens Type 3 6mm F2 0 View Angle Horizontal 58 Power Consumption Max 500mA IR on Power Supply 9V DC 600mA 10 Ope...

Page 64: ...cts are subject to continuous improvement Lorex Corporation and its subsid iaries reserve the right to modify product design specifications and prices without notice and without incurring any obligati...

Page 65: ...ne of Sight The digital wireless signal is virtually interference free However you should always ensure there is a clear line of sight between the camera and the receiver 19 2 Obstacles There should b...

Page 66: ...ndow to see outside be cause the night vision LED s produce Infrared light that reflects off the glass If you need to look outside install the camera outdoors Please note that the camera must be insta...

Page 67: ...ough The signal range also depends on whether there are competing signals using the same frequency as the camera For example signals from cordless phones or routers may affect signal strength Adaptive...

Page 68: ...nce using an algorithm generated by the receiver which only the camera can follow through the pairing function Pairing is an electronic handshake between digital wireless devices Digital wireless cam...

Page 69: ...ent does cause harmful interference to radio or television reception which can be determined by turning the equipment on and off the user is encouraged to try to cor rect the interference by one or mo...

Page 70: ...d Electronic Equipment RoHS Directive 2002 95 EC The RoHS directive prohibits the sale of electronic equipment containing certain hazardous substances such as lead cadmium mercury and hexavalent chrom...

Page 71: ......

Page 72: ...istered trademarks or trademarks of Lorex Corporation and or its subsidiaries All other trademarks trade names or company names referenced herein are used for identification only and are the property...

Reviews: