background image

1

Getting started

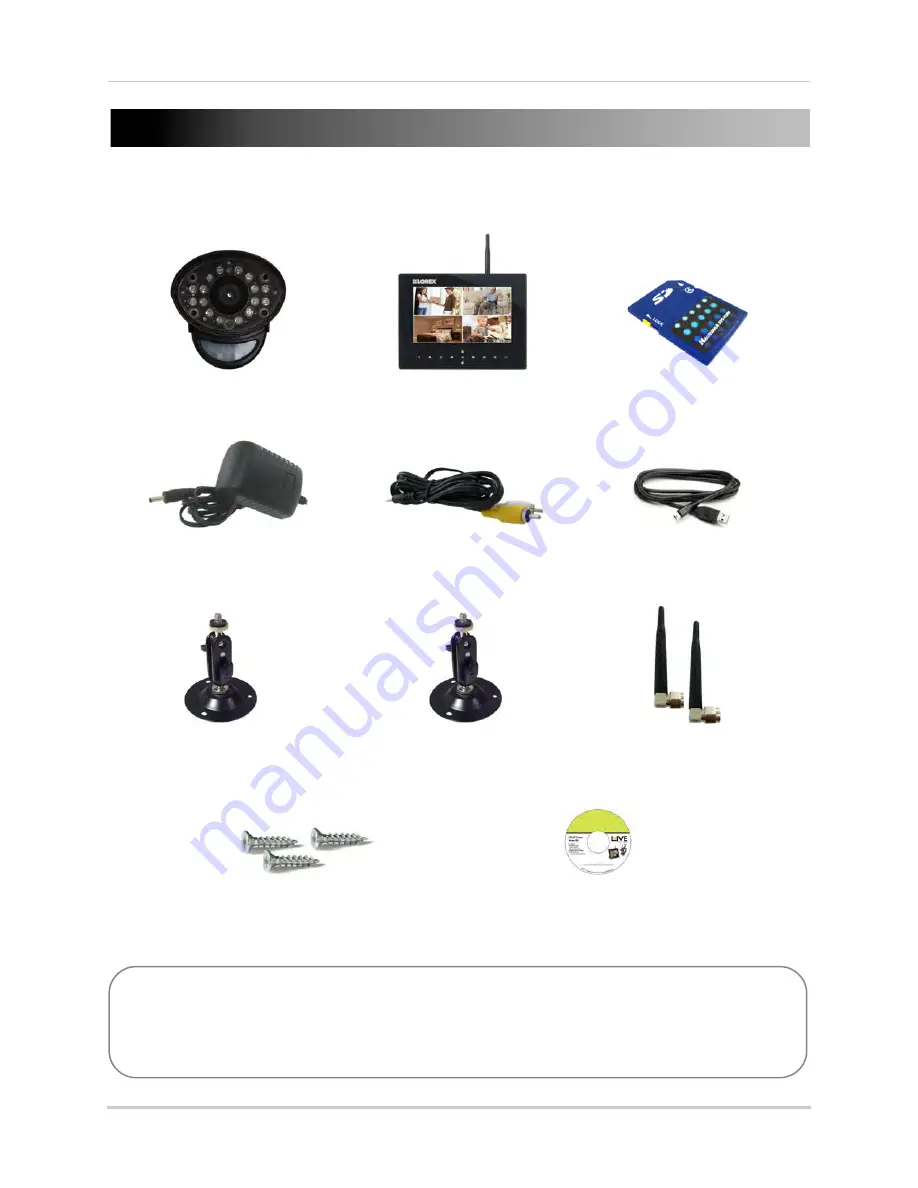
The system includes the following components:

Two way audio outdoor 
camera*

LCD monitor / wireless 
receiver*

SD memory card**

Power adapters for receiver 
and camera*

AV cable

Camera mounting stand*

Under the counter 
mounting kit

Wireless antennas (for 
receiver and camera)*

Mounting kit(s)*

*Configuration may vary by model.

USB cable

Software CD

**Optional SD card. Consult your package for content details.

CAMERA CONFIGURATION, MONITOR SIZE, AND NUMBER OF ACCESSORIES MAY VARY BY 
MODEL. PLEASE REFER TO YOUR PACKAGE FOR SPECIFIC DETAILS. 
CHECK YOUR PACKAGE TO CONFIRM THAT YOU HAVE RECEIVED THE COMPLETE SYSTEM.

Summary of Contents for LW2730 Series

Page 1: ...www lorextechnology com LW2730 LW2930 SERIES WIRELESS HOME MONITORING SYSTEM USER S GUIDE ENGLISH VERSION 1 0...

Page 2: ...INSIDE REFER SERVICING TO QUALIFIED SERVICE PERSONNEL The lightning flash with arrowhead symbol within an equilateral triangle is intended to alert the user to the presence of uninsulated dangerous v...

Page 3: ...vice for warranty matters 1 888 425 6739 1 888 42 LOREX Tech Support for technical installation issues 1 877 755 6739 1 877 75 LOREX Mexico 001 800 681 9263 001 800 514 6739 International 800 425 6739...

Page 4: ...rend les renseignements sur les produits guides d utilisation guides de d part rapide et FAQ www lorextechnology com support En ligne Hay 2 maneras f ciles de comunicarse con nosotros Norte Am rica At...

Page 5: ...logy com support If you require further installation assistance please visit www lorextechnology com installation or contact a professional installer Please note that once the components of this produ...

Page 6: ...de ce produit vous ne pouvez pas retourner celui ci directement au magasin sans son emballage original Favor de leer la gu a de instalaci n r pida y la gu a del usuario antes de instalar este product...

Page 7: ...design of every instrument However safety is your responsibility too This sheet lists important information that will help to ensure your enjoyment and proper use of the product and accessory equipme...

Page 8: ...pment yourself as opening or removing covers may expose you to dangerous voltage or other hazards Refer all servicing to qualified service personnel 2 Conditions Requiring Service Unplug this product...

Page 9: ...radiator and nearby persons Industry Canada Notice This device complies with Industry Canada licence exempt RSS standard s Operation is subject to the following two conditions 1 This device may not ca...

Page 10: ...aries depending on model 2 Cameras require a local power outlet 3 Local viewing up to 4 cameras simultaneously Local recording and playback of one camera at a time or all 4 cameras simultaneously on o...

Page 11: ...m 12 Using the Intercom two way audio 12 Two way audio volume 13 Using AV output 13 Setting the time 14 Recording 15 Recording prerequisites 15 Minimum recording times on SD cards 15 Recording mode su...

Page 12: ...ng Skype 42 Step 5 of 6 Send a contact request 43 Step 6 of 6 Test the connection 44 Connecting to Skype on a Mac 45 Step 1 of 6 Installing the camera driver for Mac OS 45 Step 2 of 6 Connecting the v...

Page 13: ...stand Under the counter mounting kit Wireless antennas for receiver and camera Mounting kit s Configuration may vary by model USB cable Software CD OptionalSDcard Consultyourpackageforcontentdetails...

Page 14: ...camera pointing out of a window The nighttime picture will be unusable due to reflection from the night vision LED s The cameras are pre paired so they work out of the box Each camera has a channel nu...

Page 15: ...ra stand Tighten thumb screws 4 Connect the black power cable extending from the camera to the cable of the power adapter and plug in the power adapter to an outlet or surge protector Make sure the po...

Page 16: ...lace the receiver in a location that will have a clear reception to your camera Try to maintain line of sight and minimize the number of obstructions between the camera and receiver Adjust the antenna...

Page 17: ...For more details see Pairing adding cameras on page 33 7 Antenna Wireless antenna 8 Power Cable Connect the included power adapter to the cable extending from the camera This camera includes an Auto...

Page 18: ...crease volume on receiver Scroll left right in menus Channel Select Change channel Scroll up down in menus OK In menus confirm selection While viewing open Play back mode to view recorded video or upl...

Page 19: ...Connect the Audio Video cable to view video on an external TV or monitor optional 7 Receiver Stand 8 Power Input DC5V Connect the included power adapter 9 Microphone Microphone for two way audio 10 A...

Page 20: ...LL MOTION LED indicators NEW SCAN The blue lights indicate the following NEW A new video file has been recorded to the SD card FULL The SD card is full NOTE The Full light will only appear if Overwrit...

Page 21: ...receiver Understanding the on screen display With camera 1 properly connected and powered on the system displays a single channel full screen live view of the camera 1 2 3 4 5 6 7 9 8 1 File Name The...

Page 22: ...s the SD card is full 6 Overwrite icon Indicates Overwrite mode is on which means the system will overwrite the oldest recordings when the SD card is full For details see Enabling disabling overwrite...

Page 23: ...s enabled when you first power on the system and when you exit Screen Saver mode Auto Sequence Viewing mode Auto Sequence Viewing Mode switches between connected channels in full screen Auto Sequence...

Page 24: ...parts of the image Zoom is activated Press UP DOWN LEFT RIGHT to look at different parts of the image 3 Press the ZOOM button again to exit digital zoom Using the Intercom two way audio Use the Interc...

Page 25: ...included AV cable to connect the system to a TV for viewing on a larger screen To enable AV output 1 Connect the single end of the AV cable to the AV Out port on the rear panel of the wireless receive...

Page 26: ...s to open the main menu Press left and right to select Settings and press the OK button 2 Select Date Time and press the OK button 3 Press RIGHT LEFT to move the cursor press UP DOWN to change the yea...

Page 27: ...errides other actions on the receiver You must stop recording on the system in order to perform other actions such as opening the Main Menu Quad mode etc Minimum recording times on SD cards The system...

Page 28: ...ch day from Recording Schedule Record MOTION RECORDING AUTO System only records when motion is detected by a camera Compatible with Quad mode recommended Compatible with Auto Sequence Viewing mode Pre...

Page 29: ...le recording to have the system automatically record continuously from one camera from Auto Sequence Viewing mode system records cameras in sequence or from the entire screen in Quad or Screen Saver m...

Page 30: ...uence Viewing mode and Quad mode Press to enable Screen Saver mode not available from Quad mode 3 When the Start Time arrives recording begins The REC indicator appears on screen Stopping Schedule Rec...

Page 31: ...may trigger recording from changes in light or moving trees leaves etc You can set the sensitivity of video motion detection depending on your preferences see Configuring video motion detection on pag...

Page 32: ...condsafter thetriggered motionevent For details on adjusting the motion recording time see Configuring motion recording duration on page 20 below 3 Press again to stop motion recording MOTION will tur...

Page 33: ...cord and press OK 3 Select Mode and press OK 4 Select 4 Channel recording or Single Channel recording and press OK 5 Press until all menus are closed Quad mode must be selected to use 4 Channel record...

Page 34: ...ect HIGH 640x480 VGA resolution or LOW 360x240 QVGA resolution quality and press OK to save your settings 4 Press until all menus are closed Enabling disabling overwrite Use the overwrite feature to h...

Page 35: ...ack saved files The system cannot record during Playback ATTENTION Video playback To playback recorded video on the system 1 Stop all recording on the system 2 During live viewing press OK The File me...

Page 36: ...T to skip to the next video in the list DOWN Stop video You can then press RIGHT LEFT to select a different video file To exit playback Press to return to the file list Press repeatedly to return to l...

Page 37: ...file and press OK to open it Press LEFT RIGHT to scroll through saved images Press to return to the file list Press repeatedly to return to live view NOTE If you do not press any buttons the system wi...

Page 38: ...ory on page 35 ATTENTION Viewing video directly from the SD card You can view the saved video files on your computer PC or Mac by using an SD card reader not included Saved video files are in AVI form...

Page 39: ...e freeware application available at www videolan org ATTENTION To playback recorded video on a Mac 1 Remove the SD card from the wireless receiver by gently pushing on the SD card The SD card will pop...

Page 40: ...You can connect the wireless receiver to a PC to upload personal images to the SD card for digital picture frame mode The built in PhotoRun application automatically converts and resizes your images...

Page 41: ...ppears Click Open folder to view files Open folder to view files 3 Double click the PHOTORUN file The PhotoRun application opens PHOTORUN 4 Click then select the folder where the images you would like...

Page 42: ...ximum 256 images 6 Saved images appear in the lower portion of the screen If you want to delete images from the SD card click to delete the selected image or click to delete all the images in the sele...

Page 43: ...ress UP DOWN to select Blank Screen or Photo Frame If you press Blank Screen when Screen Saver mode is activated the screen will turn blank until motion is detected Press to return to live viewing Ify...

Page 44: ...LCD receiver displays the triggered camera in single channel full screen and the motion alarm beeps if Alarm Volume is turned up but the system does not record When the motion trigger is finished the...

Page 45: ...ssign your existing cameras to different channels NOTE Accessory cameras model LW2731AC1 are available from www lorextechnology com To pair an additional camera 1 Connect the new camera to a power out...

Page 46: ...e the volume of the buzzer when motion is detected by the camera s The Alarm Volume also controls the volume of the beep when you press buttons on the wireless receiver If you want to turn off the buz...

Page 47: ...press OK 3 Select ON and then press OK to save changes 4 Press until all menus are closed Format Memory Use the Format Memory menu to format the SD card It is highly recommended to format the SD card...

Page 48: ...E Restore factory settings DOES NOTdeletevideofilesontheSD card nor does it reset the date and time on the system To restore default settings 1 Press then press RIGHT LEFT to select Settings and press...

Page 49: ...K button to save changes 4 Press the button to exit NOTE Any disabled channels will be blacked out in Quad mode Brightness Use the Brightness menu to adjust the brightness level of video coming from y...

Page 50: ...se the video function on Skype Traffic congestion may result in choppy video Mobile Data Charges When using a mobile cellular network data charges may apply Check with your provider for details Comput...

Page 51: ...ll the camera drivers 1 Insert the software CD into your computer An Autoplay window opens 2 Click Run Lorex exe Run Lorex exe 3 Click the USB Driver button and then click USB Driver for PC The driver...

Page 52: ...ount A Skype account allows you to connect to your camera through the Skype service Skype is a service that allows users to make voice calls and video calls to anywhere in the world In order to connec...

Page 53: ...the computer via the USB cable Live video Continue Select Wireless Monitoring System if necessary NOTE If you can see an image from a webcam that is already connected select Wireless Monitoring System...

Page 54: ...ype Step 4 of 6 Configuring Skype 7 Click on Tools Options Options 8 Click the Calls button 9 Click the Show advanced options button Show advanced options 10 Under Allow calls from select people in my...

Page 55: ...a call Save Click Save Step 5 of 6 Send a contact request Next you have to send a friend request to your personal account e g Tom Smith 1 Click the Add a contact button Add a contact 2 Search for the...

Page 56: ...ep requires you to log in to Skype from a different computer or compatible mobile device 1 Log in to your personal account e g Tom Smith 2 A new contact pop up appears Click the new contact request ic...

Page 57: ...ftware CD into your computer The Lorex CD icon appears on your desktop 2 Double click the Lorex CD icon on your desktop 3 Double click the Mac folder 4 Double click the SD Series Mac Driver zip file t...

Page 58: ...ur video monitor using Skype you will need two accounts one for the camera e g Lorex Camera and one for yourself e g Tom Smith NOTE The Skype illustrations and instructions below serve as a guideline...

Page 59: ...ra if your device is connected If the video area is black check to see if your camera is on and is paired to Channel 1 Also check to make sure your video monitor is connected to your computer NOTE Whe...

Page 60: ...he contact list for its account Allow calls from Contacts Privacy tab NOTE You may also select Anyone which will allow anyone with a Skype account to call the device and access your camera This settin...

Page 61: ...rom a different computer or compatible mobile device 1 Log in to your personal account e g Tom Smith 2 The contact request from your device s Skype account should appear in the left column under Recen...

Page 62: ...om and click on Join Skype Join Skype 2 Click Create an Account Fill in the appropriate fields Create Account 3 Click the I Agree Continue button I Agree Continue 4 Follow the on screen instructions t...

Page 63: ...era remotely using Skype however you can change the camera that is shown on Skype manually using the video monitor Pair the camera that is most important for you to view remotely to Channel 1 When you...

Page 64: ...o your computer with the USB cable Ensure you have configured your camera s Skype account to auto accept incoming calls Ensure your personal Skype account has been added to the contact list for the vi...

Page 65: ...r the call to connect Voice Call button NOTE Video may appear pixelated immediately after connecting It should improve within a few seconds depending on your Internet connection Viewing your camera on...

Page 66: ...Resolution 640 x 480pxl NTSC Minimum Illumination 0Lux IR on Night Vision Distance 40ft 12m PIR Range 21ft 6 5m View Angle Diagonal 52 Power Consumption Max Max 460mA Power Supply 9V DC Dimensions W 7...

Page 67: ...lear line of sight between the camera and the receiver Clear line of sight Clear line of sight Cable accessory antenna Obstacles There should be little to no obstacles obstructing the line of sight be...

Page 68: ...quired A 20ft extension cable is included help with proper position of the antenna 2 4 GHZ Omni Directional Wireless Antenna Use the 2 4GHz Omni Directional Wireless Antenna model ACCANTO8 to extend t...

Page 69: ...ed you will need to re apply the previous display view and recording mode A Power Failureicon appearson screen ThePowerFailure iconindicatesthatapower failure occurred while the system was actively re...

Page 70: ...installing in a location which requires the wireless signal to pass through cement concrete andmetalstructures This will reduce the rangeoftransmission 2 Drill the holes and then mount the stand to th...

Page 71: ...ash where a strong light source is pointed at the camera lens The camera lens IS NOT harmed during a whitewash DO NOT point your camera towards a light source This occurs when a camera is pointed at a...

Page 72: ...er pkg file Follow the on screen instructions to install Q How do I setup remote viewing using Skype A Follow the instructions under Viewing your camera remotely using Skype on page 38 If you have fol...

Page 73: ...Skype on PC 1 Click Tools Options 2 Click the Video Settings button 3 Under Select Webcam select Wireless Monitoring System to make the video monitor the primary camera Video Settings Select Wireless...

Page 74: ...a number changes from cam 1 to cam 2 Q Can I extend the wireless range of the receiver A Yes There are optional antennas available at www lorextechnology com that help boost wireless signals Q What is...

Page 75: ......

Page 76: ...Copyright 2012 Lorex Technology Inc LW2730 LW2930 Series www lorextechnology com Version 1 0...

Reviews: