8
Bioscience Solutions
– Lucetta™ 2 Luminometer Manual
3.2 Setup Instructions
– Carefully unpack the instrument and place it on the bench in a
dry, dust-free environment, protected from direct sunlight and
significant temperature fluctuations.
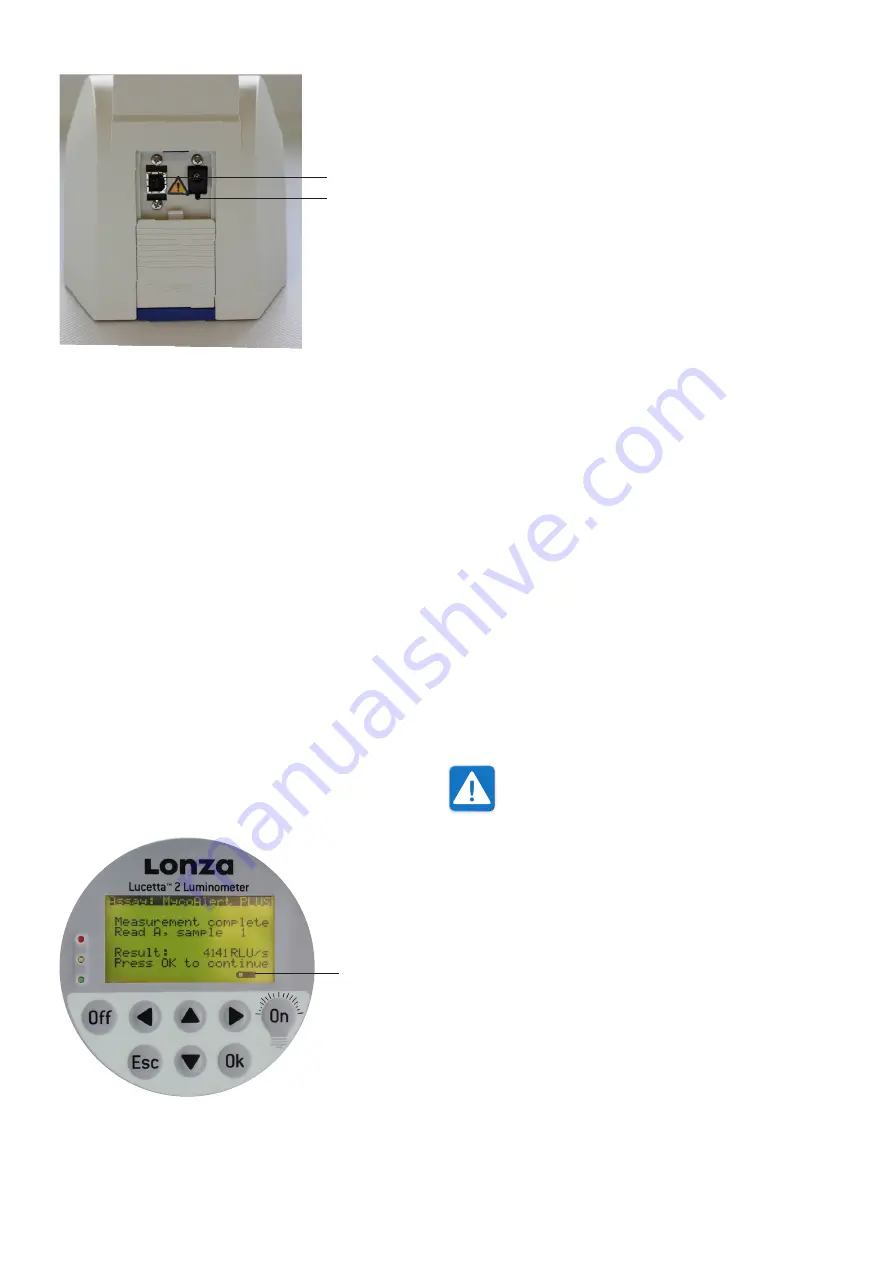
– To connect the instrument to an electrical outlet, slide the
protective panel on the rear of the instrument to the open position
to access the power socket. Plug in the power supply delivered
with the instrument and connect to a suitable outlet. Refer to the
power and safety information in sections 9.2 (Technical Data)
and 2.3 (Safety Instructions and Use Precautions).
– Turn the instrument on by pressing the ON button. The display will
illuminate when ON button is pressed a second time.
– Check the status of the rechargeable battery via the charging
indicator on the lower right corner of the display (Figure 3). If the
battery is low, please fully recharge it before using the instrument
or attach the instrument to an electrical outlet.
1
Charging indicator
3.3 Optimal Operation Temperature
It is strongly recommended to operate luminescence measurements at
room temperature (20°C) to achieve the performance characteristics
listed in the technical data. The general operating range is 15–30°C
and below 70% humidity.
3.4 Battery Operation
The Lucetta™ 2 Luminometer is equipped with a rechargeable battery.
– The battery status can be checked via the charging indicator on
the lower right corner of the display.
– A full battery charge requires 4 to 5 hours. Prior to the first use, or
after a long period of unuse charge the battery for at least 5 hours.
– Ensure the instrument is switched on during the charge time.
– The battery lifespan depends on the power-on time of the
instrument, the use of display light and the age of the battery. The
battery may auto-discharge when the instrument is not used for
an extended period.
– To optimize the battery lifespan, the display light switches off
after 15 sec if the instrument is not in use.
– A warning message is displayed 10 minutes before the battery
becomes fully discharged. This is indicated by the message
“Battery low”. Connect the instrument to the charger and charge
the battery for at least 5 hours. If the battery is not charged,
a second warning message “Battery empty” is displayed. The
instrument shuts down automatically after another 10 minutes to
avoid deep discharge and needs to be connected to the charger if
switched on again.
3.5 Electrical Outlet Operation
When performing measurements while connected to an
outlet, the battery should be fully charged. If possible, avoid
charging of the battery during measurement, as charging
elevates the instrument internal temperature . During very
sensitive measurements or weak luminescence signals,
this slight temperature increase may lead to a high dark
count signal and influence measurement results.
3.6 Consumables
75 mm length and up to 12 mm diameter, 5 ml polystyrene tubes
are recommended (e.g. Sarstedt (Cat. No. 55.476) or BD Falcon
Round-Bottom Tubes (Cat. No. 352054)). Alternatively, 1.5 or 2 ml
microcentrifuge tubes may be used.
3.7 Quality Control
It is considered good laboratory practice to evaluate samples
according to instructions and specific recommendations included
in the package insert of the reagent kit or the standard laboratory
protocol. Performance failures of Quality Control checks could result in
erroneous test data. Samples should be obtained, treated and stored
following the instructions and recommendations of the kit insert.
Known internal quality standards or samples should be run.
Figure 2. Back view of the Lucetta™ 2 Luminometer
1
Power cord receptacle
2
USB port Type B
Figure 3. Display view with charging indicator
1
1
2
Summary of Contents for Lucetta 2
Page 1: ...Bioscience Solutions Lucetta 2 Luminometer Manual...
Page 2: ......


