12
CHARGE THE BATTERY
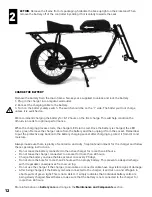
Remove the battery from the main frame. Two keys are supplied to unlock and lock the battery.
1. Plug in the charger into a regular wall outlet.
2. Connect the charging cable to the battery.
3. Turn on the battery safety switch. The switch should be on the “I” side. The battery will not charge
unless it is switched on.
We recommend charging the battery for 8-12 hours on the first charge. This will help condition the
lithium-ion cells for optimal performance.
When the charging process starts, the charger LEDs turns red. Once the battery is charged, the LED
turns green. Remove the charger cable from the battery and then unplug it from the socket. Remember
to put the protective cap back onto the battery charging socket after charging to protect it from dirt and
moisture.
Always make sure there is plenty of ventilation and a dry, fireproof environment for the charger and follow
these operating instructions:
•
Do not leave the battery connected to the active charger for more than 48 hours.
•
Do not leave the charger connected to a socket for more than 48 hours.
•
Charge the battery and use the bike at least once every 90 days
•
Do not store the bike for more than 24 hours with an empty battery. This prevents a deep discharge
with irreparable consequences from occurring.
•
Do not use the charger if the charger, main cable or connector cable have any visible signs of damage.
•
After being charged, if the battery remains connected to the charger, it will turn on and off again in
short spurts of green light. This is not a defect. It simply indicates that individual battery cells are
being slowly charged. Nevertheless, make sure that the battery is not connected to the charger for
more than 48 hours.
More information on
battery care
and range in the
Maintenance and Components
section.
2
ACTION
: Remove the frame from its packaging. Stabilize the bike upright on the kickstand. Then,
remove the battery off of the controller by sliding it horizontally towards the seat.
!


