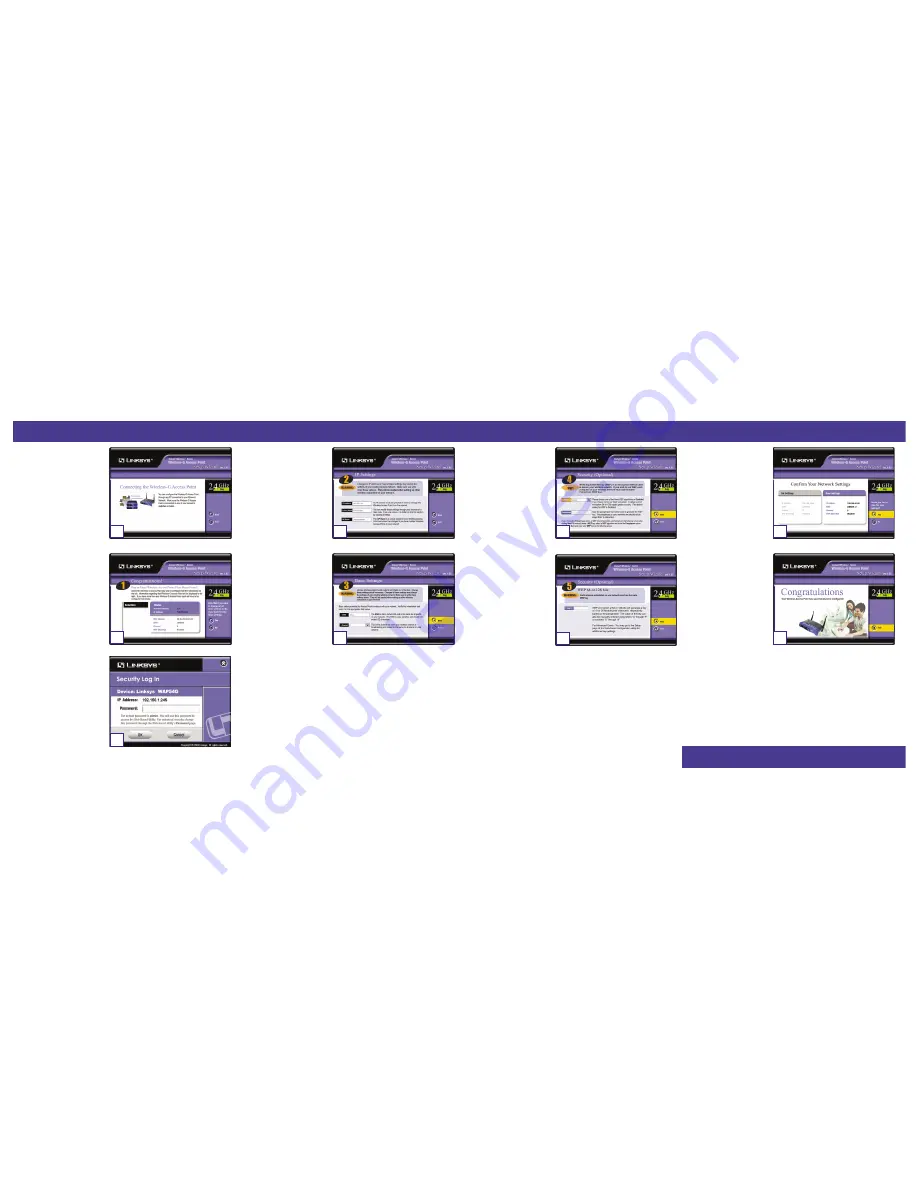
C. You can configure the Access
Point through any PC con-
nected to your Ethernet net-
work. Make sure the Access
Point is connected to one of
your network switches or
hubs. Click the Next button.
D. The next screen will display a
list of access points on your
network, along with the status
information for each access
point. If there is only one
access point on your network,
it will be the only one dis-
played. If there are more than
one displayed, select the
Access Point by clicking on it,
and then click the Yes button.
E. On the Enter Network
Password screen, enter the
default password, admin, in
the Password field. Then
click the OK button. For
added security, remember to
change this password later
through the Web-based
Utility’s Password screen.
W W W . L I N K S Y S . C O M
F. The IP Settings screen will
appear. Enter an IP Address
and Subnet Mask appropriate
to your network. Then enter a
unique name in the AP Name
field. Click the Next button.
G. The Basic Settings screen
will appear. Enter your wire-
less network’s SSID, and
select the channel at which
the network broadcasts its
wireless signal. Then click
the Next button.
H. The Security screen will
appear. Set the Wired
Equivalent Privacy (WEP)
encryption for your wireless
network. Select a WEP con-
figuration method and a
passphrase. Then click the
Next button.
I. The second Security screen
shows the WEP key. If you
entered a passphrase, then the
Key 1 field will display the
automatically generated
WEP key. If you did not enter
a passphrase, then enter a
WEP key in the Key 1 field.
Each point in your wireless
network must use the same
WEP key for the network to
function properly. Click the
Next button.
J. The next screen will allow
you to review your settings.
If these settings are correct,
click the Yes button to save
these settings. If there are
any problems with the set-
tings, click the No button to
exit the Setup Wizard.
K. At this point, the configura-
tion performed with the
Setup Wizard is complete.
To configure any other
access points in your net-
work, you can run this
Setup Wizard again. Click
the Exit button to exit the
Setup Wizard.
Congratulations! The installation of the Wireless-G Access Point is
complete.
For additional details, advanced configuration, or any other questions,
refer to the User Guide on the Setup Wizard CD-ROM.
QI_WAP54G-121602NC BW
C
D
F
E
G
H
I
J
K