background image

AP20 Installation Guide

1     Contents of the box and important features:

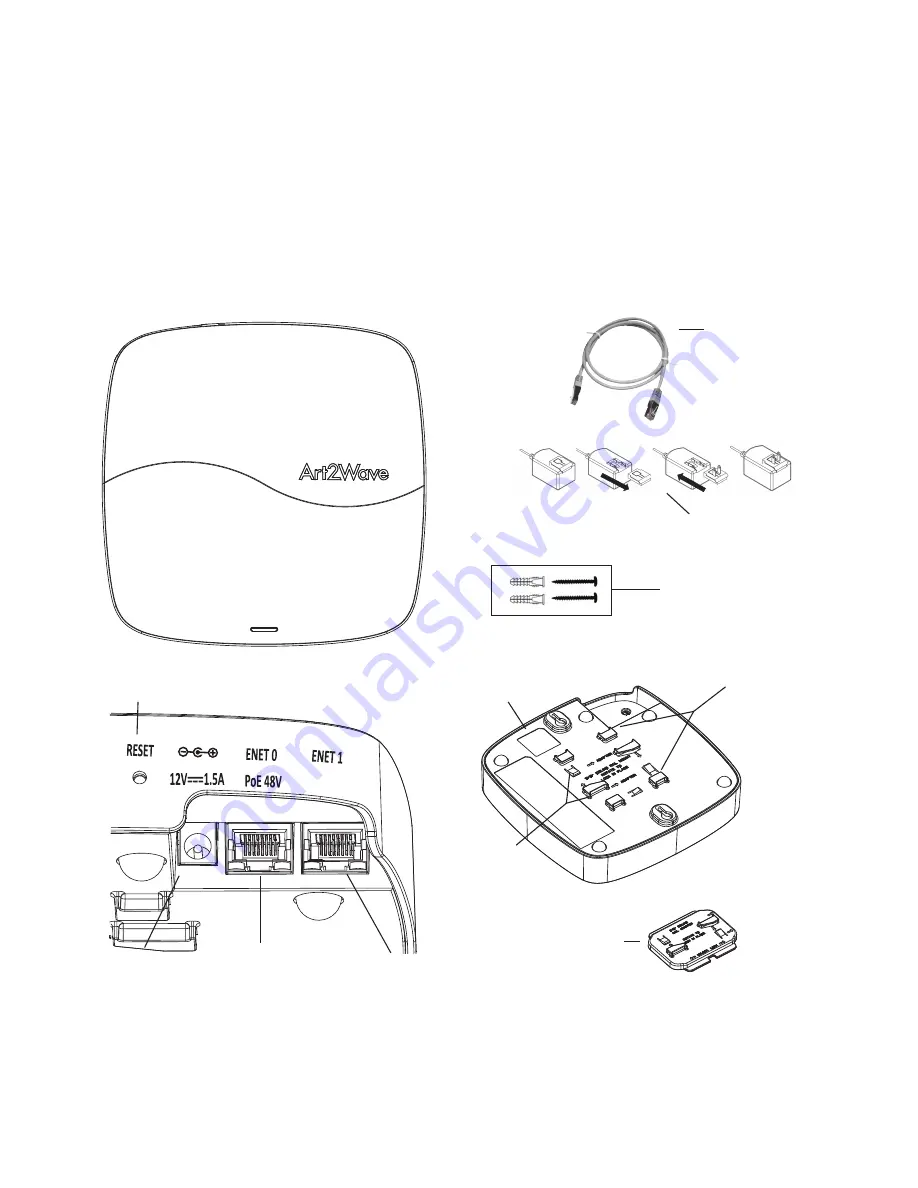
Factory Reset Switch

Power Port

ENET 0 (Uplink Ethernet

Port,  Power-over-Ethernet

enabled)

ENET 1 (Reserved

      do not use)

9/16” Ceiling Rail Adapter

15/16” Ceiling Rail

          Mount

Identity QR Code

Slots for 9/16” Ceiling

       Rail Adapter

Ethernet Cable

 Power Adapter,

cover and prong

Wall Mount Installation

Kit:

    2 Phillips Screws

    2 Sinkers

Summary of Contents for ap20

Page 1: ...er Port ENET 0 Uplink Ethernet Port Power over Ethernet enabled ENET 1 Reserved do not use 9 16 Ceiling Rail Adapter 15 16 Ceiling Rail Mount Identity QR Code Slots for 9 16 Ceiling Rail Adapter Ethernet Cable Power Adapter cover and prong Wall Mount Installation Kit 2 Phillips Screws 2 Sinkers ...

Page 2: ...ile device or using the Art2Wave website By installing the Art2Wave mobile device app you can scan the QR code on the back of the access point and link it to your account Information about the app is available at http art2wave com The mobile device app includes instructions for completing the process To link the access point to your account using the Website sign into your account at http art2wave...

Page 3: ...e following Mount the access point as high as possible above any obstructions Do not mount the access point next to building support columns or any other physical obstructions that may cause dead zones Do not mount the access point near any material that may absorb or reflect Wi Fi signals This unit must be installed indoors The unit AC power adapter and its cables are not designed for outdoor use...

Page 4: ...iling rail Printed instructions on the back of the unit explain which clips to use 5 2 Ceiling mounting to a 15 16 rail Slide the Access point diagonally over the rail and rotate until the unit clicks into place Press thess clips in and turn to dismount the Access Point ...

Page 5: ...6 ceiling rail Printed instructions on the back of the unit explain which clips to use 1 Slide the adapter into the clips on the back on the unit 2 With the adapter in place slide the Access Point diagonally over the rail and rotate until the unit clicks into place Press these clips and turn to dismount the Access Point ...

Page 6: ...5 4 Wall mounting The figure below shows you how to mount the access point to a wall using screws and sinkers Note Screw center distance 141mm ...

Page 7: ...nagement services This usually occurs when the unit cannot get an IP Address from your network using DHCP and has switched to Local Network Configuration mode Note See the Tips and Troubleshooting section if the access point does not reach Solid blue For a full description of LED Status Description visit the Support website www art2wave com support Unit has just received power and has started boot...

Page 8: ...to navigate to http 192 168 100 1 3 Follow the on screen instructions See the Support section http art2wave com support for information about Local Network Configuration Note Local Configuration mode will only activate if the access point is in Factory Default condition and has never connected to the Art2Wave management services in the cloud If the access point is disconnected from a power source ...

Page 9: ...ING FROM ANY BREACH OF WARRANTY OR UNDER ANY OTHER LEGAL THEORY IN SOME JURISDICTIONS THE FOREGOING LIMITATION DOES NOT APPLY TO DEATH OR PERSONAL INJURY CLAIMS OR ANY STATUTORY LIABILITY FOR INTENTIONAL AND GROSS NEGLIGENT ACTS AND OR OMISSIONS SO THE ABOVE EXCLUSION OR LIMITATION MAY NOT APPLY TO YOU SOME JURISDICTIONS DO NOT ALLOW THE EXCLUSION OR LIMITATION OF DIRECT INCIDENTAL OR CONSEQUENTIA...

Page 10: ...interference in a residential installation This equipment generates uses and can radiate radio frequency energy and if not installed and used in accordance with the instructions may cause harmful interference to radio communications However there is no guarantee that interference will not occur in a particular installation If this equipment does cause harmful interference to radio or television re...

Page 11: ...peration is subject to the following two conditions 1 This device may not cause interference and 2 This device must accept any interference including interference that may cause undesired operation of the device Cet appareil est conforme aux CNR exemptes de licence d Industrie Canada Son fonctionnement est soumis aux deux conditions suivantes 1 Ce dispositif ne peut causer d interférences et 2 Ce ...

Page 12: ...t se conformer à la limite de p i r e spécifiée pour l exploitation point à point et non point à point selon le cas iv De plus les utilisateurs devraient aussi être avisés que les utilisateurs de radars de haute puissance sont désignés utilisateurs principaux c à d qu ils ont la priorité pour les bandes 5 250 5 350 MHz et 5 650 5 850 MHz et que ces radars pourraient causer du brouillage et ou des ...

Reviews: