4
/17
X1
X2
Y1
Y2
vertical rigid wall EI 120 S
B1 + 80 mm
Btot + 80 mm
H1 + 80 mm
Htot + 80 mm
light vertical plasterboard wall EI 120 S
B1 + 100 mm
Btot + 100 mm
H1 + 100 mm
Htot + 100 mm
light vertical plasterboard wall EI 90 S
B1 + 75 mm
Btot + 75 mm
H1 + 75 mm
Htot + 75 mm
light vertical gypsum blocks wall EI 120 S
B1 + 80 mm
Btot + 80 mm
H1 + 80 mm
Htot + 80 mm
light vertical gypsum blocks wall EI 90 S
B1 + 80 mm
Btot + 80 mm
H1 + 80 mm
Htot + 80 mm
horizontal floor EI 180 S
B1 + 130 mm
Btot + 130 mm
H1 + 130 mm
Htot + 130 mm
horizzontal floor EI 120 S
B1 + 130 mm
Btot + 130 mm
H1 + 130 mm
Htot + 130 mm
horizzontal floor EI 90 S
B1 + 130 mm
Btot + 130 mm
H1 + 130 mm
Htot + 130 mm
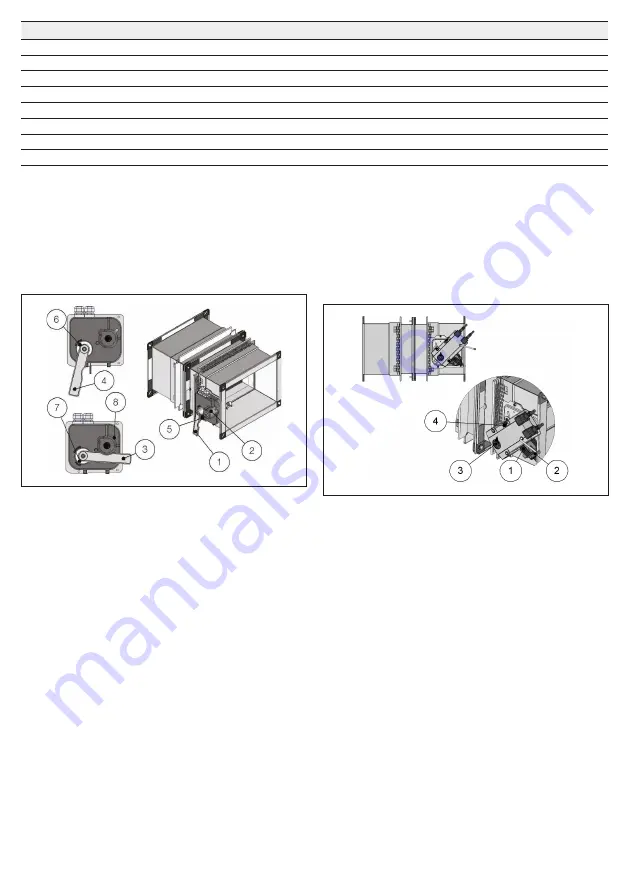
Mechanism type
Manual / Manual with magnet
1. Manual opening lever
2. Protection box
3. Lever position when the blade is open
4. Lever position when the blade is closed
5. Magnet knob (for magnetic version)
6. Closed blade indicator
7. Open blade indicator
8. Manual closing button
Blade closing mode
Automatic closing with thermal fuse.
The control mechanism has a thermosensitive element that auto-
matically closes the blade when the temperature in the duct exceeds
70°C (or 95°C for the fire damper with 95°C thermal fuse).
It is possible to close the damper by pressing the indicated button.
If the manual mechanism is equipped with electromagnet it is possi-
ble to remotely close the fire damper.
The manual command mechanism with magnet is equipped with
an electromagnet which, in case power is interrupted (interuption
magnet version) or when power is supplied (input magnet version),
comands the closing of the damper.
Blade opening mode
The damper must be opened when the ventilation system if
switched off.
In case of closed damper by pressing the closing button or remotely
by electromagnet (magnetic version), it is possible to manually open
the fire damper blade by rotating the lever antyclockwise.
For power supply interruption electromagnet, provide power supply
and pull the magnet knob before opening the fire damper.
In case of closed damper as a result of the action of the thermosen-
sitive element, it is possible to manually reopen the damper by rotat-
ing the lever counterclockwise once the element has been replaced.
Position indication microswitches
On request, the fire damper can be supplied with position mi-
croswitches (SA/SC/S2 optional) that signal the blade position (open
or closed). Refer to Electrical connections paragraph for more details.
Closing by remote control
With power supply input or interruption magnet (WK45M version
only).
Temperature calibration of thermosensitive element for auto-
matic damper closing
70 °C±7 °C (Standard)
95 °C±9 °C (On request).
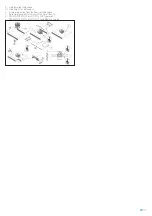
Belimo motorized version
1. Manual closing switch
2. Manual opening lever
3. Position indicator
4. Blade locking lever
Blade closing mode
Automatic closing with thermal fuse.
The control mechanism has a thermosensitive element that auto-
matically closes the blade when the temperature in the duct or in
the room exceeds 72°C (or 95°C for the 95°C version).
To close the damper when the motor is connected, press the switch
on the temperature sensor or cut off the power supply.
Blade opening mode
The damper must be opened when the ventilation system if
switched off.
To open the damper with the electric motor driven actuator, provide
power supply to the motor. Refer to the section Electrical connec-
tions for further information.
To manually open the damper, use the handle supplied and carefully
rotate clockwise to the 90° indicator. To hold the damper in open
position operate on the lever indicated in figure.
For VGB/DGB versions to hold the damper in open position, carefully
rotate the handle counterclockwise.
During the manual opening of the damper, power must not be sup-
plied to the motor.
Position indication microswitches
The motorized versions are supplied with two microswitches to
show the blade's position (open or closed). Refer to the section Elec-
trical connections for further information.
Closing by remote control
If power to the motor is cut off, the blade will close.
Temperature calibration of thermosensitive element for auto-
matic damper closing
72 °C±7 °C (Standard)
95 °C±9 °C (On request).


