Connections and Configuration
15
3. Once the cable passes the test, lay it in the pattern desired. Pay special attention to the following
cable placement precautions.
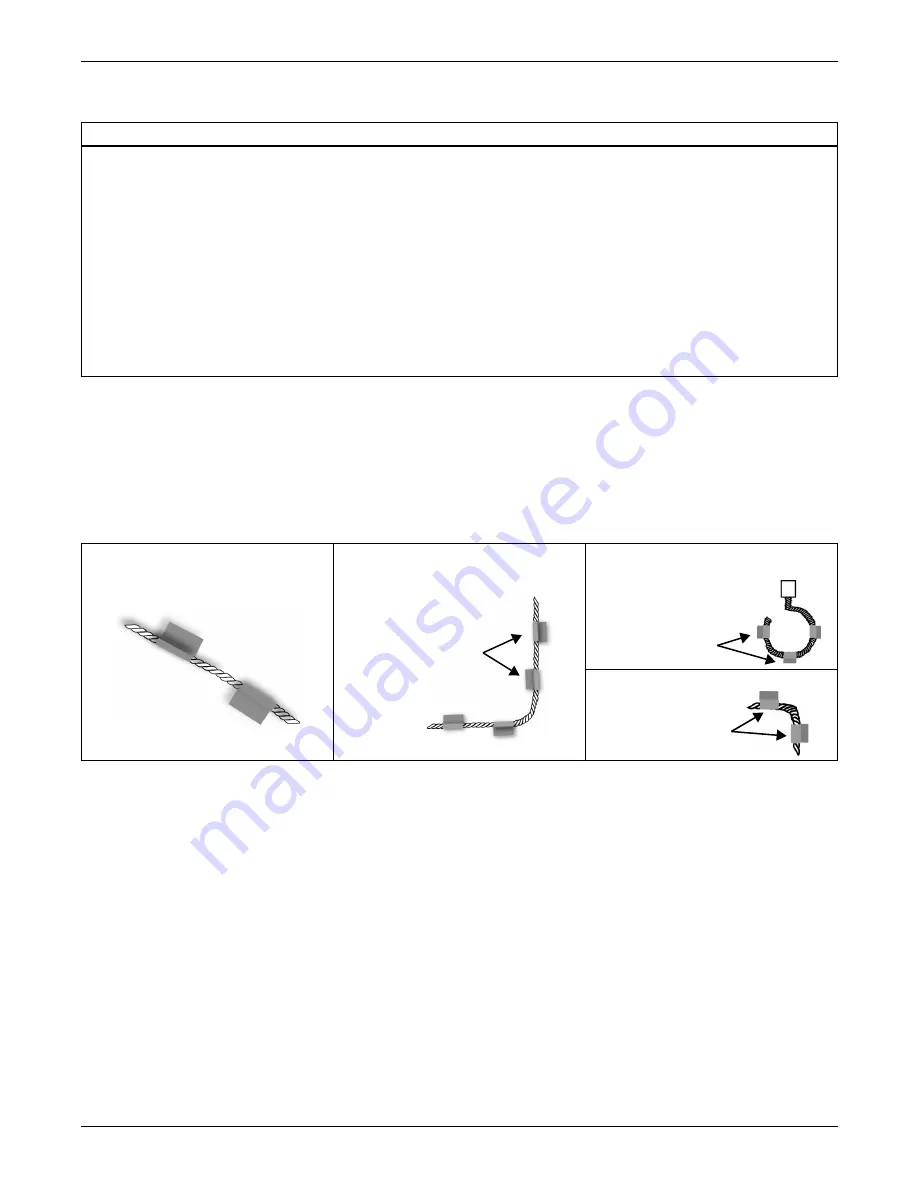
4. Install the hold-down clips in pairs, as shown in
Figure 10
, with the following considerations:
a. The adhesive used to install the hold-down clips must NOT come in contact with the detection
cable.
b. One pair every 6 to 8 ft. (1.8-2.4m) in straight patterns (see
Figure 11
).
c. One pair every 3 to 4 ft. (0.9-1.2m) in circular patterns (see
Figure 12
).
d. One pair at the beginning and end of the arc when turning 90 degrees (see
Figure 13
).
e. One pair as needed to maintain consistent uniform contact between the floor and detection
cable.
5. Once adhesive is completely dry, snap the cable into each hold-down clip.
6. Check that there are no gaps between the floor and detection cable. (Add clips as required.)
7. Be certain there are no alarms present on the module.
8. Do final testing as per instruction in
Step 2
.
DETECTION CABLE PLACEMENT PRECAUTIONS
• Do not use detection cable that is damaged or dirty—for example, from plaster, spackle or debris.
• Detection cable should not be dragged through contaminants (dirty or greasy areas). Floor must be clean
for the detection cable to function properly and for the hold-down clips to adhere to the floor surface.
• Careful consideration should be taken to place detection cable out of the direct discharge airflow path of
environmental equipment. This type of equipment can discharge moisture into the airflow. Place cable
6 ft. (1.8m) from discharge to avoid nuisance alarms during humidification.
• Tools or heavy objects can do permanent damage when dropped, rolled, or set on the detection cable.
Avoid foot traffic on the detection cable as well.
• Do not use any type of adhesive tape to secure the detection cable.
• Do not allow soldering or welding near the detection cable without providing protection from heat and
contaminants. (Also avoid installing the detection cable in or near these type of areas.)
• Mild dishwashing liquid can be used to clean the detection cable of many contaminants.
Figure 10 Installation of hold-
down clips in pairs
Figure 11 Cable laid in straight
patterns
Figure 12 Cable laid in circular
patterns
Figure 13 90° turn in cable
Hold-down clips
every 6-8 ft.
(1.8-2.4m)
along straight
sections
Hold-down clips
every 3-4 ft.
(0.9-1.2m)
Hold-down clips
at beginning &
end of arc
Summary of Contents for 115VAC LPL1150
Page 1: ...MONITORING LIQUI TECT MONITORING SYSTEM USER MANUAL...
Page 2: ......
Page 45: ...Specifications 41 NOTES...
Page 46: ...Specifications 42...
Page 47: ......


