Installation
21
3
Install
ation
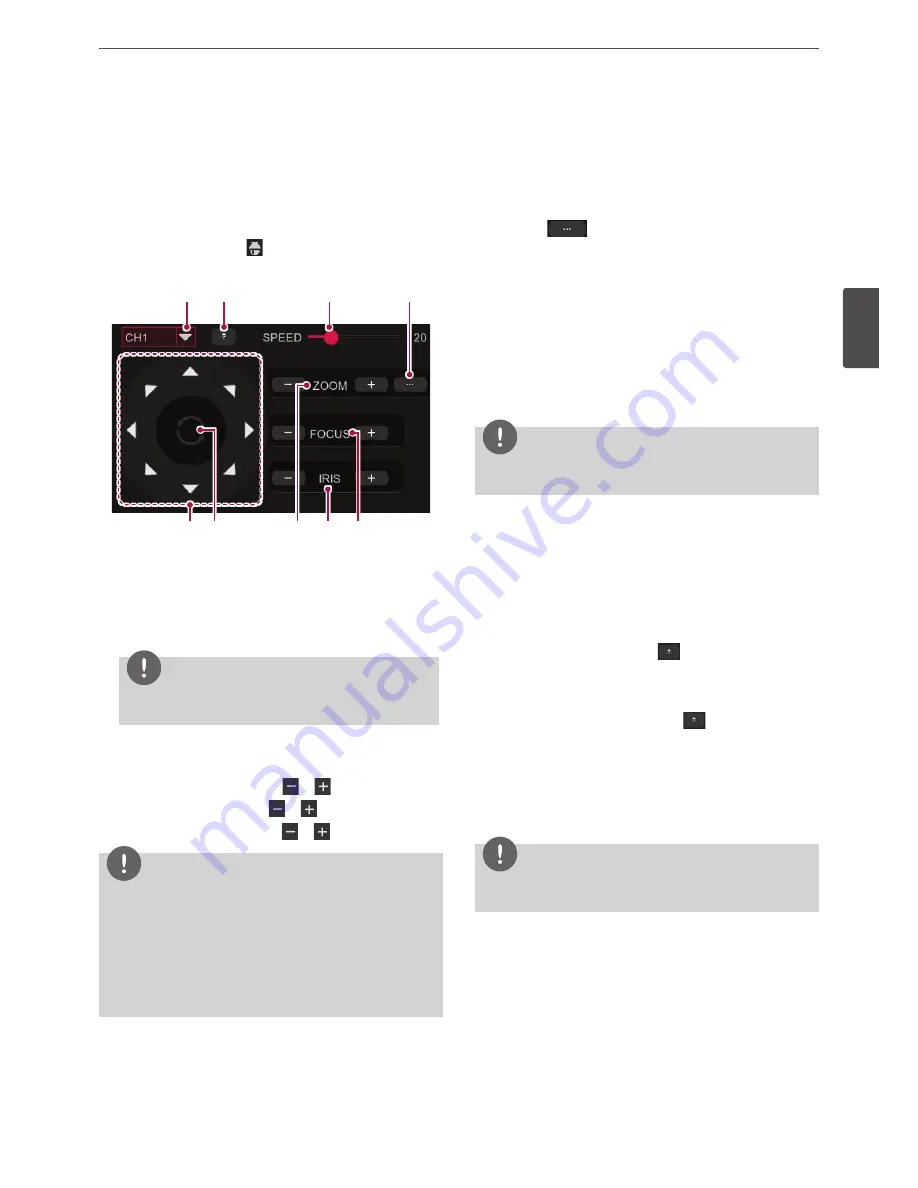
PTZ Camera Control
You can control the cameras connected via the data port of RS-485
terminal. You must set the configuration between the PTZ camera and
the DVR.
1. Select the PTZ camera channel that you want to use among the
live screen.
2. Quick button will appear when you click the live screen of selected
channel. When you select
icon, PTZ setting screen will appear
as below.
a
b
c
d
e
g
f
h
i
a
Select the channel.
b
Start or end a preset tour.
c
Adjust the motion speed of PTZ camera.
d
Preset set up screen appears.
Refer to the "Preset Settings".
NOTE
To activate this function, you need to register the preset
positions of the PTZ cameras.
e
Adjust the direction of PTZ camera by using an arrow.
f
When you select, PTZ camera will rotate.
g
Adjust the zoom by using button
or
.
h
Adjust the iris by using button
or
.
i
Adjust the focus by using button
or
.
NOTE
• If you click the right mouse button (or press the [MENU]
button of remote control) in live screen after complete to set
up the PTZ, PTZ setting screen will disappear.
•
Refer to the manuals of the PTZ camera for more details.
•
Some PTZ cameras may not be operated properly with this
unit.
•
You cannot control the other functions when the PTZ setting
screen is displayed.
Setup for PTZ Cameras
The following function is available only with cameras provided with the
preset function. The preset function makes the combination camera
move to the programmed preset position.
It is necessary to program preset positions for the combination
camera beforehand.
1. Select the
button of PTZ setting screen.
2. Set up the position of camera by using PTZ functions.
3. Open the keypad by selecting [No.] field then enter the number
you want.
4. Enter the time you want by selecting the [Time] feild.
5. If you select the [Set] button, the one preset setting will add.
6. Repeat the step 5 from step 2 whenever adds one preset. The
number of preset that set up in upper of preset screen will mark
up automatically.
7. Save the setting contents by selecting [Save] button after
complete all preset set up.
NOTE
The preset number can set up 0 to 255, but real setting range may
different depend on the camera.
Moving to preset position
1. Enter the preset number you want with keypad by selecting the
[No.] field.
2. Select the [GO TO] button.
Moves the camera to preset position of entered number.
Monitoring all preset settings
1. Start tour by selecting the upper
button of setting screen
after set up the preset.
Displays the all positions of preset in the live screen by moving in
order.
2. You can stop the tour by selecting the
button once again.
Deliting the preset setting
1. Enter the preset number you want with keypad by selecting the
[No.] field.
2. Select the [Clear].
Deletes the preset position of entered number.
NOTE
Preset position deleting function is may not supported depend on
the type of PTZ cameras.
Summary of Contents for LRA3040N-NH
Page 47: ......


