background image

Basic operation

On and off

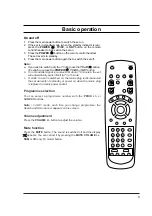
1. Press the main power button to switch the set on.
2. If the set is in standby mode (when the standby indicator is red),

press the POWER (

r

r

)TV/AV, or SKY button on the remote

control handset to fully switch the set on.

3. Press the POWER (

r

r

button on the remote control handset. 

The set reverts to standby. 

4. Press the main power button again the to switch the set off. 

Note :
a. If you wish to switch only the TV off, press the TV off (

y

y

button.

To switch on, press the POWER (

r

r

)TV/AV or SKY button.

b. If no broadcast signal is received for about 10 minutes, the set

will automatically switch itself to TV off mode.

c. If, while  the set is switched on, the mains plug is disconnected

the set will switch to standby or power on when the mains plug
is replaced in mains power socket.

Programme selection

You can select a programme number with the PR/CH +/- or
NUMBER buttons.

Note : In SKY mode, each time you change programme, the
Search and Scan banner appears on the screen.

Volume adjustment

Press the /- button to adjust the volume.

Mute function 

Press the MUTE button. The sound is switched off and the display

W

W

appears. You can cancel it by pressing the MUTE/-

,

SSM or I/II (only TV mode) button.

TV off

I/II

MUTE

VOLUME

PR/CH

TV/AV

1

2

3

4

5

6

7

8

9

pqrs

SSM

0

wxyz

mno

def

abc

jkl

ghi

tuv

POWER

SKY

9

Summary of Contents for DI-28Z12

Page 1: ...e Record model number and serial number of the set See the label attached on the back cover and quote this information to your dealer when you require service Model number Serial number P NO 3828VA0172D PD8TA 026A TX 3828VA0172C 3840VA0024A B 3840VA0016A 373 026F FOR THE GUARANTEE TERMS CONDITIONS PLEASE REFER TO BACK COVER OF THIS MANUAL ...

Page 2: ...2 ...

Page 3: ...se wait This is normal and not a fault When changing programme s in SKY mode there may be a delay of several seconds before the picture appears the picture or sound may also freeze or stop momentarily when the new programme is first displayed Again this is normal and not a fault Note This set is designed to receive analogue terrestrial and BSkyB digital satellite broadcasts only It is not designed...

Page 4: ...Connection of external equipment 23 Aerial socket Euro SCART socket AV1 Audio Video in sockets AV2 S video Audio in sockets S AV Digital satellite dish socket DISH INPUT Satellite out socket SKY OUT Telephone line socket TELEPHONE INPUT LINE RS 232 Audio out sockets AUDIO OUT Digital satellite receiving 25 What is the digital satellite What is the SkyGuide Getting started 26 Switch on off Changing...

Page 5: ... coloured green or green and yellow If any other plug is fitted use a 5 amp fuse either in the plug or at the distribution board Important The wires in this mains lead are coloured in accordance with the following codes BLUE NEUTRAL BROWN LIVE As the colours of the wires in the mains lead of this set may not correspond with the coloured marking identifying the terminals in your plug proceed as fol...

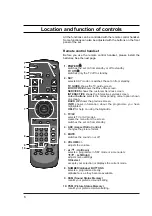
Page 6: ...us screen INFO shows information about the programme you have highlighted HELP for help on using the SkyGuide 3 TV AV selects TV or AV modes clears the menu from the screen switches the set on from standby 4 ARC Aspect Ratio Control changes the picture format 5 MUTE switches the sound on or off 6 VOLUME adjusts the volume 7 D E Up Down selects a programme in SKY mode or a menu item F G Left Right ...

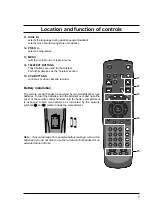
Page 7: ...d by two AAA Alkaline type batteries To load the batteries turn the handset over and open the cover of the remote control handset until the battery compartment is exposed Install two batteries as indicated by the polarity symbols and marked inside the compartment Note To avoid damage from possible battery leakage remove the batteries if you do not plan to use the remote control handset for an exte...

Page 8: ...tandby ARC Aspect Ratio Control changes the picture format MENU calls the main menu or clears a menu i i Information shows information about the programme you have highlighted BACK UP shows the previous screen TV GUIDE shows the TV guide screen 8 OK select accepts your selection or displays the current mode F G Volume Down Up adjusts the volume In SKY mode it s available after selecting the VOLUME...

Page 9: ... about 10 minutes the set will automatically switch itself to TV off mode c If while the set is switched on the mains plug is disconnected the set will switch to standby or power on when the mains plug is replaced in mains power socket Programme selection You can select a programme number with the PR CH or NUMBER buttons Note In SKY mode each time you change programme the Search and Scan banner ap...

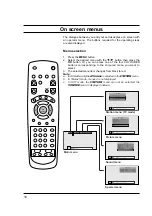
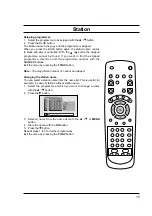
Page 10: ... press the OK button Or you can press one of the four COLOURED buttons corresponding to the coloured menu you want to select 3 The selected menu item changes from black to red Note a In AV mode only the AV name is selected in the STATION menu b In Teletext mode menus are not displayed c In SKY mode the STATION menu can not be selected the VOLUME menu is displayed instead MENU OK select Special men...

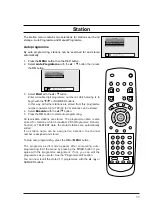
Page 11: ...xecute with the D E button 5 Press the OK button to start auto programming All receivable stations are stored The programme name is also stored for stations which broadcast PDC Programme Delivery Control or TELETEXT data the stored stations are automatically sorted If no station name can be assigned to a station the channel number is assigned and stored To stop auto programming press the OK or MEN...

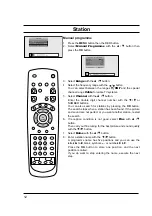
Page 12: ...ton The search stops when a station has been found If the picture and sound are not perfect or you want another station restart the search 6 If reception condition is not good select Fine with D E button Then carry out fine tuning for the best picture and sound quality with the F G button 7 Select Name with the D E button 8 Enter a station name with the F G button A programme name has five positio...

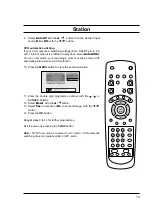
Page 13: ...ize and VCR selection 10 Press the MENU button to store the searched station 11 Enter the double digit programme number with the F G or NUMBER buttons 12 Select Store with the D E button 13 Select Yes to execute or No to cancel storage with the F G button 14 Press the OK button Repeat steps 3 to 14 for further programmes Exit the menu by pressing the TV AV button Note NTSC can only be received in ...

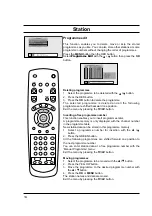
Page 14: ...e programme number This function enables you to insert programmes later A programme memory is only displayed with the channel number in the programme table New station data can be stored in this programme memory 1 Select a programme number for insertion with the D E button 2 Press the GREEN button All the following programmes are shifted forward one position to the next programme number You can en...

Page 15: ...th the NUMBER buttons Exit the menu by pressing the TV AV button Note The programme number 01 cannot be skipped Changing the station name You can select a station name from the name list This is useful for example in case of stations without station name 1 Select the programme at which you want to change a name with the D E button 2 Press the G button 3 Select a name from the name list with the D ...

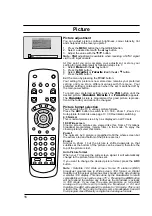
Page 16: ...atic switching 4 3 Normal This is normal picture size 4 by 3 as displayed on all TV sets 16 9 Wide screen Cinema screen pictures are viewed like this Some TV stations broadcast programmes mainly films in the mode To enjoy the cinema picture select this mode Zoom 1 The normal 4 by 3 picture is magnified to fill the whole screen but the extreme top and bottom of the picture are lost Zoom 2 Similar t...

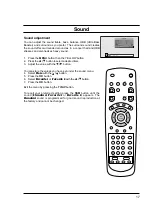
Page 17: ... a desired item 3 Adjust the value with the F G button You can store the values you have set under the sound menu 4 Select Store with the D E button 5 Press the OK button 6 Select Favorite 1 or Favorite 2 with the D E button 7 Press the OK button Exit the menu by pressing the TV AV button To recall your preferred setting press the SSM button until the sound Standard Favorite 1 or Favorite 2 appear...

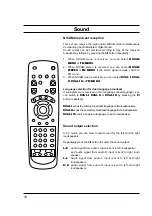
Page 18: ...a programme is received in two languages dual language you can switch to DUAL I DUAL II or DUAL I II by pressing the I II button repeatedly DUAL I sends the primary broadcast language to the loudspeakers DUAL II sends the secondary broadcast language to the loudspeakers DUAL I II sends a separate language to each loudspeaker Sound output selection In AV mode you can select output sound for the lef...

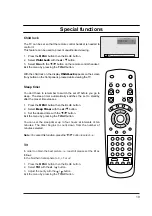
Page 19: ...leep The sleep timer automatically switches the set to standby after the preset time elapses 1 Press the MENU button then the BLUE button 2 Select Sleep Timer with the D E button 3 Set the desired time with the F G button Exit the menu by pressing the TV AV button You can set the sleep timer up to four hours at intervals of ten minutes The timer begins to count down from the number of minutes sele...

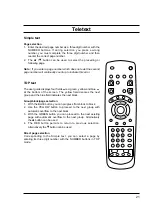
Page 20: ...itted by the broadcast station Two page numbers TV channel name date and time are displayed on the screen headline The first page number indicates your selection while the second shows the current page displayed Press the TEXT or TV AV button to switch off teletext The previous mode reappears FASTEXT The teletext pages are colour coded along the bottom of the screen and are selected by pressing th...

Page 21: ...tom of the screen The yellow field denotes the next group and the blue field indicates the next block Group block page selection 1 With the BLUE button you can progress from block to block 2 Use the YELLOW button to proceed to the next group with automatic overflow to the next block 3 With the GREEN button you can proceed to the next existing page with automatic overflow to the next group Alternat...

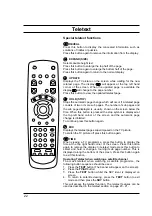
Page 22: ...eft hand corner of the screen and the automatic page change is inhibited To continue press this button again MIX Displays the teletext pages superimposed on the TV picture To switch the TV picture off press this button again TIME When viewing a TV programme press this button to display the time at the top right hand corner of the screen Press this button again to remove the display In teletext mod...

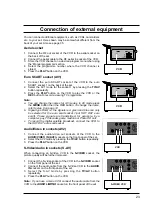
Page 23: ...KY OUT euro scart These signals are transmitted for example by a computer pay TV decoder game machine or Photo CD unit c To record the digital satellite broadcast connect the VCR to the SKY OUT euro scart socket Audio Video in sockets AV2 1 Connect the audio video out sockets of the VCR to the AUDIO VIDEO IN AV2 sockets on the front panel of the set 2 Select the AV2 mode by pressing the TV AV butt...

Page 24: ...ust first remove the mains lead then unplug the telephone lead at its wall socket You may need to purchase a telephone socket doubler to allow the telephone lead and your normal telephone to be connected at the same time Satellite receiver REN Value 0 5 RS 232 The RS 232 socket is for future use If you connect earthed equipment to this socket you must used an approved screened cable WARNING You mu...

Page 25: ...elpful and easy to use on screen guide to your digital satellite services It is designed for people who want to get the most out of watching television The SkyGuide allows you to 1 See on screen TV programme listings for up to seven days 2 See TV listings while you are watching a programme 3 Set parental control restrictions and programme purchase price limits 4 Modify your SkyGuide settings Sky k...

Page 26: ...the TV AV button to revert to TV and AV modes Note When you first switch this TV on and whenever you switch it off and then on at the main power switch there will be a delay of up to one minute while the internal digital satellite receiver initializes itself If the TV is in SKY mode the following message will be displayed on the screen Initializing Please wait This is normal and not a fault Changi...

Page 27: ...he four parts are TV GUIDE Shows on screen listings for channels and programmes BOX OFFICE Allow you to order specific movies and events that you choose to purchase SERVICES Allow you to set Parental Controls and see useful customer information INTERACTIVE Gives access to a range of interactive services as they become available Your set is ready for the future of television Some of these features ...

Page 28: ...wn on the screen Press the button of the same colour to choose that option or function You can also use the NUMBER buttons as shortcuts Whenever a list of numbered options is shown you can press the appropriate NUMBER button to choose an option quickly If you go to a screen you don t want press the BACK UP button to return to the previous SkyGuide screen Note Press the SKY button to return to the ...

Page 29: ...o watch and it is on now press the OK select button your set tunes to it Note The banner will disappear automatically after a few seconds or you can press the BACK UP button to remove it immediately TV Guide Press the TV GUIDE button to see the TV GUIDE screen TV GUIDE LISTINGS TV programmes scheduled for today and the coming week listed by channel number ENTERTAINMENT MOVIES SPORTS NEWS and DOCUM...

Page 30: ...F G button to see programmes being shown at different times Times are shown at the top of the programme listing You can also use the Page Up RED and Page Down GREEN button to see the preceding or next section of the channel listing Use the 24 Hours YELLOW button to move forwards 24 hours at a time To move backwards 24 hours at a time use the 24 Hours BLUE button Note The TV GUIDE LISTINGS screen s...

Page 31: ...lude channels that your set is capable of receiving but for which listings may not be available in the SkyGuide for example foreign language channels To see the other channels screen press the TV GUIDE button highlight OTHER CHANNELS then press the OK select button The other channels list is shown on your screen To watch one of these channels highlight it then press the OK select button Note When ...

Page 32: ...NTROL lets you specify what categories of programme can be viewed and how much can be spent when ordering an individual programme before PIN is needed To display the PARENTAL CONTROL screen press the SERVICES button Highlight PARENTAL CONTROL then press the OK select button Note If your set is not connected to your telephone line you will have to call your broadcaster s helpdesk to change your PIN...

Page 33: ...d unless your PIN is entered VIEWING RESTRICTIONS can only be applied to programmes where the broadcaster provides category restriction information To restrict a category of programme highlight it then press the Restrict RED button A cross marks a category you have restricted To remove a restriction highlight the category then press the Restrict RED button The cross is removed indicating that the ...

Page 34: ... cost before your PIN is needed 3 Highlight Save New Settings and then press the OK select button Note If you set the SPENDING LIMIT at 0 00 then the PIN will always be required when ordering a programme Changing your PIN To see the CHANGE PIN screen highlight CHANGE PIN on the PARENTAL CONTROL screen then press OK select button The CHANGE PIN screen lets you change your PIN any time you wish To c...

Page 35: ...cording or a pre recorded tape press the TV AV button on the TV remote control handset to select the euro SCART socket AV1 Note 1 It is only possible to record one satellite programme at a time it is possible to view a terrestrial TV programme or playback a video tape on a second VCR connected to the euro SCART socket AV1 while recording a satellite programme on the first VCR connected to the Sky ...

Page 36: ...er 8 Highlight Find Channels and press OK select button your set checks the settings you entered and looks for any new channels at those settings 9 The NEW CHANNELS screen appears on your TV This is a list of the channels that your set has found You can select those you want to add to the Other Channels list 10 To add a channel highlight it then press the Store Channel YELLOW button 11 When you ha...

Page 37: ...n subtitles on or off where available Some programmes may offer a choice of language and or subtitles Save New Settings to confirm any changes or press the BACK UP button to cancel Note You can easily reset the settings for your SkyGuide to the standard settings Press the reset RED button when viewing the Picture Settings Sound Settings and or Language and Subtitles screens Select Save New Setting...

Page 38: ... them Note If you still have a problem call your broadcasters helpdesk For your broadcasters helpdesk number select the Telephone Number option from the SERVICES screen Make sure you have your Sky Viewing Card number Set Make and Model number available before you call your broadcaster 38 T V GUIDE BOX OFFICE SERVICES NTERACTI V E ...

Page 39: ... listings to see when the channel is available You can t find a channel you have previously watched The channel only broadcasts for part of the day Check it is your Sky Viewing Card Check it is in the right way up Check that your card is not damaged If the problem continues call your broadcaster s helpdesk For your broadcaster s helpdesk number select the Telephone Numbers option from the Services...

Page 40: ...r local interference Adjust contrast Adjust brightness Adjust colour Adjust volume Check the batteries in remote control Check Audio Video sockets VCR only Check these items and try to adjust these Symptoms No picture no sound Sound OK poor picture Picture OK poor sound Picture blurred Lines or streaks in picture Poor reception on some channels No colour Poor colour Remote control does not work 40...

Page 41: ...1 to 69 CCIR PAL System I Cable channels S01 to S47 Mini Din 4 pin Phono composite video in Phono left and right IEC 169 2 female 75Ω coaxial Audio left and right out composite video out Audio left and right in out composite video in out RGB in Phono left and right F type female RJ11 DB 9 female data communications equipment DCE EIA TIA 232 E ITU TV 28 115 2 Kbit s max Note If you connect earthed ...

Page 42: ...seconds 10 seconds Stereo Mono Bargraph mid position On Off On Off English French German Spanish Scots Welsh Irish Hindi Punjabi On Off Digital interface On the back panel there is a plate which covers a general purpose interface This is for future plug in modules which will have their own installation instructions You must disconnect your Digital Satellite Colour Television from the mains before ...

Page 43: ...43 ...

Page 44: ...be directed to the dealer from whom the equipment was originally purchased The dealer may before carrying out service under guarantee require a receipted account as evidence of the date of purchase D We respectfully point out that your dealer is not obligated to replace batteries if they become exhausted or worn in use E Aerial alignment and consumer control adjustments are not covered by this gua...

Reviews: