background image

8

Getting Started

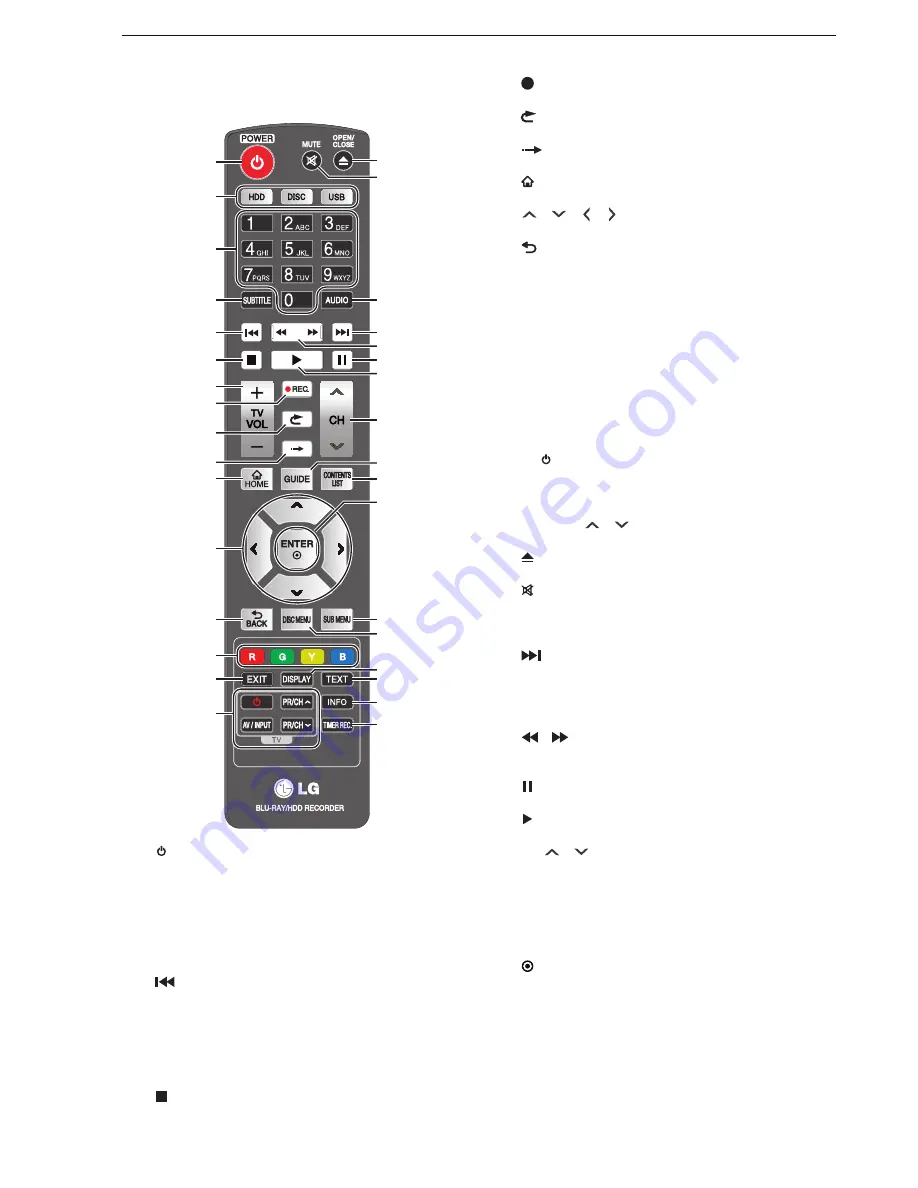
Functional Overview

Remote control

AKB73675701

AKB73675701

I.REPLAY

I.REPLAY

I.SKIP

I.SKIP

1

3

2

4

5

6

7
8

9

10
11

12

13

14

15

16

17
18

19

20
21
22
23

24

25
26

27

28
29

30
31

32

33

1. 

[


POWER]

 (standby / on) button

•  Press to switch the unit on / off.

2.  Media buttons (

[HDD]

 / 

[DISC]

 / 

[USB]

)

•  Press to switch to the media to operate.

3. Number 

buttons

•  Used to enter numbers or letters.

4. 

[SUBTITLE]

 button

•  Press to select a subtitle language.

5. 

[

]

 (skip) button

•  During playback, press once to return to the 

beginning of the current title / chapter / track / File.

•  During playback, press twice to return to the 

previous title / chapter / track / File.

•  During the JPEG playback, press to return to the 

previous File.

6. 

[

]

 (stop) button

•  Press to stop playback / recording.

7. 

[TV VOL + / –]

 button

•  Used to control the TV volume.

8. 

[

 REC.]

 button

•  Press to start recording.

9. 

[

 I.REPLAY]

 button

•  Press for the instant replay function.

10. 

[

 I.SKIP]

 button

•  Press for the instant skip function.

11. 

[

 HOME]

 button

•  Press to display the home menu.

12. 

[

 / 

 / 

 / 

]

 buttons

•  Press to select items or settings.

13. 

[

 BACK]

 button

•  Press to return to the previously displayed menu or 

screen.

14.  Coloured buttons (

[RED]

 / 

[GREEN]

 / 

[YELLOW]

 / 

[BLUE]

)

•  Press to activate shortcut keys on some BD-Video 

functions. They are also used to switch between 
pages in a file / contents list.

•  These buttons are also used for “Programme Guide” 

and “Edit Channels” in “DTV Menu”.

15. 

[EXIT]

 button

•  Press to exit from the various screen / windows.

16.  TV control buttons

• 

[

(TV power) button


-

Press to turn the TV on / off.

• 

[AV / INPUT]

 button


-

Press to switch the TV’s source input.

• 

[PR/CH 

 / 

]

 buttons


-

Press to switch TV’s channels.

17. 

[

 OPEN/CLOSE]

 button

•  Press to open / close the disc tray.

18. 

[

 MUTE]

 button

•  Press to switch “On” / “Off” the audio.

19. 

[AUDIO]

 button

•  Press to select the audio channel (audio language).

20. 

[

]

 (skip) button

•  During playback, press to skip to the next chapter / 

track / file.

•  When playback is in pause mode, press to forward 

the playback frame by frame.

21. 

[

 / 

]

 (reverse / forward) button

•  During playback, press to fast reverse / fast forward 

the playback.

22. 

[

]

 (pause) button

•  Press to pause playback.

23. 

[

]

 (play) button

•  Press to start playback / resume playback.

24. 

[CH 

 / 

]

 button

•  Press to switch up / down through the memorised 

channels.

25. 

[GUIDE]

 button

•  Press to display the programme guide screen.

26. 

[CONTENTS LIST]

 button

•  Press to display the contents list.

27. 

[

 ENTER]

 button

•  Press to confirm or select menu items.

28. 

[SUB MENU]

 button

•  Press to display the sub menu / play menu.

29. 

[DISC MENU]

 button

•  For BD-Video, press to display the pop-up menu / 

top menu.

•  For DVD-Video, press to display the top menu / disc 

menu.

30. 

[DISPLAY]

 button

•  Press to display chapter / time information.

EAB31̲30AD.indb   8

2012/08/28   10:12:44

Summary of Contents for BR625T

Page 1: ...ease read this manual carefully before operating your set and retain it for future reference 1 V M N 3 3 0 5 3 EAB31AD EAB30AD 1VMN33053 Owner s Manual Blu ray Disc Recorder BR629T BR625T http www lg com ...

Page 2: ...ch powers only that appliance and has no additional outlets or branch circuits Check the specification page of this owner s manual to be certain Do not overload wall outlets Overloaded wall outlets loose or damaged wall outlets extension cords frayed power cords or damaged or cracked wire insulation are dangerous Any of these conditions could result in electric shock or fire Periodically examine t...

Page 3: ...d by the 3D vision If you feel anything unusual stop viewing immediately If you have experienced a major illness or you are pregnant you may be strongly affected by the 3D vision If you feel anything unusual stop viewing immediately For 3D vision how it appears depends on the viewer and physical condition If you feel discomfort do not view 3D content Trademark Information Manufactured under licens...

Page 4: ...ERCIAL ACTIVITY AND OR WAS OBTAINED FROM A VIDEO PROVIDER LICENSED TO PROVIDE VC 1 VIDEO NO LICENSE IS GRANTED OR SHALL BE IMPLIED FOR ANY OTHER USE ADDITIONAL INFORMATION MAY BE OBTAINED FROM MPEG LA L L C SEE HTTP WWW MPEGLA COM MPEG Layer 3 audio coding technology licensed from Fraunhofer IIS and Thomson THIS PRODUCT IS LICENSED UNDER THE MPEG 4 VISUAL PATENT PORTFOLIO LICENSE FOR THE PERSONAL ...

Page 5: ... recorded in Video format R Video DVD R disc recorded in Video format RW VR DVD RW disc recorded in VR format R VR DVD R disc recorded in VR format DVD Video Commercially available DVD Video disc Audio CD Audio CD CD DA finalised CD RW CD R discs formatted in Audio CD format DISC AVCHD DVD RW R DVD RW R disc containing movies in AVCHD format DISC JPEG BD RE R DVD RW R DVD RW R CD RW R disc contain...

Page 6: ...2 Viewing 4 22 Viewing a Programme Currently On Air 22 Selecting a channel 22 Selecting a channel from the Programme List window 22 Editing favourite groups 22 Switching the audio 22 Switching the subtitles 23 Switching the image quality Super Resolution 23 Unlock the DTV rating temporarily 23 Viewing from an External Device 23 Switching to the external input 23 Viewing a cable TV programme 24 Sup...

Page 7: ...iting functions 49 Adding Deleting a Chapter Mark 49 Adding a chapter mark 49 Deleting a chapter mark 49 Hiding chapters 49 Changing a Title Name Protecting a Title 50 Changing a title name 50 Protecting a title 50 Deleting Unnecessary Titles 50 Deleting a single title 50 Delete multiple titles at one time 51 Deleting Parts of a Title 51 Dividing a Title 51 Converting the Recording Mode Image Qual...

Page 8: ...o functions They are also used to switch between pages in a file contents list These buttons are also used for Programme Guide and Edit Channels in DTV Menu 15 EXIT button Press to exit from the various screen windows 16 TV control buttons TV power button Press to turn the TV on off AV INPUT button Press to switch the TV s source input PR CH buttons Press to switch TV s channels 17 OPEN CLOSE butt...

Page 9: ...ndby mode 4 Display panel 5 OPEN CLOSE button To open close the disc tray 6 USB port To connect a USB HDD USB device 7 Reset button Press in case this unit operates unexpectedly or does not operate 8 POWER standby on button To turn the unit on off Display panel 1 2 3 4 5 6 7 Display panel 1 Displayed during dubbing 2 Displayed while updating the firmware converting a pre existing title to a differ...

Page 10: ... name current recording duration will be displayed 11 Media type Note For the discs recorded on other devices information may not be displayed properly Ƈ About icons Power of this unit Loading This unit is turned on Media Disc tray is opening closing Loading Loading a disc USB device Media types HDD USB HDD Disc BD RE BD RE BD R BD R BD RE R BD Video BD Video BD Video BDAV ORG BDAV ORG BDAV origin...

Page 11: ...us playback and editing operations can be performed from the submenu in the contents list Refer to page 40 Media Manager The following operations are available on each media Refer to page 52 HDD Menu Delete All Titles Refer to page 53 Delete All Unprotected Titles Refer to page 53 BD DVD Menu Format Refer to page 53 Finalise Refer to page 52 Edit Disc Name Refer to page 52 Disc Protect OffĺOn Refe...

Page 12: ...lable on the TV DIGITAL OUT OPTICAL AUDIO VIDEO VIDEO OUT IN R L AUDIO R L DIGITAL OUT OPTICAL VIDEO IN AUDIO R L Yellow Audio cables supplied White Left Red Right White Left Red Right Yellow Video cable supplied Auido Vidoe IN Audio L R Video S video To VIDEO IN To AUDIO IN To AUDIO OUT To VIDEO OUT Note Use a High Speed HDMI cable with the HDMI logo which is complying with the HDMI standard Make...

Page 13: ...TV signals as is without converting or compressing If your cable TV service is the pass through type you can directly select channels on this unit and use the EPG Network Connection By connecting this unit to your broadband Internet you can enjoy the network features such as BD Live functions Please contact each content provider for details You can also use this unit as a DLNA server which enables...

Page 14: ...ttings Network Connection then select Auto or Manual For a LAN cable use a category 5 or higher straight cable If you need the MAC address of this unit you can confirm it in Home Menu Settings Network Settings Displaying network status Connection to an Audio System You can enjoy multi channel audio by connecting this unit to a digital audio system Ƈ Using an optical audio cable HDMI OUT LAN DIGITA...

Page 15: ...TV then tune it to the correct source input associated with this unit 3 Turn on this unit Please refer to Basic setup on page 16 for details Please go on to Ƈ Initial Setting on page 16 Preparation for the Remote Control Battery installation Install 2 R6 1 5V batteries matching the polarity as indicated inside battery compartment 1 2 3 Operable range of the remote control 30 30 Infrared sensor win...

Page 16: ...e setting Depending on your TV some or all buttons may not function on the TV even after entering the correct manufacturer code When you replace the batteries of the remote the code number you have set may be reset to the default setting Set the appropriate code number again Basic Setup DTV Operations Basic setup Ƈ Finding the viewing source input 1 After having made all the necessary connections ...

Page 17: ...Lock DTV Rating Unlock P Kids C G PG M MA 15 AV 15 R Adult All Change PIN Code Signal Information Initial Setting Limiting the access to the particular channels You can set limits to access to particular channels for parental control purposes Once a channel is locked the PIN Code will be required to perform the following functions Auto Tuning Editing the channel map Programming a timer recording o...

Page 18: ...last 2 digit number to your desired number up to 3 digit numbers e g When the PC s IP Address is 192 168 10 12 enter a number such as 192 168 10 223 The 223 can be any number except 12 For Subnet Mask and Default Gateway please enter the same numbers as those on your PC s network setting When you enter a wrong number select Clear to clear the incorrect number then press ENTER After having entered ...

Page 19: ...onnection speed Receiving the Programme Guide The programme guide also known as EPG Electronic Programme Guide gives you a list of the DTV programmes and detailed information about programmes By selecting a programme in the programme guide you can view the programme or set a timer recording Guide to the Programme Guide screen To call up the Programme Guide screen press GUIDE in DTV viewing mode 24...

Page 20: ...ase select Yes and follow the instructions in Ƈ To register Ƈ To register Press HOME then select Media Manager USB HDD Menu Register USB HDD setting 1 The list of USB HDD registration screen will appear Use to select a row with unregistered then press ENTER Register Setting Current connected device unregistered Return List of USB HDD registration USB HDD1 unregistered USB HDD2 unregistered USB HDD...

Page 21: ...t Note that all recorded titles on the USB HDD will be deleted A USB HDD deregistered from this unit will no longer be recordable or playable If you wish to re register the USB HDD it will be initialised again and all recorded titles will be deleted Please be careful when deregistering a USB HDD Recorded titles on a USB HDD registered to this unit can only be used on this particular unit and is no...

Page 22: ...Editing favourite groups on page 22 Editing favourite groups You can sort DTV channels into 4 different favourite groups 1 4 One channel can be assigned to multiple favourite groups 1 Press HOME then select DTV Menu Edit Channels then press ENTER 2 Select the channel you wish to add to a favourite group using 3 Press a group number 1 2 3 4 Move Y Y Y Y Edit Channels Channels 3 Station C 1 2 3 4 Fa...

Page 23: ...refer to the user manual of the device Switching to the external input 1 Press SUB MENU to call up the sub menu 2 Use to select Switch DTV or AV then press ENTER 3 Use to select AV then press ENTER Note In the following case AV is not available During a dual recording of 2 DTV programmes Viewing a cable TV programme To view a cable TV programme through this unit select a channel on the home termin...

Page 24: ...nts List 2 2 Chase play 1 When dubbing a copy once programme refer to About dubbing restrictions on page 55 to learn if the dubbing will be copy or move 2 When dubbing to DVD RW Video DVD R Video the disc will automatically be finalised after dubbing is completed In this owner s manual finalised DVD RW Video DVD R Video discs are described as DVD Video 3 If you wish to add a recording to a finalis...

Page 25: ...recordings to discs For mechanical reasons the HDD may degrade quickly Other information The internal HDD is unreplaceable Attempting to replace it causes malfunctions and voids your warranty Please turn the unit power off when it will not be used for an extended period of time No data is recorded on the HDD Please record on your own media before playback About USB HDD external HDD Ƈ Available fun...

Page 26: ... incompatible Ƈ About USB devices USB devices which can be connect to the USB port on the front of this unit are USB HDD USB memory stick Digital camera containing JPEG files Digital camcorder containing AVCHD contents Do not connect any other types of USB device other than the examples above or it may cause damage to this unit or loss of data Operations in use of a USB hub or USB extension cable ...

Page 27: ... using DVD RW discs can be formatted multiple times Note that this process deletes all data on the disc Refer to page 53 DVD R DVD R discs cannot be re formatted A brand new DVD R is formatted in VR mode at the factory No need to re format the disc before using 1 Place a brand new disc in the unit 2 Use to select Yes then press ENTER This disc is not formatted and cannot be played or recorded Form...

Page 28: ...ection mode Refer to the user manual of the USB device for details It may take a while to recognise the USB device This unit does not support AVCHD Ver 2 0 If your USB HDD has a power switch turn on the USB HDD first before you turn on this unit To disconnect the USB device make sure the playback is stopped then slowly pull out the device As for USB HDD make sure the power of this unit and the USB...

Page 29: ...1 Recording mode image quality and approx recording time Recording mode refers to the image quality You can choose whether to give priority to image quality or recording duration Image quality and recording duration by recording mode TS Digital broadcasting As is broadcasted AF Digital broadcasting Compressed HD quality AN AE XP Digital broadcasting External input SD quality SP LP EP High image qu...

Page 30: ... Rec to HDD USB HDD BD RE BD R For dubbing recording mode changing HDD USB HDD BD RE BD R HDD USB HDD BD RE BD R RW VR RW Video R Video RW VR R VR Rec mode TS AF AN AE XP SP LP EP XP SP LP EP Bilingual audio Dual audio Both Main Sub audio will be recorded It is switchable during playback Both Main Sub audio will be recorded It is switchable during playback 4 Both Main Sub audio will be recorded 1 ...

Page 31: ...ingual audio content make sure the setting in Recording External Input Audio is set to Bilingual If it is set to Stereo both Main and Sub audio will be output at the same time 4 When dubbing a title recorded in TS mode using AF AN AE mode or converting it to AF AN AE mode the audio will be recorded in stereo and when playing back the title both Main Sub audio will be output at the same time In ord...

Page 32: ... BD R TS XP SP LP EP Available Chase play also available Available Chase play not available Not available Ƈ Playable media and a possible timer recording while dubbing a title Dubbing direction Dubbing speed Playback Timer recording HDD USB HDD BD RE BD R RW R RW R BD Video DVD Video DISC AVCHD Audio CD DISC JPEG DISC DivX DISC MP3 DISC WMA USB JPEG USB DivX USB MP3 USB WMA HDD USB HDD BD RE BD R ...

Page 33: ...corded and the recording media by pressing DISPLAY Changing the recording mode image quality You can change the recording mode image quality when recording from an external device For DTV recording only TS is available and it is not changeable 1 Press SUB MENU to call up the sub menu 2 Use to select Rec Mode then press ENTER 3 Use to select the desired setting then press ENTER Remain HDD 400 00 XP...

Page 34: ... Current affairs Current affairs Education Education Education Infotainment Infotainment Infotainment Special Special Special Comedy Comedy Comedy Drama Drama Drama Documentary Documentary Documentary Note The programme guide is not available when you first set up this unit This unit needs to receive the EPG data Refer to Receiving the Programme Guide on page 19 If programme information is unavail...

Page 35: ...g This unit can record 2 DTV programmes or record 1 DTV programme and another recording from an external device simultaneously Preparation Start recording the first programme 1 Start recording another programme To record a programme currently being viewed Refer to Recording a Programme Currently On Air on page 33 To programme a timer recording from the programme guide Refer to Programming a Timer ...

Page 36: ...een on page 34 Timer Programming 19 00 THU 02 08 2012 Programme AAA WED 01 08 19 00 20 00 1 Station A Programme BBB THU 02 08 18 00 18 30 2 Station B Programme CCC THU 02 08 21 00 2 00 3 Station C REC TS TS TS TS TS TS Display each function with SUB MENU To move to next page Press RED GREEN For the timer programmes set from the programme guide select a programme then press ENTER or SUB MENU In the...

Page 37: ...ess BACK to finish Ƈ Modifying a timer programme from Programme Guide 1 Press GUIDE to call up the programme guide screen Refer to Guide to the Programme Guide screen on page 19 2 Use to select the timer programme to modify then press ENTER 3 Use to select Programme Change then press ENTER 4 Modify the timer programme 5 Press then use to select OK then press ENTER 6 Press BACK to finish Note For t...

Page 38: ...it Right before the timer recording If the unit is powered off it will automatically be turned on 2 minutes before a timer recording starts After a timer recording The recording will automatically stop Alternate recording When a timer recording cannot be performed for the following reasons the unit will record to the HDD if possible then notify on the Timer Programming screen If the disc is not re...

Page 39: ...ated This unit will automatically be turned off after system configuration If a power outage occurs before a timer recording After recovering from a power outage the clock will be readjusted Timer programmes will remain If a power outage occurs while a timer recording is in progress Recording will be terminated at the time of power outage If recovering from the power outage before the end time of ...

Page 40: ...r at the end of the list Old Sorts titles in the order from old to new If the recording date is unknown the title will appear at the end of the list 5 Use to select OK then press ENTER Note In disc mode narrowing down by genre is not available This unit cannot play back AVCHD files directly from a USB device Resume point The resume point will be saved by pressing during playback To remove the resu...

Page 41: ...mercially Available Disc Preparation Press DISC Note It may take extra time to read some discs Playing back a Blu ray Disc DVD BD Video DVD Video 1 Place a disc in the unit Some discs automatically start playback If the disc menu appears follow the instructions on screen 2 Press to start playback Ƈ Operations from the disc menu or pop up menu Only when it is available on the disc Various operation...

Page 42: ... device in the following conditions When the disc tray is in motion During disc load HDD disc recording HDD disc playback editing or dubbing While the title list or file list of disc is displayed While the Settings Timer Programming Programme Guide screen is displayed Do not disconnect the USB device while the indicator on the device is flickering Note for MP3 WMA To stop playback press while play...

Page 43: ... DVD Video DVD AVCHD During playback press I REPLAY I SKIP Every press of I REPLAY I SKIP skips replays based on the setting in Playback up to 10 presses at a time Ƈ Search HDD USB HDD BD RE BD R BD Video RW R Video RW VR R VR DVD Video DVD AVCHD Audio CD DivX MP3 WMA JPEG 1 During playback press SUB MENU to call up the play menu then select Search using then press ENTER Search Audio Subtitle Repe...

Page 44: ... play back from a USB HDD connect it to the unit To play back a disc place it in the unit Press HDD DISC USB accordingly If the password entry screen appears when playing back a disc refer to Ƈ Configuring BD Rating Level DVD Rating Level on page 66 Switching the audio language subtitle language camera angle If the password entry screen appears when playing back a disc refer to Ƈ Configuring BD Ra...

Page 45: ...amera angle Noise reduction HDD USB HDD BD RE BD R BD Video RW R Video RW VR R VR DVD Video DVD AVCHD DivX 1 During playback press SUB MENU to call up the play menu then select Noise Reduction using then press ENTER 2 Use to select your desired setting Noise Reduction On Super resolution HDD USB HDD BD RE BD R BD Video RW R Video RW VR R VR DVD Video DVD AVCHD DivX Super Resolution enhances SD qua...

Page 46: ...ess HOME to call up the home menu 2 Use to select Contents List then press ENTER 3 Use to select the media that contains JPEG files then press ENTER 4 Use to select Photo then press ENTER 3 Use to select the desired file then press ENTER If you wish to view all files in a folder use to select the folder then press ENTER To view a different page use RED GREEN to switch between pages 4 Press ENTER o...

Page 47: ...some commercially produced film and videos and their soundtracks When a prohibited use of an unauthorized copy is detected a message will be displayed and playback or copying will be interrupted More information about Cinavia technology is provided at the Cinavia Online Consumer Information Center at http www cinavia com To request additional information about Cinavia by mail send a postcard with ...

Page 48: ...e 1 For a title scheduled to convert to a different recording mode editing for the title is not available 2 This unit can undo finalisation only on DVD RW VR discs which were finalised on this unit 3 The disc will automatically be finalised after dubbing is completed 4 You can rename the disc when dubbing Note When the title or the disc is protected editing shown above cannot be performed during d...

Page 49: ...ing on page 48 2 Use to select Hide Chapter then press ENTER 3 During the visible chapter playback Visible appears on the preview screen use to select Hidden then press ENTER The chapter will be hidden are available to play back You can make a hidden chapter visible again by selecting Visible during hidden chapter playback Changing a Title Name Protecting a Title Guide to editing a title name Ƈ Av...

Page 50: ... able to undo Make sure it is the correct title before deleting Preparation When editing on a USB HDD connect it to the unit When editing on a disc place it in the unit Press HDD DISC USB accordingly Deleting a single title 1 Press CONTENTS LIST to call up the Contents List screen 2 Use to select a title to delete then press SUB MENU 3 Press to select Title Delete then press ENTER 4 Confirmation m...

Page 51: ...t steps 2 to 4 5 Press BACK to finish Converting the Recording Mode Image Quality HDD USB HDD By converting the recording mode image quality of a recorded title you can use the HDD more efficiently Converting a title recorded in the TS quality into AF AN AE XP SP LP EP Preparation When editing on a USB HDD connect it to the unit Press HDD or USB accordingly 1 Press CONTENTS LIST to call up the Con...

Page 52: ...ded on this unit BD R RW VR RW VR R VR Finalising a disc recorded on this unit makes the disc playable on other devices such as Blu ray Disc players recorders PC s Preparation Place a disc in the unit to finilise Press HOME then select Media Manager 1 Use to select BD DVD Menu then press ENTER 2 Use to select Finalise then press ENTER 3 A confirmation message will appear Use to select Yes then pre...

Page 53: ...VR Preparation Press DISC You can initialise a disc multiple times Note that all data will be deleted Press HOME then select Media Manager 1 Use to select BD DVD Menu then press ENTER 2 Use to select Format then press ENTER For a DVD RW disc select a format type 3 A confirmation message will appear Use to select Yes then press ENTER Initialisation process cannot be cancelled once it has begun For ...

Page 54: ...vice For DVD RW AVCHD DVD R AVCHD DVD RW AVCHD DVD R AVCHD only discs finalised on the recording device are possible to dub to this unit Recording mode for dubbing Ƈ When dubbing from the contents list Dubbing source Dubbing to Media Rec mode Media speed Rec mode fixed HDD TS BD RE BD R High Same as source Normal Between AF AN AE XP SP LP EP RW VR RW Video R Video RW R Normal Between XP SP LP EP A...

Page 55: ...he same recording mode image quality as the original title While high speed dubbing the channel which is selected on the unit will be displayed Ƈ Normal speed dubbing at the speed of 1 x Normal speed dubbing takes the same length of time or longer as the original title When the dubbing is in a different recording mode image quality it is performed as a normal speed dubbing Note that a higher recor...

Page 56: ...the display will disappear when the dubbing finishes Ƈ When dubbing to a DVD RW Video R Video disc After dubbing finishes the disc will automatically start finalising the disc Note From the Contents List screen only one title dubbing can be performed at a time Dubbing Multiple Titles at One Time Preparation Prepare as follows according to the dubbing media Dubbing direction Preparation Proceed to ...

Page 57: ...hen press ENTER 2 Use to select a title then press ENTER 3 Use to move the title to your desired position then press ENTER 10 After the modification to the dubbing list use to select OK then press ENTER 11 Start is highlighted Press ENTER When the dubbing is HDD ļ USB HDD Start move or Start copy will appear DUB will be displayed on the display of the unit To stop dubbing Press then select Yes in ...

Page 58: ...Recording Auto Chapter Cinavia Cinavia Notice This product uses Cinavia technology to limit the use of unauthorized copies of some commercially produced film and videos and their soundtracks When a prohibited use of an unauthorized copy is detected a message will be displayed and playback or copying will be interrupted More information about Cinavia technology is provided at the Cinavia Online Con...

Page 59: ...inutes and 30 seconds 11 x LP 3 minutes 20 x EP DTV HD 6 hours 2 minutes and 20 seconds 26 x DTV HD 8 hours 2 minutes and 10 seconds 28 x Required time may differ depending on the conditions of the disc and dubbing source The speed indication such as 8x 12x 30x is not the time ratio based on the actual title duration For a 2x BD RE R disc a high speed dubbing will be performed at the maximum speed...

Page 60: ...DD Menu USB HDD Menu When simultaneous rec play is performed on the USB HDD or the contents list is being displayed during recording During recording mode conversion while the unit is powered off During software update Ƈ In the following cases playback on a client device will stop or a confirmation message will appear When the following operations are performed on this unit When playing back a BD ...

Page 61: ... audio with primary audio if it is available or only the primary audio Mix Audio Output The audio for the secondary video and the interactive application will be output together with the audio for the primary video The secondary audio is the audio for the secondary video Directors comment etc and the interactive audio is the audio for the interactive application Button click sounds etc HD Audio Ou...

Page 62: ...rom the HDMI OUT jack Off SIMPLINK On Sets whether to utilise the SIMPLINK function Off 3D settings 3D Playback Auto 3D Auto 3D The images will be output in 3D for a 3D compatible TV 2D for a conventional TV 2D The 3D contents will be output in 2D Some discs cannot output 2D images 2D 3D Type Frame packing Frame packing Outputs 3D images in frame packing mode Left and right image packed into one v...

Page 63: ...lly even if you select PCM Dolby D Subtitle Recording On When dubbing a title recorded in TS mode and when it has subtitle information you can choose whether to dub the subtitle as a part of the image The subtitle will be recorded as an image so it cannot be turned on off when playing back the dubbed title The English subtitles will preferentially be selected If the preset language does not exist ...

Page 64: ...ithout using proxy server Do Not Use Connection Speed Auto Sets the connection speed In most cases you can connect to the Internet without making any changes to the default setting 10BASE Half 10BASE Full 100BASE Half 100BASE Full Connection Test Perform a network connection test After you change the IP address or DNS setting always perform this test BD Live Setting Allow You can restrict Internet...

Page 65: ...00 16 00 19 00 4 00 7 00 DivX R VOD Register This menu item provides you with the DivX VOD registration code The DivX registration code is required when downloading DivX VOD files from the Internet To learn more about DivX VOD visit www divx com vod Deregister To deregister this unit from the activated device list of your DivX VOD player a deregistration code is required This menu item provides yo...

Page 66: ...download the latest software through the air and update this unit 1 Press HOME then select Settings Others Download Update then press ENTER A confirmation message will appear 2 Use to select Yes then press ENTER The unit will start scanning all the DTV channels for the latest software If software is found the unit will start loading it automatically After loading completes the unit will automatica...

Page 67: ...Kashmiri ks 5765 Kurdish ku 5767 Kirghiz ky 5771 Latin la 5847 Lingala ln 5860 Laothian lo 5861 Lithuanian lt 5866 Latvian Lettish lv 5868 Malagasy mg 5953 Maori mi 5955 Macedonian mk 5957 Malayalam ml 5958 Mongolian mn 5960 Moldavian mo 5961 Marathi mr 5964 Malay ms 5965 Maltese mt 5966 Burmese my 5971 Nauru na 6047 Nepali ne 6051 Dutch nl 6058 Norwegian no 6061 Occitan oc 6149 Afan Oromo om 6159...

Page 68: ...er cord connected securely Are the batteries in the remote control still good If none of above try step 2 in Ƈ Trouble checkup on page 68 The unit automatically turns on by itself If is shown on the display panel the unit is in the process of recording mode conversion If and UPDATE are shown on the display panel the unit is downloading for a software update The unit will automatically turns on 2 m...

Page 69: ...Are the cables cords connected securely When connecting this unit and TV with an HDMI cable be sure that the resolution in Settings HDMI HDMI Video Resolution is set to the correct resolution which the TV supports If you are not sure press and hold for 5 seconds or longer This configures the resolution to Auto and the selected channel should be displayed When HDMI Video Resolution is set to Auto o...

Page 70: ...d title cuts before the programme ends Do multiple timer programmes overlap This also happens when the end time of the earlier programme and the start time of the latter programme are exactly the same Unable to perform a dual recording This unit is unable to perform a dual recording both programmes simultaneously to one disc USB HDD Unable to record to a USB HDD Is the USB HDD connected to the uni...

Page 71: ...le was recorded in TS mode and it will be converted to AE mode after the unit goes standby Recording mode conversion will be performed in the order of older to newer titles in the contents list Title deletion Editing Dubbing Unable to delete a title Unable to edit a title chapter marks disc If the title media is protected it is not possible to delete or edit Cancel protection on the media before e...

Page 72: ...le when connecting this unit and LG s SIMPLINK compatible TV with an HDMI cable and the SIMPLINK setting on both devices is completed The SIMPLINK functions will no longer be effective if this unit s AC cord or HDMI cable is unplugged To restore the settings connect the AC cord and HDMI cable securely to this unit switch the TV s external source input to this unit or set Settings HDMI SIMPLINK to ...

Page 73: ...cord The programme is record prohibited Cancel recording because of insufficient capacity The recording was cancelled because the recording media became full The recording time exceeded 8 hours Recording was stopped The maximum duration of one title is 8 hours Timer programming Built in HDD does not have enough space to record If space is not ensured when you record at the end of the programme can...

Page 74: ... DivX is a codec compression decompression which can compress images to a very small amount of data The software can compress video data from almost any devices to the size that can be sent on the Internet without dropping visual quality of the images Dolby Digital Plus The next generation digital audio compression technology developed as an extension to Dolby Digital Blu ray Disc supports 7 1 mul...

Page 75: ...ning Region code Region associated discs and players with the particular areas of the world This unit will only play discs with the compatible region code The region code of this unit may be found on the rear panel Some discs are compatible with more than one region or all regions Resume playback This unit memorises where you stopped playback so you can continue from where you left off SD quality ...

Page 76: ...MPEG 4 AVC H 264 Audio recording format Sampling frequency Compression format 48 kHz Dolby Digital Linear PCM XP mode Dolby Digital Plus TS mode MPEG TS mode AAC TS mode HE AAC TS mode Tuner DVB T channels VHF Band III UHF Band IV UHF Band V 6 12 ch 27 35 ch 36 69 ch Input Output Front Panel USB port TYPE A USB 2 0 DC 5 V Max 500 mA Rear Panel VHF UHF antenna input output terminal 75 ȍ Audio input...

Page 77: ...to surrender the rights These restrictions translate to certain responsibilities for you if you distribute copies of the software or if you modify it For example if you distribute copies of such a program whether gratis or for a fee you must give the recipients all the rights that you have You must make sure that they too receive or can get the source code And you must show them these terms so the...

Page 78: ...o copy the source along with the object code 4 You may not copy modify sublicense or distribute the Program except as expressly provided under this License Any attempt otherwise to copy modify sublicense or distribute the Program is void and will automatically terminate your rights under this License However parties who have received copies or rights from you under this License will not have their...

Page 79: ... it that you can change the software and use pieces of it in new free programs and that you are informed that you can do these things To protect your rights we need to make restrictions that forbid distributors to deny you these rights or to ask you to surrender these rights These restrictions translate to certain responsibilities for you if you distribute copies of the library or if you modify it...

Page 80: ...table form under the terms of Sections 1 and 2 above provided that you accompany it with the complete corresponding machine readable source code which must be distributed under the terms of Sections 1 and 2 above on a medium customarily used for software interchange If distribution of object code is made by offering access to copy from a designated place then offering equivalent access to copy the...

Page 81: ...following the terms and conditions either of that version or of any later version published by the Free Software Foundation If the Library does not specify a license version number you may choose any version ever published by the Free Software Foundation 14 If you wish to incorporate parts of the Library into other free programs whose distribution conditions are incompatible with these write to th...

Page 82: ...tial Developer Grant The Initial Developer hereby grants You a world wide royalty free non exclusive license subject to third party intellectual property claims a under intellectual property rights other than patent or trademark Licensable by InitialDevelopertouse reproduce modify display perform sublicenseanddistribute the Original Code or portions thereof with or without Modifications and or as ...

Page 83: ...ossible and b describe the limitations and the code they affect Such description must be included in the LEGAL file described in Section 3 4 and must be included with all distributions of the Source Code Except to the extent prohibited by statute or regulation such description must be sufficiently detailed for a recipient of ordinary skill to be able to understand it 5 Application of this License ...

Page 84: ...T WARRANTY OF ANY KIND either express or implied See the License for the specific language governing rights and limitations under the License The Original Code is ______________________________________ The Initial Developer of the Original Code is ________________________ Portions created by ______________________ are Copyright C ______ _______________________ All Rights Reserved Contributor s ___...

Page 85: ...OF THE AUTHORS OR COPYRIGHT HOLDERS BE LIABLE FOR ANY DAMAGES CAUSED BY THE USE OR THE INABILITY TO USE OF THE FREETYPE PROJECT 2 Redistribution This license grants a worldwide royalty free perpetual and irrevocable right and license to use execute perform compile display copy create derivative works of distribute and sublicense the FreeType Project in both source and object code forms and derivat...

Page 86: ...ENSE ISSUES The OpenSSL toolkit stays under a dual license i e both the conditions of the OpenSSL License and the original SSLeay license apply to the toolkit See below for the actual license texts Actually both licenses are BSD style Open Source licenses In case of any license issues related to OpenSSL please contact openssl core openssl org OpenSSL License Copyright c 1998 2008 The OpenSSL Proje...

Page 87: ...ay be modifi ed altered or added to and in particular the designs of glyphs or characters in the Fonts may be modifi ed and additional glyphs or characters may be added to the Fonts only if the fonts are renamed to names not containing either the words Bitstream or the word Vera This License becomes null and void to the extent applicable to Fonts or Font Software that has been modifi ed and is dis...

Page 88: ......

Reviews: