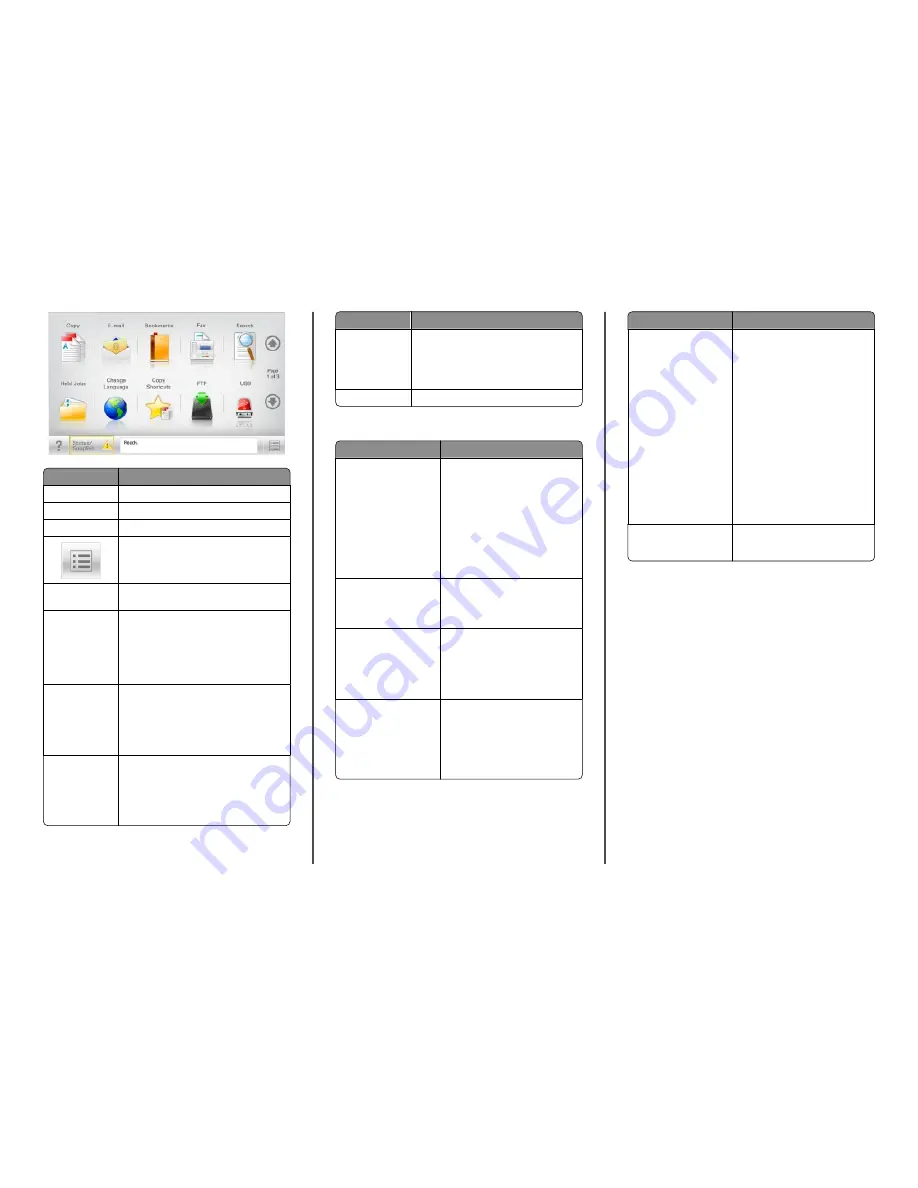
Lexmark XS795dte Quick Reference Download Page 2

Touch

To

Copy

Access the Copy menus and make copies.

E-mail

Access the E-mail menus and send e

mails.

Fax

Access the Fax menus and send fax.

Access the printer menus.
Note: These menus are available only when 

the printer is in the 

Ready

 state.

FTP

Access the File Transfer Protocol (FTP) menus 

and scan documents directly to an FTP server.

Status message 

bar

Show the current printer status such as 

Ready

 or 

Busy

.

Show printer conditions such as 

Toner 

Low

 or 

Cartridge Low

.

Show intervention messages so the printer 

can continue processing.

Status/Supplies

Display a warning or error message 

whenever the printer requires intervention 

to continue processing.

Access the messages screen for more 

information on the message, and how to 

clear it.

USB or USB 

Thumbdrive

View, select, print, scan, or e

mail photos and 

documents from a flash drive.
Note: This button appears only when you 

return to the home screen while a memory 

card or flash drive is connected to the 

printer.

Touch

To

Bookmarks

Create, organize, and save a set of bookmarks 

(URL) into a tree view of folders and file links.
Note: The tree view supports only 

bookmarks created from this function, and 

not from any other application.

Held Jobs

Display all current held jobs.

Other buttons that may appear on the home screen:

Touch

To

Search held jobs

Search on any of the following items:

User name for held or confidential 

print jobs

Job names for held jobs, 

excluding confidential print jobs

Profile names

Bookmark container or print job 

names

USB container or print job names 

for supported file types

Release Held Fax

Access the list of held faxes.
Note: This button appears only when 

there are held faxes with a 

scheduled hold time previously set.

Lock Device

Open a password entry screen. Enter 

the correct password to lock the 

printer control panel.
Note: This button appears only when 

the printer is unlocked and password 

has been set.

Unlock Device

Open a password entry screen. Enter 

the correct password to unlock the 

printer control panel.
Note: This button appears only when 

the printer is locked. The printer 

control panel buttons and shortcuts 

cannot be used while this appears.

Touch

To

Cancel Jobs

Open the Cancel Jobs screen. The 

Cancel Jobs screen shows three 

headings: Print, Fax, and Network.
The following options are available 

under the Print, Fax, and Network 

headings:

Print job

Copy job

Fax profile

FTP

E-mail send

Each heading has a list of jobs shown 

in a column under it which can show 

only three jobs per screen. If more 

than three jobs exist in a column, then 

an arrow appears enabling you to 

scroll through the jobs.

Change Language

Launch the Change Language pop

up 

window that allows you to change the 

primary language of the printer.

Using the touch-screen buttons

Note: Your home screen, icons, and buttons may vary 

depending on your home screen customization settings and 

administrative setup.

Learning about the printer

2

Summary of Contents for XS795dte

Page 1: ...utton is blinking amber in pulsing pattern 4 Keypad Lets you enter numbers letters or symbols on the display 5 Submit Lets you submit changes made in the printer settings 6 Stop Cancel Stops all print...

Page 2: ...or held or confidential print jobs Job names for held jobs excluding confidential print jobs Profile names Bookmark container or print job names USB container or print job names for supported file typ...

Page 3: ...menu Touch any of the underlined words to return to that menu Number of Copies is not underlined since this is the current screen If you touch an underlined word on the Number of Copies screen before...

Page 4: ...n that came with your operating system 1 Open a Web browser and then type the printer IP address in the address field Note View the printer IP address on the printer control panel home screen The IP a...

Page 5: ...r click Applications Remote Operator Panel Launch VNC Applet Exporting and importing a configuration using the Embedded Web Server You can export configuration settings into a text file that can then...

Page 6: ...re loading 3 Squeeze and then slide the length guide to the correct position for the paper size you are loading Note The length guide has a locking device To unlock push the button on top of the lengt...

Page 7: ...of equipment instability load each paper drawer or tray separately Keep all other drawers or trays closed until needed 1 Pull the tray out 2 Adjust the width guide as necessary 3 Flex the sheets back...

Page 8: ...ccepts paper or specialty media within the following dimensions Width 89 mm 3 5 in to 229 mm 9 02 in Length 127 mm 5 in to 1270 mm 50 in Note Maximum width and length can be applied only to short edge...

Page 9: ...ys using other paper sizes can be linked manually using the Paper Size menu available from the Paper Size Type menu Note To link the multipurpose feeder Configure MP must be set to Cassette in the Pap...

Page 10: ...File Print If necessary click the disclosure triangle to see more options 2 From the Print dialog and pop up menus adjust the settings as needed Note To print on a specific paper type adjust the pape...

Page 11: ...From the printer control panel touch Cancel Job or press on the keypad 2 Touch the print job you want to cancel and then touch Delete Selected Jobs Note If you press on the keypad then touch Resume to...

Page 12: ...the IP address in the TCP IP section 2 Click Settings 3 Under Default Settings click E mail FTP Settings 4 Click E mail Settings Setup E mail Server 5 Fill in the fields with the appropriate informat...

Page 13: ...Cancel Job while Scanning appears When using the scanner glass touch Cancel Job while Scanning appears or while Scan the Next Page Finish the Job appears Faxing Sending a fax Sending a fax using the...

Page 14: ...ument faceup short edge first into the ADF or facedown on the scanner glass Note Do not load postcards photos small items transparencies photo paper or thin media such as magazine clippings into the A...

Page 15: ...aper guides 3 Insert the flash drive into the USB port on the front of the printer The USB Drive home screen appears 4 Select the destination folder and then touch Scan to USB drive 5 Adjust the scan...

Page 16: ...he side door of the printer CAUTION HOT SURFACE The inside of the printer might be hot To reduce the risk of injury from a hot component allow the surface to cool before touching 2 Slide the latch to...

Page 17: ...ides 4 From the printer control panel touch Continue jam cleared 280 289 paper jams 1 Remove all original documents from the ADF 2 Open the ADF cover 3 Grasp the jammed paper on each side and then gen...

Page 18: ...fragments are removed 3 Close the finisher door 4 Slide the finisher back until it clicks in place 5 From the printer control panel touch Continue jam cleared 455 staple jam 1 Press the latch to open...

Page 19: ...staple cartridge holder firmly back into the stapler unit until the staple cartridge holder clicks into place 7 Close the stapler door 8 From the printer control panel touch Continue jam cleared Clear...

Reviews: