


A shortcut number was automatically assigned when you
clicked Submit. You can use this shortcut number when you
are ready to scan your documents.
a
Load an original document faceup, short edge first into the
ADF or facedown on the scanner glass.
Note: Do not load postcards, photos, small items,
transparencies, photo paper, or thin media (such as
magazine clippings) into the ADF. Place these items on
the scanner glass.
b
If you are loading a document into the ADF, then adjust the
paper guides.
c
Press
, and then enter the shortcut number using the
keypad, or touch Held Jobs on the home screen, and then
touch Profiles.
d
After entering the shortcut number, the scanner scans and
sends the document to the directory or program you
specified. If you touched Profiles on the home screen, then
locate your shortcut on the list.
8
Return to the computer to view the file.
The output file is saved in the location or launched in the
program you specified.
Scanning to a flash drive
1
Load an original document faceup, short edge first into the
ADF or facedown on the scanner glass.
Note: Do not load postcards, photos, small items,
transparencies, photo paper, or thin media (such as
magazine clippings) into the ADF. Place these items on the
scanner glass.
2
If you are loading a document into the ADF, then adjust the
paper guides.
3
Insert the flash drive into the USB port on the front of the
printer.
The USB Drive home screen appears.
4
Select the destination folder, and then touch Scan to USB
drive.
5
Adjust the scan settings.
6
Touch Scan It.
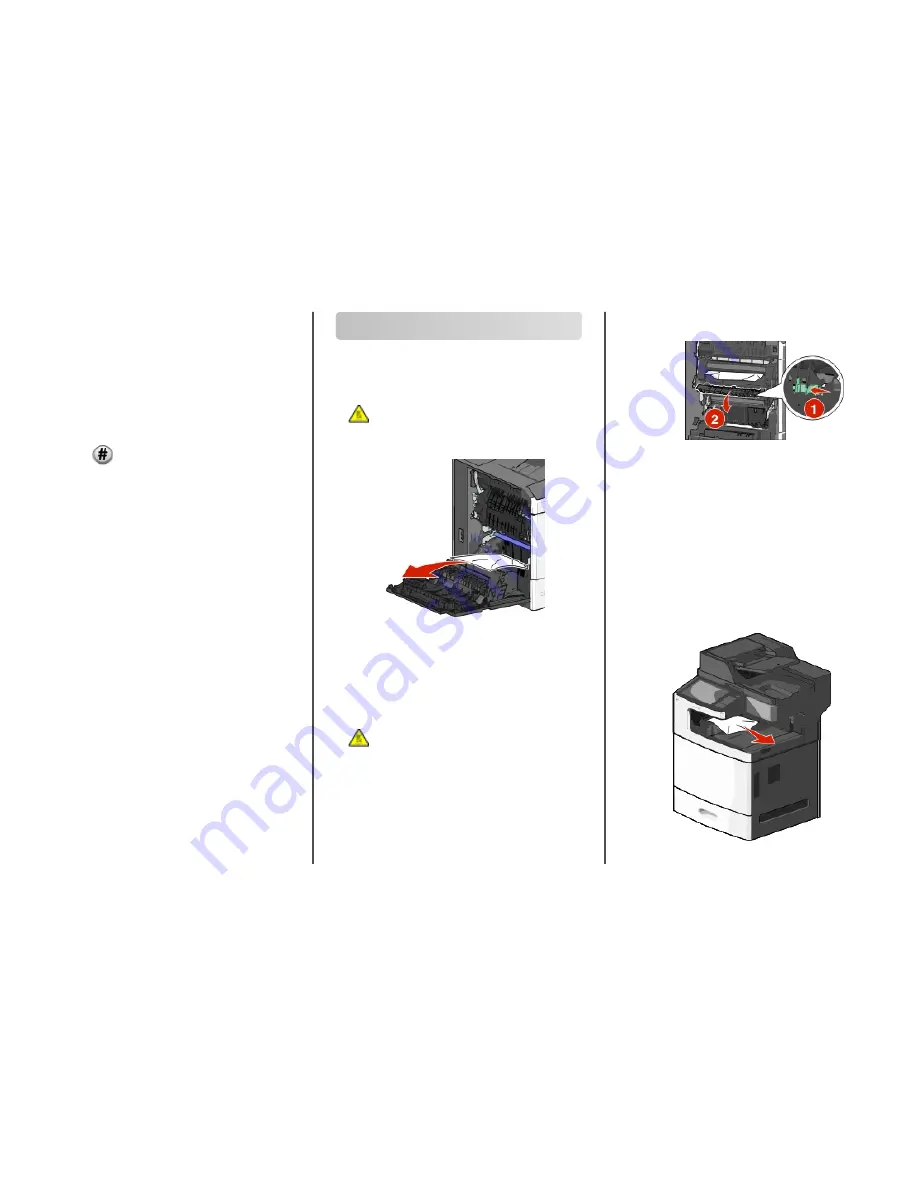
Clearing jams
200 paper jam
1
Open the side door of the printer.
CAUTION—HOT SURFACE: The inside of the printer
might be hot. To reduce the risk of injury from a hot
component, allow the surface to cool before touching.
2
Firmly grasp the jammed paper, and then gently pull it out.
Note: Make sure all paper fragments are removed.
3
Close the side door of the printer.
4
From the printer control panel, touch Continue, jam cleared.
201 paper jam
1
Open the side door of the printer.
CAUTION—HOT SURFACE: The inside of the printer
might be hot. To reduce the risk of injury from a hot
component, allow the surface to cool before touching.
2
Determine where the jam is located, and then remove it:
a
If paper is inside the fuser unit, then open the fuser access
door.
b
Firmly grasp the jammed paper on each side, and then
gently pull it out.
Warning—Potential Damage: Do not touch the center of
the fuser unit. Doing so will damage the fuser.
Note: Make sure all paper fragments are removed.
3
Close the side door of the printer.
4
From the printer control panel, touch Continue, jam cleared.
202–203 paper jams
If paper is visible in the standard exit bin, then firmly grasp the
paper on each side, and then gently pull it out.
Note: Make sure all paper fragments are removed.
Clearing jams
15


