background image

Copying

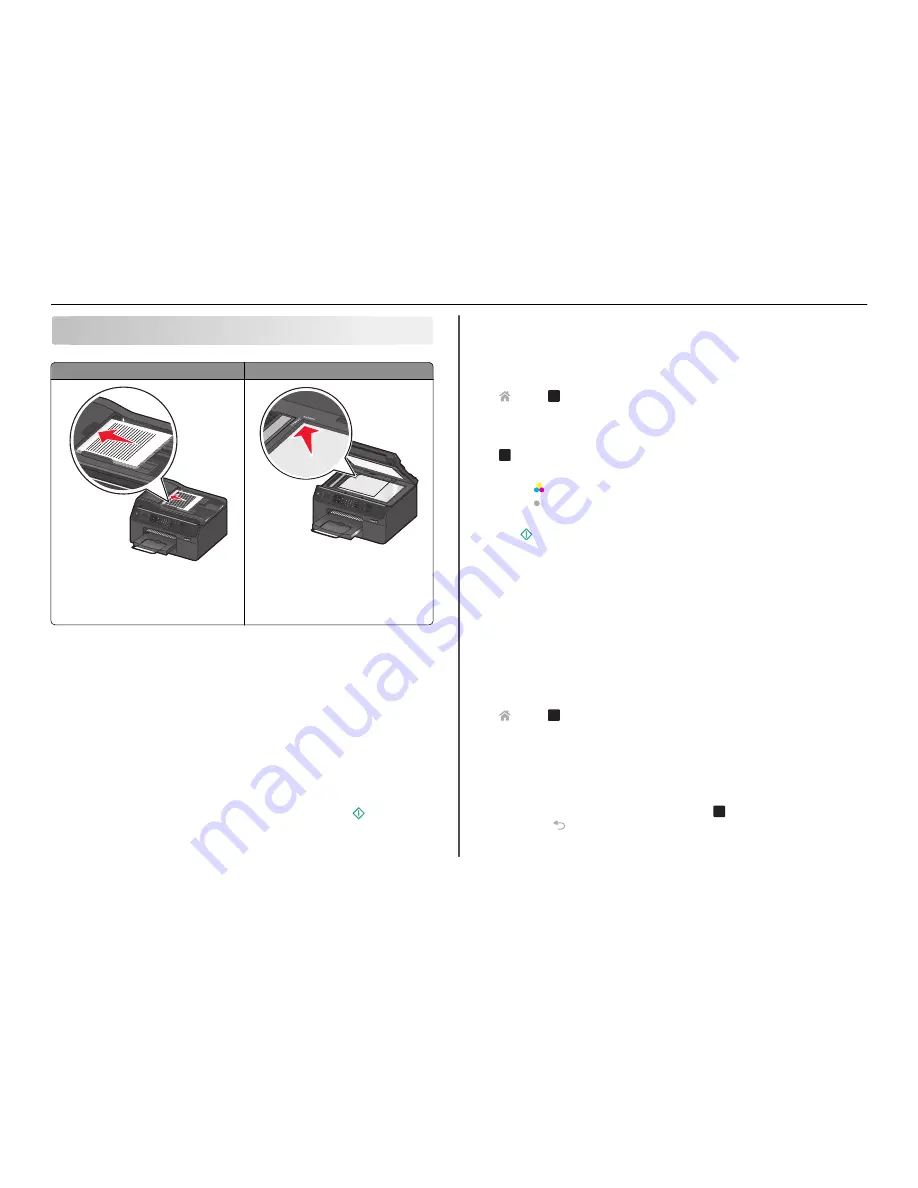
ADF

Scanner glass

Use the ADF for multiple

page documents.

Note: 

The ADF is available only in select printer

models. If you purchased a printer without an ADF,
then load original documents or photos on the
scanner glass.

Use the scanner glass for single pages, small items
(such as postcards or photos), transparencies, photo
paper, or thin media (such as magazine clippings).

Tips for copying

Make sure the exit bin is fully extended and the bin extender is flipped out.

Use the ADF when scanning two

sided pages if your printer supports duplex scanning and the ADF

supports the original document size.

Use the scanner glass when scanning two

sided pages if your printer does not support duplex scanning

or the ADF does not support the original document size.

When using the ADF, adjust the paper guides on the ADF to the width of the original document.

To easily retrieve a document after copying or scanning, lift the ADF input tray.

When using the scanner glass, close the scanner cover, if possible, to avoid dark edges on the scanned
image.

Do 

not

 load postcards, photos, small items, transparencies, photo paper, or thin media (such as

magazine clippings) into the ADF. Place these items on the scanner glass.

When the document to be copied is in place with the settings you want, press 

 to start copying.

Making copies

1

Load paper.

2

Load an original document faceup into the ADF or facedown on the scanner glass.

3

From the printer control panel, navigate to:

 > 

Copy

 > 

O K

 > 

Copies

4

Press the left or right arrow button to select the number of copies.

5

From the Copy menu screen, press the up or down arrow button to scroll to the option you want to
set, and then press the left or right arrow button to scroll to the setting you want. If necessary, press

O K

 to make a selection.

6

Select the copy mode:

Press 

 to switch to color mode.

Press 

 to switch to black

and

white mode.

When you select color or black

only printing, the light that corresponds to your choice comes on.

7

Press 

.

Note: 

The selected copy settings are reset to the factory default after two minutes of printer inactivity.

Making a duplex (two

sided) copy automatically

The automatic duplex unit supports A4-, A5-, letter-, legal-, statement-, and executive-size paper. If you
need to make two

sided copies using other paper sizes, then see the instructions for making a two

sided

copy manually.

Note: 

You cannot make two

sided copies on envelopes, card stock, or photo paper.

1

Load paper.

2

Load the original document faceup into the ADF or facedown on the scanner glass.

3

From the printer control panel, navigate to:

 > 

Copy

 > 

O K

 > 

2

Sided Copies

4

Press the left or right arrow button to select a two

sided copying option:

If you are copying a one

sided document, then press the arrow buttons to scroll to 

1

sided to

2

sided

.

If you are copying a two-sided document and using the scanner glass, then press the arrow buttons
to scroll to 

2

sided to 2

sided

.

If you want to specify the page orientation and layout of the original document and the copy, then

press the arrow buttons to scroll to 

Advanced

. Press 

O K

 every time you make a selection, and

then press 

 until you reach the Copy menu.

Copying

27

Summary of Contents for Pro4000 Series

Page 1: ...Pro4000 Series Quick Reference Guide April 2012 www lexmark com...

Page 2: ...nsed subject to a restriction that they may be used only once After this single use the license to use the print cartridges and their contents terminates and you agree to return them only to Lexmark f...

Page 3: ...d or flash drive 25 Printing documents from a memory card or flash drive 25 Canceling print jobs 25 Printing from a mobile device 26 Copying 27 Tips for copying 27 Making copies 27 Making a duplex two...

Page 4: ...ually 45 Using the Embedded Web Server 46 Accessing the Embedded Web Server 46 Understanding the home page 46 Customizing printer settings 46 Using shortcuts 48 What are shortcuts 48 Getting started 4...

Page 5: ...in a minimum power standby mode after the printer has been idle for a set amount of time the Sleep timeout Reducethescreen brightness Dimtheprinterdisplay tolowerthepowerconsumptionofyourprinter Share...

Page 6: ...s modem speed Other fax features include 99 speed dials automatic redial junk fax blocking and caller ID Photo printing Print high quality long lasting photos directly from digital memory cards PictBr...

Page 7: ...e then see Installation screen did not appear during installation on page 50 Download the printer driver from www lexmark com 3 Remove tape and packing material from all areas of the printer 4 If nece...

Page 8: ...ad paper with the printable side facedown 9 Adjust the paper guides to rest against the left right and bottom edges of the paper Note Make sure the paper is below the maximum fill line located on the...

Page 9: ...near the product and easily accessible 12 Make sure the printer is on Note It may take a while before the first screen appears on the printer control panel 13 Using the printer control panel press th...

Page 10: ...me Zone Time Zone Please choose a time zone and press OK UTC 05 00 Eastern Time USA Ca UTC 06 00 Central Time USA Ca UTC 07 00 Mountain Time USA C Note This step appears only in some countries 19 To c...

Page 11: ...e email Get my printer ready to send and receive faxes What will I be missing if I don t do this now How can I do this later Lexmark Pro4000 Series Installation Lexmark Pro4000 Series Installation Get...

Page 12: ...ecycle the alignment page Understanding the parts of the printer Use the To 1 Automatic Document Feeder ADF Scan copy or fax multiple page documents Access ADF paper jams 2 ADF input tray Load origina...

Page 13: ...anner glass Scan copy or fax photos and documents 14 Power supply with port Connect the printer to the power cord 15 Duplex unit Print on both sides of a sheet of paper Access paper jams Use the To 16...

Page 14: ...ter fax numbers Operate an automated answering system Select letters when creating a Speed Dial list Type numbers to enter or edit the date and time shown on the display Use To 6 Back Return to the pr...

Page 15: ...drives Supported memory cards and file types Memory card File type Secure Digital SD Secure Digital High Capacity SDHC Micro Secure Digital with adapter Micro SD Mini Secure Digital with adapter Mini...

Page 16: ...card is being accessed Notes The flash drive uses the same port that is used for a PictBridge camera cable An adapter may be necessary if your flash drive does not fit directly into the port Warning...

Page 17: ...ink order high yield ink cartridges Depending on your country or region you may get the ink cartridges individually or in packs You can order a mix of standard ink cartridges and high yield ink cartri...

Page 18: ...d nozzles If you have not been using the printer for a long period then you may need to clean the printhead nozzles to improve thequality of your prints Keep your printer plugged to a properly grounde...

Page 19: ...es in a box with the nozzles faceup Avoid severe jarring movements If available use the original packaging of the printer with the needed padding to keep the printer protected during transport Orderin...

Page 20: ...e first For Windows users 1 Close all open software programs 2 Insert the installation software CD If the installation dialog screen does not appear after a minute then launch the CD manually a Click...

Page 21: ...s online Product Update Receive automatic notifications of updates to your printer software when new updates are available Use the To Printing Preferences WhenyouclickFile Print Propertieswithadocumen...

Page 22: ...inter folder 1 From the Finder navigate to Applications select your printer folder Web Links 2 Double click the Web link that you want to visit Use To Customer Support Contact customer support Lexmark...

Page 23: ...business cards iron on transfers window clings and other specialty print jobs Paper and specialty media One sided or two sided printing Recommended paper Set paper type to Photo One sided Lexmark Per...

Page 24: ...lor Black to use four inks including black Color Only to use cyan magenta and yellow inks 6 Click OK to close any printer software dialogs 7 Click OK or Print For Macintosh users 1 With a document ope...

Page 25: ...print all photos selected photos by photo range and print photos using predefined photo size templates 4 To adjust the print settings press the up or down arrow button to scroll to the option you want...

Page 26: ...r mobile device Depending on your Lexmark printer model you may need to download the LexPrint Listener application from our Web site at www lexmark com lexprint Supported printers LexPrint enables you...

Page 27: ...pies 4 Press the left or right arrow button to select the number of copies 5 From the Copy menu screen press the up or down arrow button to scroll to the option you want to set and then press the left...

Page 28: ...n For short edged binding pages are bound along the short edge of the page top edge for portrait orientation and left edge for landscape orientation 5 Press and then follow the instructions on the pri...

Page 29: ...ted Computer OK The USB connected computer will receive the scan by default Note Make sure the scan software is installed on the destination computer 3 Press the up or down arrow button to scroll to t...

Page 30: ...Home select your printer Scan 5 Select Email photo Email document or Email PDF Note You can select Email document only if an OCR application is stored on your computer Scanning starts and the scan pro...

Page 31: ...ld of the Help menu 4 Adjust the scan settings as needed If applicable click on the preview dialog for more information 5 Set the application that supports the PDF format as the scan destination and t...

Page 32: ...ss when scanning two sidedpages if yourprinter does not support duplex scanning or the ADF does not support the original document size When using the ADF adjust the paper guides on the ADF to the widt...

Page 33: ...that is applicable to your telephone service Scenario 1 Standard telephone line Setup 1 Printer is connected to a dedicated fax line To connect Connect the cable from the wall jack to the port of the...

Page 34: ...hone company then make sure that you set the correct ring pattern for the printer Otherwise the printer will not receive faxes even if you have set it to receive faxes automatically Setup 3 Printer is...

Page 35: ...ternet access To minimize interference between the two channels and ensure a quality connection you need to install a DSL filter for the analog devices fax machine telephone answering machine in your...

Page 36: ...inter and telephone into the splitter Make sure you use a phone splitter not a line splitter To make sure that you are using the correct splitter plug an analog telephone into the splitter and then li...

Page 37: ...our devices into the cable modem Your cable telephone service comes from the wall jacks To connect 1 Connect the cable from the wall jack to the port of the printer 2 Remove the protective plug from t...

Page 38: ...e wrap plug from the port of the printer The printer may not come with an RJ 11 adapter in your country or region If the additional device telephone or answering machine has an RJ 11 connector then yo...

Page 39: ...It is necessary for the proper functioning of the devices on the telephone line EXT LINE To connect Connect the cable from the wall jack to the port of the printer Connecting the printer to a wall ja...

Page 40: ...our name or your company name your fax number your fax number is your telephone number unless you have a dedicated fax telephone line and the time and date on your fax machine when a transmission is m...

Page 41: ...onnected to a dedicated fax line then you can choose any number of rings that you want 1 From the printer control panel navigate to Setup OK Fax Setup OK Ringing and Answering OK Pick Up On OK 2 Selec...

Page 42: ...or Black button to select a color or black and white fax 5 Press to start the fax job Warning Potential Damage Do not touch the cables or the and ports while actively sending a fax Tip You can send a...

Page 43: ...nal on the line and takes over the call If the printer is on a dedicated fax line then you may set the printer to pick up on any number of rings If you have multiple numbers on a single line or if you...

Page 44: ...ireless network where you want to set up the printer You know the network name SSID and the WEP key or WPA WPA2 preshared key passphrase of the wireless network you want to connect to For Windows user...

Page 45: ...onon the wireless router Waitforthe printercontrolpaneltodisplay amessagetobeginWPSconfiguration Theremightbeashortdelaybeforethemessageappears Ifnothing happens after 30 seconds then do one of the fo...

Page 46: ...n Note The search fields may not appear in the Embedded Web Server depending on your printer model 3 Information pane View specific information and access submenu items depending on the menu selected...

Page 47: ...ing on your printer model Manage Profiles View the IP address of a profile or delete it Note This feature may not appear in the Embedded Web Server depending on your printer model Address Book Setup A...

Page 48: ...or wireless network Example A lawyer who uses his printer to send e mails to clients normally navigates through the printer control panel to select the feature and its available options Instead of do...

Page 49: ...r Make sure you have created a shortcut From the printer control panel navigate to Shortcuts OK select a shortcut OK or enter the shortcut number OK Note If you configured the shortcut to show the set...

Page 50: ...uments from the print queue on page 52 Cannot print through USB on page 52 Installation screen did not appear during installation If the Before you troubleshoot checklist does not solve the problem th...

Page 51: ...ote This solution applies to Macintosh users only 1 With a document open choose File Print 2 From the printer pop up menu choose your printer and then click Print If your printer does not appear on th...

Page 52: ...re the printer is not in Sleep mode Press and hold for three seconds to turn off the printer 2 Unplug the power cord from the wall outlet and then pull out the power cord from the power supply 3 After...

Page 53: ...of the following MAKE SURE THAT YOU HAVE REGISTERED YOUR USER INFORMATION IN THE PRINTER Ifyoudid not enteryouruserinformation duringinitialsetup thenenteryourfaxnameandfaxnumber In some countries yo...

Page 54: ...E THAT THE PRINTER MEMORY IS NOT FULL The printer saves an incoming fax to the printer memory before it prints the fax If the printer runs out of ink or runs out of paper while receiving the fax then...

Page 55: ...e printer is located away from obstacles or electronic devices that could interfere with the wireless signal Make sure the printer and access point are not separated by poles walls or support columns...

Page 56: ...sely to these devices MOVE THE COMPUTER PRINTER OR BOTH CLOSER TO THE ACCESS POINT The range of your wireless network depends on many factors including the abilities of your access point and network a...

Page 57: ...eferences Network AirPort or System Preferences Network Wi Fi b Click Advanced or Configure c Click TCP IP The Router entry is typically the access point 2 Type your user name and password when prompt...

Page 58: ...working and is configured to assign IP addresses If you are not sure how to do this then refer to the manual that came with your wireless router If the printer and computer have valid IP addresses and...

Page 59: ...tworkmaskusedforothercomputersandprinters on your network Cannot print to the network printer CHECK THE ETHERNET CABLE Check the Ethernet cable and the Ethernet connectors at both ends for any obvious...

Page 60: ...ternational Inc Bldg 004 2 CSC 740 New Circle Road NW Lexington KY 40550 USA 2012 Lexmark International Inc All rights reserved GOVERNMENT END USERS The Software Program and any related documentation...

Page 61: ...SL fax setup 35 digital telephone service fax setup 36 distinctive ring setting 41 documents adding a network folder shortcut 29 faxing using the computer 42 faxing using the control panel 42 printing...

Page 62: ...rint job canceling 25 Print Settings customize printer settings using 46 print troubleshooting cannot delete documents from print queue 52 printer features 6 models 6 moving 18 setting up 6 printer co...

Page 63: ...ax software 54 cannot send faxes 53 troubleshooting network cannot print to network printer 59 printer to be configured does not appear in list of printers found on network 58 troubleshooting print ca...

Reviews: