background image

GETTING STARTED

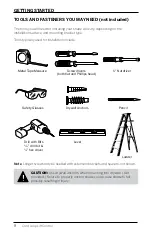
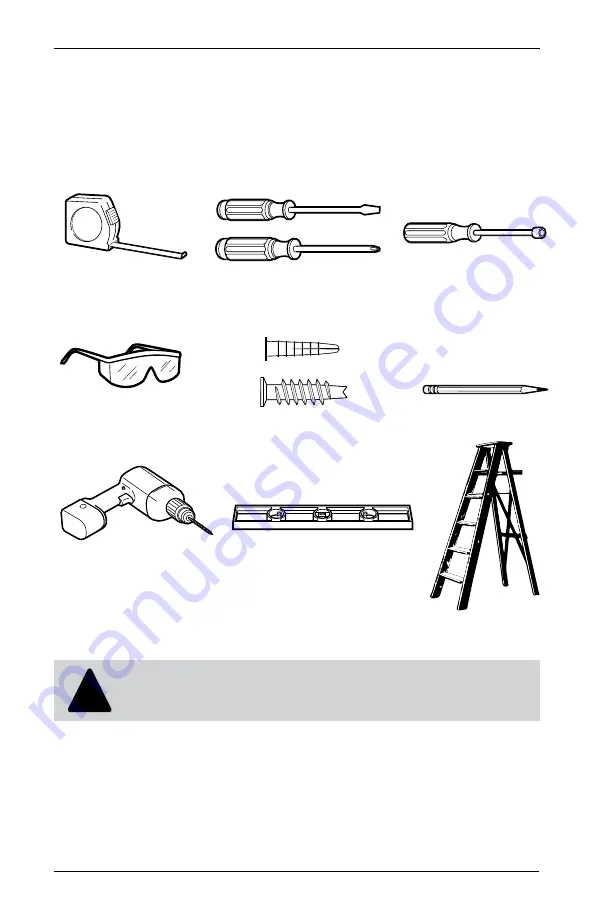
TOOLS AND FASTENERS YOU MAY NEED (not included)

The tools you will need for installing your shade will vary, depending on the 
installation surface, and mounting bracket type.

Tools typically used for installation include:

8

Cord Loop Lift Control

CAUTION: 

Use drywall anchors when mounting into drywall. (Not 

provided.) Failure to properly anchor shade could cause shade to fall 
possibly resulting in injury. 

!

Note

: Longer screws may be needed with extension brackets and spacers, not shown.

Metal Tape Measure

Safety Glasses

Drill with Bits

3

32

" drill bit &

1

4

" hex driver

Ladder

Screwdrivers  

(both flat and Phillips head)

Drywall Anchors

Level

1

4

" Nutdriver

Pencil

Summary of Contents for Corded Lift Control

Page 1: ...Natural Shades Persianas natural INSTALLATION OPERATION CARE INSTALACI N MANEJO CUIDADO Corded Lift Control Control de elevaci n con cuerda...

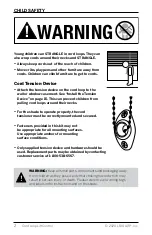
Page 2: ...rds Children can climb furniture to get to cords Always wrap the cords around the cleats in a figure eight up high out of reach of children See additional child and cord safety messaging on page 15 WA...

Page 3: ...7 Tools and Fasteners You May Need 8 Installation Inside Mount 9 11 Outside Mount 12 14 Installing Additional Components Installing Cord Cleat 15 Valance Returns 16 Hold Down Brackets 17 Extension Bra...

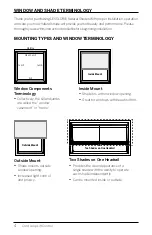
Page 4: ...ning Great for windows with beautiful trim Window Components Terminology Collectively the sill and jambs are called the window casement or frame Two Shades on One Headrail Provides the clean appearanc...

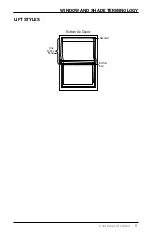
Page 5: ...WINDOW AND SHADE TERMINOLOGY 5 Bottom Up Shade Bottom Rail Headrail One Fabric Panel Headrail Top Down Bottom Up Shade Middle Rail Bottom Rail One Fabric Panel LIFT STYLES Corded Lift Control...

Page 6: ...ts Your order will include the correct number of installation brackets for your shade width as shown in the table below Shade orders may also include spacer blocks or extension brackets if they were s...

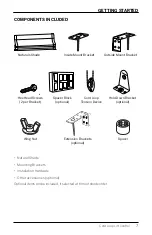
Page 7: ...ting Brackets Installation Hardware Other accessories optional Optional items will be included if selected at time of shade order Cord Cleat Naturals Shade Hex Head Screws 2 per Bracket Extension Brac...

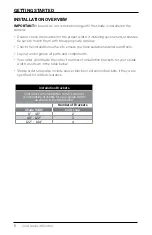
Page 8: ...ude CAUTION Use drywall anchors when mounting into drywall Not provided Failure to properly anchor shade could cause shade to fall possibly resulting in injury Note Longer screws may be needed with ex...

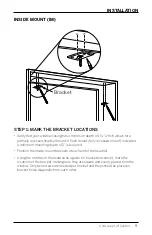
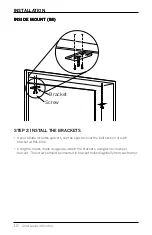
Page 9: ...minimum mounting depth of 2 is required Position the inside mount brackets at each end of the headrail Using the notches in the headrail as a guide for bracket placement mark the locations of the brac...

Page 10: ...de includes spacers slip the spacers over the bolt section of each bracket at this time Using the marks made as a guide attach the brackets using two screws per bracket The screws should be inserted i...

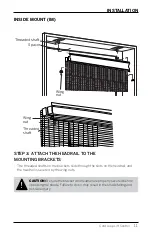
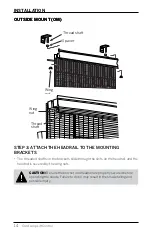
Page 11: ...the headrail and the headrail is secured by the wing nuts CAUTION Be sure the bracket and headrail are properly secured before operating the shade Failure to do so may result in the shade falling and...

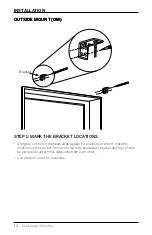
Page 12: ...ing the notches in the head rail as a guide for bracket placement mark the locations of the bracket Only two screws are needed per bracket and they should be placed in bracket holes diagonally from ea...

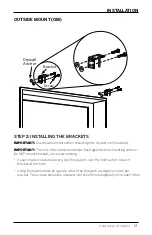
Page 13: ...ush against a flat mounting surface Do NOT mount brackets on curved molding If your shade includes spacers slip the spacers over the bolt section of each bracket at this time Using the marks made as a...

Page 14: ...ts slide through the slots on the headrail and the headrail is secured by the wing nuts CAUTION Be sure the bracket and headrail are properly secured before operating the shade Failure to do so may re...

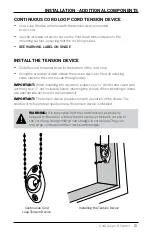
Page 15: ...igh out of reach of children Young children can STRANGLE in cords They can also wrap around their neck and STRANGLE INSTALL THE CORD CLEAT OR CORD GUIDE Using the included screws attach the optional c...

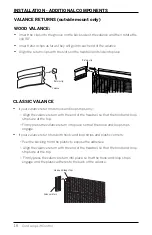
Page 16: ...e headrail so that the hook and loop strips are at the top Firmly press the valance return into place so that the hook and loop strips engage and the plastic adheres to the back of the valance Return...

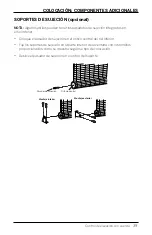
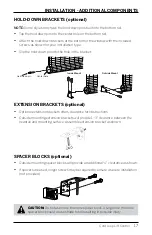
Page 17: ...own pins built into the bottom rail Tap the hold down pin into the center hole on the bottom rail Attach the hold down brackets at the bottom of the window with the included screws as shown for your i...

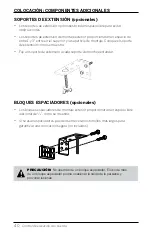
Page 18: ...between the headrail and mounting surface Assemble extension bracket as shown CAUTION Do not use more than one spacer block Using more than one spacer block could cause shade to fall resulting in poss...

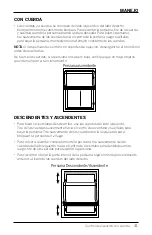
Page 19: ...the cord if the shade does not raise or lower check for objects preventing proper operation TOP DOWN BOTTOM UP To lower your shade from the top use the left hand cords Pull the cords gently toward the...

Page 20: ...ural products By nature no two strands of grass bamboo or reeds are exactly the same making every shade truly unique Slight color grain and texture variations should be expected and cherished for thei...

Page 21: ...rding any questions or concerns you may have about your new shades you may reach us at 1 800 LEVOLOR 8 30 am 6 30 pm EST www LEVOLOR com ADDITIONAL PARTS AND SERVICES Additional or replacement parts c...

Page 22: ......

Page 23: ...Persianas natural INSTALACI N MANEJO CUIDADO Control de elevaci n con cuerda...

Page 24: ...te siempre las cuerdas alrededor de las abrazaderas en forma de ocho en alto fuera del alcance de los ni os Consulte los mensajes de seguridad adicionales para ni os y cuerdas en la p gina 37 ADVERTEN...

Page 25: ...necesitar 30 Colocaci n Montaje interior 31 33 Montaje exterior 34 36 C mo colocar componentes adicionales C mo colocar la abrazadera de la cuerda 37 Recodos de cenefa 38 Soportes de sujeci n 39 Sopor...

Page 26: ...as elegantes Terminolog a de los componentes de una ventana En su conjunto el umbral y las jambas se denominan el marco Dos persianas sobre un riel superior Brinda la apariencia n tida de una sola per...

Page 27: ...Y PERSIANAS Persiana ascendente Riel superior Riel inferior Riel inferior Panel de una tela Riel superiorr Riel central Panel de una tela Persiana Descendente Ascendente ESTILOS DE ELEVACI N 27 Contro...

Page 28: ...os Su pedido incluir la cantidad correcta de soportes de colocaci n para el ancho de su persiana como se muestra en la siguiente tabla Es posible que los pedidos de persianas incluyan separadores o so...

Page 29: ...si se seleccionaron en el momento de realizar la compra de la persiana Abrazadera de la cuerda Tornillos de cabeza hexagonal 2 por soporte 29 Control de elevaci n con cuerda Soporte de montaje interio...

Page 30: ...e que sea necesario contar con tornillos m s largos con soportes de extensi n y separadores no se muestra Cinta m trica met lica Gafas de seguridad Taladro con brocas Destornilladores tanto de cabeza...

Page 31: ...una profundidad m nima de montaje de 2 Coloque los soportes de montaje interior en cada extremo del riel superior Use las muescas en el riel superior como gu a para ubicar el soporte y luego marque la...

Page 32: ...elos sobre la secci n del pasador de cada soporte en este momento Use las marcas como gu a para fijar los soportes use dos tornillos por soporte Los tornillos se deben insertar en los orificios de los...

Page 33: ...se fija con las tuercas mariposa PRECAUCI N Aseg rese de que el soporte y el riel superior est n correctamente fijados antes de poner la persiana en funcionamiento En caso contrario la persiana puede...

Page 34: ...uperior como gu a para ubicar el soporte marque la ubicaci n de los soportes Solo se necesitan dos tornillos por soporte y se deben colocar en los orificios de los soportes en forma diagonal respecto...

Page 35: ...a superficie de montaje plana NO coloque los soportes en molduras curvas Si la persiana incluye espaciadores desl celos sobre la secci n del pasador de cada soporte en este momento Use las marcas como...

Page 36: ...l riel superior y el riel superior se fija con las tuercas mariposa PRECAUCI N Aseg rese de que el soporte y el riel superior est n correctamente fijados antes de poner la persiana en funcionamiento E...

Page 37: ...do de la cuerda de tracci n como se muestra El excedente de cuerda se puede envolver alrededor de la abrazadera cuando la persiana est elevada ADVERTENCIA Ate siempre las cuerdas alrededor de las abra...

Page 38: ...las tiras de velcro queden en la parte superior Presione firmemente el recodo de la cenefa en su lugar para unir las tiras de velcro y lograr que el pl stico se adhiera a la parte posterior de la cen...

Page 39: ...pasador de sujeci n en el orifico central del riel inferior Fije los soportes de sujeci n en la parte inferior de la ventana con los tornillos proporcionados como se muestra seg n su tipo de colocaci...

Page 40: ...como se muestra Fije un soporte de extensi n a cada soporte de montaje est ndar BLOQUES ESPACIADORES opcionales Los bloques espaciadores de montaje exterior proporcionar n un espacio libre adicional...

Page 41: ...ique que no haya objetos que interrumpan el funcionamiento DESCENDENTES Y ASCENDENTES Para bajar las persianas desde arriba use las cuerdas del lado izquierdo Tire de las cuerdas suavemente hacia el c...

Page 42: ...near n Si una hebra se desliza fuera del borde la persiana ret rela desde arriba hacia abajo de esta forma no afectar la resistencia de la persiana Variaci n del color Las persianas de fibras naturale...

Page 43: ...alguna duda o problema que pueda tener acerca de su nueva persiana ll menos al 1 800 LEVOLOR de 8 30 a m a 6 30 p m EST www LEVOLOR com PIEZAS ADICIONALES Y SERVICIOS Puede solicitar piezas adicionale...

Page 44: ...2020 LEVOLOR Inc 5775 Glenridge Drive Building A Atlanta GA 30328 1011801 19 0050 032...

Page 45: ...Natural Shades Persianas natural INSTALLATION OPERATION CARE INSTALACI N MANEJO CUIDADO Continuous Cord Loop Lift Control Control de elevaci n de circuito de cuerdas continuo...

Page 46: ...ren from pulling cord loops around their necks For the shade to operate properly the cord tensioner must be correctly mounted and secured Fasteners provided in this kit may not be appropriate for all...

Page 47: ...Tools and Fasteners You May Need 8 Installation Inside Mount 9 11 Outside Mount 12 14 Installing Additional Components Continuous Cord Loop Tension Device 15 Valance Returns 16 Hold Down Brackets 17...

Page 48: ...Great for windows with beautiful trim Window Components Terminology Collectively the sill and jambs are called the window casement or frame Two Shades on One Headrail Provides the clean appearance of...

Page 49: ...WINDOW AND SHADE TERMINOLOGY Bottom Up Shade One Fabric Panel 5 Cord Loop Lift Control LIFT STYLES Headrail Bottom Rail...

Page 50: ...eners and tools Lay out and organize all parts and components Your order will include the correct number of installation brackets for your shade width as shown in the table below Shade orders may also...

Page 51: ...l Shade Mounting Brackets Installation Hardware Other accessories optional Optional items will be included if selected at time of shade order Cord Loop Tension Device Naturals Shade Hex Head Screws 2...

Page 52: ...8 Cord Loop Lift Control CAUTION Use drywall anchors when mounting into drywall Not provided Failure to properly anchor shade could cause shade to fall possibly resulting in injury Note Longer screws...

Page 53: ...ired a minimum mounting depth of 2 is required Position the inside mount brackets at each end of the headrail Using the notches in the headrail as a guide for bracket placement mark the locations of t...

Page 54: ...ade includes spacers slip the spacers over the bolt section of each bracket at this time Using the marks made as a guide attach the brackets using two screws per bracket The screws should be inserted...

Page 55: ...headrail and the headrail is secured by the wing nuts CAUTION Be sure the bracket and headrail are properly secured before operating the shade Failure to do so may result in the shade falling and poss...

Page 56: ...s in the headrail as a guide for bracket placement mark the locations of the bracket Only two screws are needed per bracket and they should be placed in bracket holes diagonally from each other Use a...

Page 57: ...he brackets must be flush against a flat mounting surface Do NOT mount brackets on curved molding If your shade includes spacers slip the spacers over the bolt section of each bracket at this time Usi...

Page 58: ...ough the slots on the headrail and the headrail is secured by the wing nuts CAUTION Be sure the bracket and headrail are properly secured before operating the shade Failure to do so may result in the...

Page 59: ...for the cord to slide through easily IMPORTANT When installing into drywall or plaster use 3 16 drill bit and insert wall anchors size 1 2 not included before inserting the screws When installing in m...

Page 60: ...ook and loop strips are at the top Firmly press the valance return into place so that the hook and loop strips engage and the plastic adheres to the back of the valance Return clip Valance Return clip...

Page 61: ...r block Using more than one spacer block could cause shade to fall resulting in possible injury EXTENSION BRACKETS optional Optional extension brackets offers clearance for obstructions Outside mounti...

Page 62: ...DURES Keep your Natural shades looking their best by periodically vacuuming them with a brush attachment Do not use water solvents or abrasive solutions to clean the shade Improper cleaning may damage...

Page 63: ...or reeds are exactly the same making every shade truly unique Slight color grain and texture variations should be expected and cherished for their unique beauty Although we maintain strict standards t...

Page 64: ......

Page 65: ...Persianas natural INSTALACI N MANEJO CUIDADO Control de elevaci n de circuito de cuerdas continuo...

Page 66: ...l tensor de la cuerda debe estar correctamente colocado y fijado Los elementos de fijaci n suministrados con este equipo podr an no ser apropiados para todas las superficies de colocaci n Use los taqu...

Page 67: ...Colocaci n Montaje interior 29 31 Montaje exterior 32 34 C mo colocar componentes adicionales Dispositivo de tensi n de circuito de cuerdas continuo 35 Recodos de cenefa 36 Soportes de sujeci n 37 Sop...

Page 68: ...la ventana Ideal para ventanas con molduras elegantes Terminolog a de los compo nentes de una ventana En su conjunto el umbral y las jambas se denominan el marco Dos persianas sobre un riel superior B...

Page 69: ...TERMINOLOG A DE VENTANAS Y PERSIANAS Persiana ascendente Riel superior Riel inferior Panel de una tela ESTILOS DE ELEVACI N Control de elevaci n del circuito continuo 25...

Page 70: ...ramientas adecuados Extienda todas las piezas y componentes y organ celos Su pedido incluir la cantidad correcta de soportes de colocaci n para el ancho de su persiana como se muestra en la siguiente...

Page 71: ...os opcionales si se seleccionaron en el momento de realizar la compra de la persiana Dispositivo tensor del circuito de cuerda Persiana de fibras naturales Tornillos de cabeza hexagonal 2 por soporte...

Page 72: ...n tornillos m s largos con soportes de extensi n y separadores no se muestra Llave de tuerca de1 4 Taladro con brocas Broca de3 32 y Destornillador hexagonal de1 4 Cinta m trica met lica Gafas de segu...

Page 73: ...a profundidad m nima de montaje de 2 Coloque los soportes de montaje interior en cada extremo del riel superior Use las muescas en el riel superior como gu a para ubicar el soporte y luego marque la u...

Page 74: ...obre la secci n del pasador de cada soporte en este momento Use las marcas como gu a para fijar los soportes use dos tornillos por soporte Los tornillos se deben insertar en los orificios de los sopor...

Page 75: ...ja con las tuercas mariposa PRECAUCI N Aseg rese de que el soporte y el riel superior est n correctamente fijados antes de poner la persiana en funcionamiento En caso contrario la persiana puede caers...

Page 76: ...omo gu a para ubicar el soporte y luego marque la ubicaci n de los soportes Solo se necesitan dos tornillos por soporte y se deben colocar en los orificios de los soportes en forma diagonal respecto u...

Page 77: ...rficie de montaje plana NO coloque los soportes en molduras curvas Si la persiana incluye espaciadores desl celos sobre la secci n del pasador de cada soporte en este momento Use las marcas como gu a...

Page 78: ...ras del riel superior y el riel superior se fija con las tuercas mariposa PRECAUCI N Aseg rese de que el soporte y el riel superior est n correctamente fijados antes de poner la persiana en funcionami...

Page 79: ...tornillos suministrados deje la cuerda un poco floja para que pueda deslizarse con facilidad IMPORTANTE En el caso de colocaciones sobre paneles de yeso o el yeso mismo emplee una broca de 3 16 e ins...

Page 80: ...firmemente el recodo de la cenefa en su lugar para unir las tiras de velcro Si los recodos de la cenefa tienen tiras de velcro y esquinas pl sticas siga estos pasos Despegue la parte posterior del pl...

Page 81: ...el riel superior y la superficie de montaje Coloque el soporte de extensi n como se muestra Fije un soporte de extensi n a cada soporte de montaje est ndar COLOCACI N COMPONENTES ADICIONALES BLOQUES E...

Page 82: ...eri dicamente con el accesorio de cepillo de la aspiradora No use agua solventes ni soluciones abrasivas para limpiar las persianas Una limpieza inadecuada puede da ar la persiana y anular la garant a...

Page 83: ...de color veta o textura son normales y se destacan por su belleza nica Si bien mantenemos est ndares estrictos para controlar estas variaciones no podemos garantizar una coincidencia de color exacta...

Page 84: ...2020 LEVOLOR Inc 5775 Glenridge Drive Building A Atlanta GA 30328 1011802 19 0050 033...

Page 85: ...Cordless Lift Control Control de elevaci n sin cuerda Natural Shades Persianas natural INSTALLATION OPERATION CARE INSTALACI N MANEJO CUIDADO...

Page 86: ...Valance Returns 14 Hold Down Brackets 15 Extension Brackets 15 Spacer Blocks 15 Operation Operating the Shade 16 Cleaning and Care Cleaning Procedures 16 Additional Information and Support Warranty 17...

Page 87: ...its within window opening Great for windows with beautiful trim Window Components Terminology Collectively the sill and jambs are called the window casement or frame Two Shades on One Headrail Provide...

Page 88: ...WINDOW AND SHADE TERMINOLOGY 4 Cordless Lift Control Bottom Up Shade LIFT STYLES Bottom Rail Headrail One Fabric Panel...

Page 89: ...fasteners and tools Lay out and organize all parts and components Your order will include the correct number of installation brackets for your shade width as shown in the table below Shade orders may...

Page 90: ...stallation Hardware Other accessories optional Optional items will be included if selected at time of shade order Hex Head Screws 2 per Bracket Spacer Block optional Outside Mount Bracket Extension Br...

Page 91: ...typically used for installation include Metal Tape Measure Safety Glasses Drill with Bits Ladder Screwdrivers both flat and Phillips head Drywall Anchors Level 1 4 Nutdriver Pencil Note Longer Screws...

Page 92: ...ly recessed mount is desired a minimum mounting depth of 2 is required Position the inside mount brackets at each end of the headrail Using the notches in the headrail as a guide for bracket placement...

Page 93: ...ACKETS If your shade includes spacers slip the spacers over the bolt section of the bracket at this time Using the marks made as a guide attach the brackets using two screws per bracket The screws sho...

Page 94: ...through the slots on the headrail and the headrail is secured by the wing nuts CAUTION Be sure the bracket and headrail are properly secured before operating the shade Failure to do so may result in...

Page 95: ...BRACKET LOCATIONS Using the notches in the headrail as a guide for bracket placement mark the locations of the brackets Only two screws are needed per bracket and they should be placed in bracket hole...

Page 96: ...brackets must be flush against a flat mounting surface Do NOT mount brackets on curved molding If your shade includes spacers slip the spacers over the bolt section of the bracket at this time Using...

Page 97: ...lide through the slots on the headrail and the headrail is secured by the wing nuts CAUTION Be sure the bracket and headrail are properly secured before operating the shade Failure to do so may result...

Page 98: ...e headrail so that the hook and loop strips are at the top Firmly press the valance return into place so that the hook and loop strips engage and the plastic adheres to the back of the valance VALANCE...

Page 99: ...k Using more than one spacer block could cause shade to fall resulting in possible injury EXTENSION BRACKETS optional Optional extension brackets offers clearance for obstructions Outside mounting ext...

Page 100: ...ave hold down brackets unhook the bottom rail before raising CLEANING PROCEDURES Keep your Natural shades looking their best by periodically vacuuming them with a brush attachment Do not use water sol...

Page 101: ...o strands of grass bamboo or reeds are exactly the same making every shade truly unique Slight color grain and texture variations should be expected and cherished for their unique beauty Although we m...

Page 102: ......

Page 103: ...Control de elevaci n sin cuerda Persianas natural INSTALACI N MANEJO CUIDADO...

Page 104: ...Soportes de Sujeci n 33 Soportes de Extensi n 33 Bloques Espaciadores 33 Manejo C mo manejar la persiana 34 Limpieza y Cuidado Procedimientos de Limpieza 34 Informaci n adicional y asistencia Garant...

Page 105: ...ntes Terminolog a de los componentes de una ventana En su conjunto el umbral y las jambas se llaman batiente de la ventana o marco Dos persianas sobre un riel superior Brinda la apariencia n tida de u...

Page 106: ...TERMINOLOG A DE VENTANAS Y PERSIANAS Persiana ascendente Panel de una tela ESTILOS DE ELEVACI N 22 Control de elevaci n sin cuerdas Riel superior Riel inferior...

Page 107: ...ezas y componentes y organ celos Su pedido incluir la cantidad correcta de soportes de colocaci n para el ancho de su persiana como se muestra en la siguiente tabla Es posible que los pedidos de persi...

Page 108: ...cionales si se seleccionaron en el momento de realizar la compra de la persiana Tornillos de cabeza hexagonal 2 por soporte Bloque espaciador opcionales Soporte de montaje exterior Soportes de extensi...

Page 109: ...que sea necesario contar con tornillos m s largos con soportes de extensi n y separadores no se muestra PRECAUCI N Use taquetes para paneles de yeso cuando el sistema se coloque sobre este material N...

Page 110: ...profundidad m nima de montaje de 2 Coloque los soportes de montaje interior en cada extremo del riel superior Use las muescas en el riel superior como gu a para ubicar el soporte y luego marque la ub...

Page 111: ...celos sobre la secci n del pasador del soporte en este momento Use las marcas como gu a para fijar los soportes use dos tornillos por soporte Los tornillos se deben insertar en los orificios de los so...

Page 112: ...se fija con las tuercas mariposa PRECAUCI N Aseg rese de que el soporte y el riel superior est n correctamente fijados antes de poner la persiana en funcionamiento En caso contrario la persiana puede...

Page 113: ...ior como gu a para ubicar el soporte y luego marque la ubicaci n de los soportes Solo se necesitan dos tornillos por soporte y se deben colocar en los orificios de los soportes en forma diagonal respe...

Page 114: ...na superficie de montaje plana NO coloque los soportes en molduras curvas Si la persiana incluye espaciadores desl celos sobre la secci n del pasador del soporte en este momento Use las marcas como gu...

Page 115: ...se fija con las tuercas mariposa PRECAUCI N Aseg rese de que el soporte y el riel superior est n correctamente fijados antes de poner la persiana en funcionamiento En caso contrario la persiana puede...

Page 116: ...sione firmemente el recodo de la cenefa en su lugar para unir las tiras de velcro Si los recodos de la cenefa tienen tiras de velcro y esquinas pl sticas siga estos pasos Despegue la parte posterior d...

Page 117: ...nsi n de montaje exterior proporcionar n un espacio de entre 1 y 3 entre el riel superior y la superficie de montaje Coloque el soporte de extensi n como se muestra BLOQUES ESPACIADORES opcionales Los...

Page 118: ...ior antes de levantarlas PROCEDIMIENTOS DE LIMPIEZA Para lograr que sus persianas de fibras naturales luzcan lo mejor posible l mpielas peri dicamente con el accesorio de cepillo de la aspiradora No u...

Page 119: ...leves de color veta o textura son normales y se destacan por su belleza nica Si bien mantenemos est ndares estrictos para controlar estas variaciones no podemos garantizar una coincidencia de color ex...

Page 120: ...2020 LEVOLOR Inc 5775 Glenridge Drive Building A Atlanta GA 30328 1011800 19 0050 034...

Page 121: ...Battery Powered Motorized Operating System Sistema de funcionamiento motorizado con bater a Natural Shades Persianas natural INSTALLATION OPERATION CARE INSTALACI N MANEJO CUIDADO...

Page 122: ...the FCC Rules These limits are designed to provide reasonable protection against harmful interference in a residential installation This equipment generates uses and can radiate radio frequency energ...

Page 123: ...ide Mount Shade fits within window opening Great for windows with beautiful trim Window Components Terminology Collectively the sill and jambs are called the window casement or frame Outside Mount Sha...

Page 124: ...WINDOW AND SHADE TERMINOLOGY LIFT STYLES Battery Powered Motorized Operating System 4 Bottom Up Shade Headrail Bottom Rail One Fabric Panel...

Page 125: ...d Bottom Up Shade Motor Control Button Headrail Battery Pack Clip 5 Battery Powered Motorized Operating System ALL 1 2 3 4 5 6 Socket Battery Pack Cover Extension Cable Wall Mount Bracket Premium 6 Ch...

Page 126: ...ed Longer 6 Hex Head Screw for Use with Spacer Blocks Not Provided 6 Flat Head Screw for Use with End Mounts Provided Speed Nut and Screw Two Provided with Each Extension Bracket Hex Head Screws 1 per...

Page 127: ...cally used for installation include Metal Tape Measure Safety Glasses Drill with Bits 3 32 drill bit 1 4 hex driver Ladder Screwdrivers both flat and Phillips head Drywall Anchors Level 1 4 Nutdriver...

Page 128: ...the headrail is the proper width If installing several sets of shades be sure to match them with the appropriate window Check the installation surface to ensure you have suitable fasteners and tools L...

Page 129: ...order space additional bracket s evenly between the two end brackets Allow a minimum of 18 from the motor side of the headrail and 15 between the brackets to accomodate the Standard Battery Pack Moun...

Page 130: ...w holes using a 3 32 drill bit use drywall anchors to mount into drywall Attach the installation brackets using the screws provided 1 screw per bracket Ensure all brackets are square with each other I...

Page 131: ...attery wand clip onto the back channel of the headrail Rotate the clip down until it snaps into place STEP 4 MOUNT THE BATTERY WAND INTO THE BATTERY WAND CLIP Align the battery wand with its socket to...

Page 132: ...ble from the shade into the extension cable Plug the other end of the extension cable into the socket in the battery pack Secure the extension cable using wire retainers not provided Install the batte...

Page 133: ...n top of the headrail onto the front lip of installation brackets Push the headrail up and back until it snaps into place Check to ensure the headrail is securely in the brackets Check that the bottom...

Page 134: ...indow molding With a pencil mark the installation brackets or extension bracket screw locations through the larger oblong rear holes of the bracket 1 screw per bracket Use a level to ensure all bracke...

Page 135: ...is required to mount the brackets The top of the installation brackets or extension brackets should be at the desired shade height The brackets should be level and aligned When using extension bracke...

Page 136: ...r installation bracket to provide the clearance required for the battery pack and battery pack bracket Drill the screw holes using a 3 32 drill bit Attach the installation or extension brackets using...

Page 137: ...o a flat vertical mounting surface with 6 mounting screws long enough for a secure installation The top of the spacer blocks should be at the desired shade height If using extension brackets attach an...

Page 138: ...tteries are not recommended Skip this step if your shade will not have an attached battery wand Attach the battery wand clip to the headrail Make sure to position the clip so that the battery wand wil...

Page 139: ...attery wand clip during installation Damage or overheating of components could result STEP 5 PLUG THE POWER CABLE INTO THE BATTERY WAND On the back of the headrail connect the power cable coming from...

Page 140: ...the shade into the extension cable Plug the other end of the extension cable into the socket in the battery pack Secure the extension cable using wire retainers not provided Install the battery wand c...

Page 141: ...ts Push the headrail up and back until it snaps into place Check to ensure the headrail is securely in the brackets Check that the bottom of the headrail is snapped into the base of each bracket Check...

Page 142: ...the valance clips into place WOOD VALANCE RETURNS outside mount only Insert the clips into the groove on the back side of the valance and then rotate the clip 90 Insert return clips as far as they wi...

Page 143: ...so that the hook and loop strips are at the top Firmly press the valance return into place so that the hook and loop strips engage If your valance return has both hook and loop strips and plastic corn...

Page 144: ...not operate see Troubleshooting on pages 26 27 Press the button to alternately lower stop and raise the shade Further Operation and Programming Information Remote Operation For information regarding...

Page 145: ...any input device from operating the shade Its primary use is during installation to correct group and network assignments This reset does not affect travel limits 1 Press and hold the manual control b...

Page 146: ...plug it back in A green LED inside the manual control button housing should flash to indicate the motor has power Check that the batteries in the battery wand satellite battery pack or C size satellit...

Page 147: ...e batteries Check that the battery wand satellite battery pack C size satellite battery wand or DC power supply is securely connected to the power cable and the cables are not pinched or caught in the...

Page 148: ...re created using natural products By nature no two strands of grass bamboo or reeds are exactly the same making every shade truly unique Slight color grain and texture variations should be expected an...

Page 149: ...ave about your new shades you may reach us at 1 800 LEVOLOR 8 30 am 6 30 pm EST www LEVOLOR com ADDITIONAL PARTS AND SERVICES Additional or replacement parts can be ordered or shades can be repaired o...

Page 150: ......

Page 151: ...Sistema de funcionamiento motorizado con bater a Persianas natural INSTALACI N MANEJO CUIDADO...

Page 152: ...igital de Clase B en conformidad con la Parte 15 de las Normas de la FCC Estos l mites est n dise ados para proporcionar una protecci n razonable contra interferencias perjudiciales en una colocaci n...

Page 153: ...lduras elegantes Terminolog a de los componentes de una ventana En su conjunto el umbral y las jambas se denominan el marco Montaje exterior La persiana se coloca por fuera de la abertura de la ventan...

Page 154: ...TERMINOLOG A DE VENTANAS Y PERSIANAS ESTILOS DE ELEVACI N Persiana ascendente Riel superior Riel inferior Panel de una tela 34 Sistema de funcionamiento motorizado con bater a...

Page 155: ...Riel superior Bot n de control manual ALL 1 2 3 4 5 6 Tomacorriente Tapa del paquete de bater as Cable de extensi n Soporte para colocaci n en la pared Control remoto superior de 6 canales opcional Pa...

Page 156: ...extensi n Soporte de sujeci n opcional INTRODUCCI N Persiana Soportes de montaje Materiales de colocaci n Equipo del control remoto Equipo de colocaci n de las bater as sat lite Cable de extensi n Otr...

Page 157: ...rnillos m s largos con soportes de extensi n y separadores no se muestra PRECAUCI N Use taquetes para paneles de yeso cuando el sistema se coloque sobre este material No incluidos Si sujeta la persian...

Page 158: ...urarse de que tiene los elementos de fijaci n y las herramientas adecuados Extienda todas las piezas y componentes y organ celos Su pedido incluir la cantidad correcta de soportes de colocaci n para e...

Page 159: ...ra uniforme entre los dos soportes de los extremos Deje un m nimo de 18 desde la parte del motor del riel superior y 15 entre los soportes a fin de colocar el paquete de bater as est ndar Coloque la p...

Page 160: ...realizar la colocaci n sobre paneles de yeso use los taquetes adecuados para ese material Fije los soportes de colocaci n con los tornillos suministrados Se utiliza 1 tornillo por soporte Aseg rese de...

Page 161: ...para bater as en el canal trasero del riel superior Gire el soporte hacia abajo hasta que encaje en el lugar correcto PASO 4 COLOCAR EL TUBO PARA BATER AS EN EL SOPORTE CORRESPONDIENTE Alinee el tubo...

Page 162: ...al tomacorriente Conecte el cable de alimentaci n de la persiana al cable de extensi n Conecte el otro extremo del cable de extensi n al tomacorriente del paquete de bater as Sujete el cable de extens...

Page 163: ...superior en el borde frontal de los soportes de colocaci n Presione el riel superior hacia arriba y hacia abajo hasta que encaje en el lugar correcto Verifique que el riel superior haya quedado bien...

Page 164: ...nes de los tornillos del soporte de colocaci n o extensi n a trav s de los orificios posteriores rectangulares del soporte m s grandes Use 1 tornillo por soporte Use un nivel para asegurarse de que to...

Page 165: ...de 1 1 4 como m nimo para colocar los soportes La parte superior de los soportes de colocaci n o los soportes de extensi n debe colocarse a la altura deseada para la persiana Los soportes deben estar...

Page 166: ...como m nimo por cada soporte de colocaci n a fin de proporcionar el espacio necesario para el paquete de bater as y el soporte para dicho paquete Perfore los orificios para los tornillos con una broc...

Page 167: ...soportes de colocaci n en una superficie de montaje plana con tornillos de montaje n 6 lo suficientemente largos como para sujetar la colocaci n La parte superior de los bloques espaciadores debe colo...

Page 168: ...dan las bater as de litio ni las bater as recargables Omita este paso si la persiana no trae un tubo para bater as Fije el soporte del tubo para bater as al riel superior Aseg rese de colocar el sopor...

Page 169: ...ara bater as no muerda el cable durante la colocaci n Se pueden da ar los componentes o puede ocurrir un sobrecalentamiento PASO 5 CONECTAR EL CABLE DE ALIMENTACI N AL TUBO PARA BATER AS En la parte p...

Page 170: ...riente Conecte el cable de alimentaci n de la persiana al cable de extensi n Conecte el otro extremo del cable de extensi n al tomacorriente del paquete de bater as Sujete el cable de extensi n con lo...

Page 171: ...ior en el borde frontal de los soportes de colocaci n Presione el riel superior hacia arriba y hacia abajo hasta que encaje en el lugar correcto Verifique que el riel superior haya quedado bien ajusta...

Page 172: ...se fije en su lugar RECODOS DE LA CENEFA DE MADERA solo para montaje exterior Inserte los clips en la ranura en la parte posterior de la cenefa y luego r telos 90 Inserte los clips del recodo lo m s...

Page 173: ...e firmemente el recodo de la cenefa en su lugar para unir las tiras de velcro Si los recodos de la cenefa tienen tiras de velcro y esquinas pl sticas siga estos pasos Despegue la parte posterior del p...

Page 174: ...terminal para comprobar el funcionamiento Si la persiana no funciona consulte la secci n Soluci n de problemas en la p gina 56 57 Presione el bot n para bajar subir o detener la persiana Informaci n s...

Page 175: ...maci n almacenada en la memoria de la persiana incluidas las asignaciones de grupo lo cual impide que cualquier dispositivo de entrada controle la persiana Su principal uso es durante la colocaci n pa...

Page 176: ...que la tela de la persiana no est apretada entre el soporte de colocaci n y el riel superior Verifique que el riel superior est completamente adentro de los soportes de colocaci n Problema La persian...

Page 177: ...er as sat lite el tubo para bater as sat lite tipo C o la fuente de alimentaci n est n correctamente conectados al cable de alimentaci n y que los cables no est n apretados o trabados en el riel super...

Page 178: ...n Si una hebra se desliza fuera del borde la persiana ret rela desde arriba hacia abajo de esta forma no afectar la resistencia de la persiana Variaci n del color Las persianas de fibras naturales Lev...

Page 179: ...r acerca de su nueva persiana ll menos al 1 800 LEVOLOR de 8 30 a m a 6 30 p m EST www LEVOLOR com PIEZAS ADICIONALES Y SERVICIOS Puede solicitar piezas adicionales o de repuesto as mismo las persiana...

Page 180: ...2020 LEVOLOR Inc 5775 Glenridge Drive Building A Atlanta GA 30328 1011799 19 0050 035...

Reviews: