


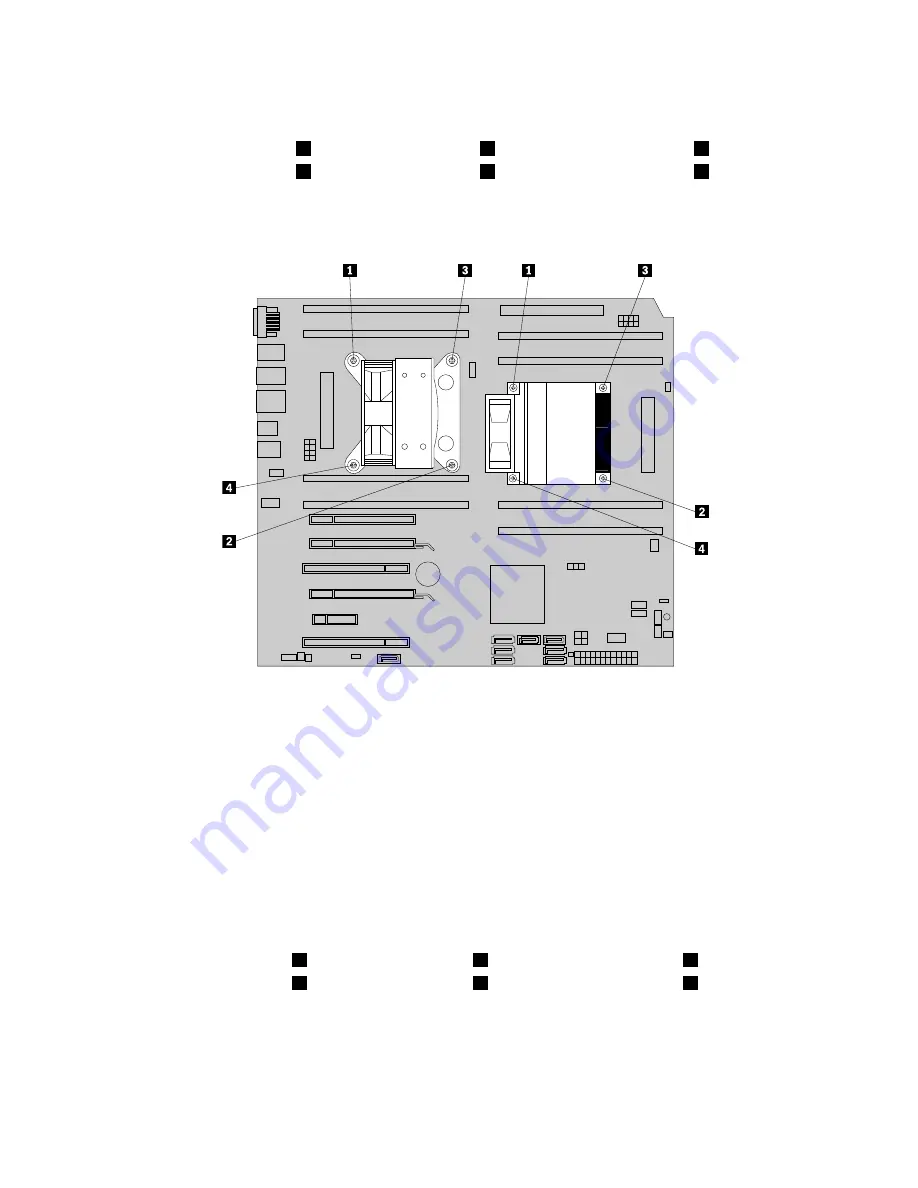
8. Follow this sequence to remove the four screws that secure the heat sink and fan assembly to the
system board:
a. Partially remove screw
1
, then fully remove screw
2
, and then fully remove screw
1
.
b. Partially remove screw
3
, then fully remove screw
4
, and then fully remove screw
3
.
Note:
Carefully remove the four screws from the system board to avoid any possible damage to the
system board. The four screws cannot be removed from the heat sink and fan assembly.
Figure 25. Removing the heat sink and fan assembly
9. Lift the failing heat sink and fan assembly off the system board.
Notes:
a. You might have to gently twist the heat sink and fan assembly to free it from the microprocessor.
b. Do not touch the thermal grease while handling the heat sink and fan assembly.
10. Position the new heat sink and fan assembly on the system board so that the four screws are aligned
with the holes on the system board.
Note:
Position the new heat sink and fan assembly so that the heat sink and fan assembly cable is
toward the microprocessor fan connector on the system board.
11. Follow the following sequence to install the four screws to secure the new heat sink and fan assembly.
Do not over-tighten the screws.
a. Partially tighten screw
1
, then fully tighten screw
2
, and then fully tighten screw
1
.
b. Partially tighten screw
3
, then fully tighten screw
4
, and then fully tighten screw
3
.
12. Connect the heat sink and fan assembly cable to the microprocessor fan connector on the system
board. See “Locating parts on the system board” on page 11.
13. If you are replacing heat sink and fan assembly 2, reinstall the optical drive bracket into the chassis.
Then, reinstall the optical drive into the chassis. See “Replacing the optical drive” on page 37.
14. Reinstall the PCI card holder. See “Removing and reinstalling the PCI card holder” on page 31.
42
ThinkStation User Guide
Summary of Contents for ThinkStation 1095
Page 1: ...ThinkStation User Guide Machine Types 1095 1096 and 1097 ...
Page 6: ...iv ThinkStation User Guide ...
Page 12: ...x ThinkStation User Guide ...
Page 26: ...14 ThinkStation User Guide ...
Page 34: ...22 ThinkStation User Guide ...
Page 40: ...28 ThinkStation User Guide ...
Page 78: ...66 ThinkStation User Guide ...
Page 84: ...72 ThinkStation User Guide ...
Page 118: ...106 ThinkStation User Guide ...
Page 120: ...108 ThinkStation User Guide ...
Page 126: ...114 ThinkStation User Guide ...
Page 130: ...118 ThinkStation User Guide ...
Page 134: ...122 ThinkStation User Guide ...
Page 135: ......
Page 136: ......