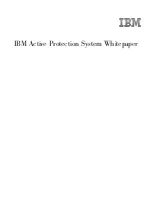
5. Reinstall all the 11 screws that secure the main bracket to the front bezel.
6. Reinstall the optical drive. See “Installing an optical drive” on page 80.
7. Reinstall the heat sink assembly. See “Installing the microprocessor and heat sink assembly” on page 88.
8. Close the system board shielding. See “Closing the system board shielding” on page 74.
9. Go to “Completing the FRU installation” on page 107.
Replacing the microprocessor and heat sink assembly
CAUTION:
The microprocessor and heat sink assembly might be very hot. Turn off the computer
and wait three to five minutes to let the computer cool before opening the computer cover.
Attention:
Do not open your computer or attempt any repair before reading and understanding the “Important Safety
Information” on page 1.
This section provides instructions on how to replace the microprocessor and heat sink assembly.
86
ThinkCentre Hardware Maintenance Manual
Summary of Contents for ThinkCentre M62z
Page 1: ...ThinkCentre Hardware Maintenance Manual Machine Types 5106 5110 5114 and 5150 ...
Page 2: ......
Page 3: ...ThinkCentre Hardware Maintenance Manual Machine Types 5106 5110 5114 and 5150 ...
Page 8: ...2 ThinkCentre Hardware Maintenance Manual ...
Page 15: ...Chapter 2 Safety information 9 ...
Page 19: ...Chapter 2 Safety information 13 ...
Page 20: ...1 2 14 ThinkCentre Hardware Maintenance Manual ...
Page 21: ...Chapter 2 Safety information 15 ...
Page 27: ...Chapter 2 Safety information 21 ...
Page 31: ...Chapter 2 Safety information 25 ...
Page 38: ...32 ThinkCentre Hardware Maintenance Manual ...
Page 64: ...58 ThinkCentre Hardware Maintenance Manual ...
Page 70: ...64 ThinkCentre Hardware Maintenance Manual ...
Page 76: ...70 ThinkCentre Hardware Maintenance Manual ...
Page 116: ...110 ThinkCentre Hardware Maintenance Manual ...
Page 120: ...114 ThinkCentre Hardware Maintenance Manual ...
Page 125: ......
Page 126: ......