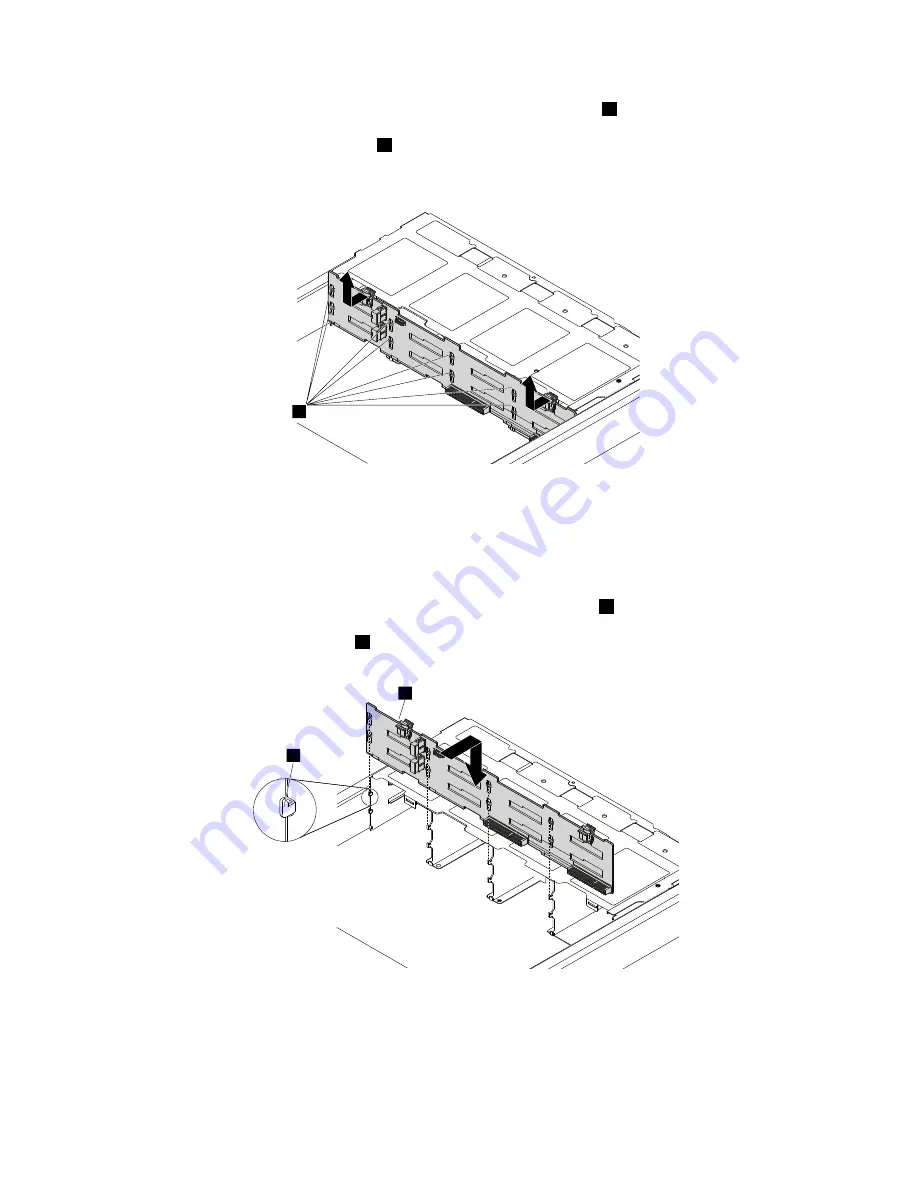
8. Carefully lift the backplane straight up a little bit so that the small hooks
1
on the chassis are aligned
with the corresponding holes in the backplane. Then, move the backplane to the rear of the chassis to
release the backplane from the hooks
1
.
1
Figure 100. Removing the front backplane
9. Touch the static-protective package that contains the new backplane to any unpainted surface on the
outside of the storage product. Then, remove the new backplane from the package.
Note:
Carefully handle the backplane by its edges.
10. Note the orientation of the new backplane. Ensure that the small hooks
1
on the chassis pass through
the corresponding holes in the new backplane. Then, carefully press the new backplane straight down
so that it is secured by the latches
2
on the backplane.
1
2
Figure 101. Installing the front backplane
11. Reinstall all the drives and dummy trays (if any) in the drive bays. See “Installing or replacing a hot-swap
drive” on page 108.
12. Refer to your note to connect the cables to the new backplane.
118
Lenovo Storage N4610 User Guide and Hardware Maintenance Manual
Summary of Contents for Storage N4610
Page 1: ...Lenovo Storage N4610 User Guide and Hardware Maintenance Manual Machine Types 70G0 and 70G1 ...
Page 14: ...xii Lenovo Storage N4610 User Guide and Hardware Maintenance Manual ...
Page 18: ...4 Lenovo Storage N4610 User Guide and Hardware Maintenance Manual ...
Page 20: ...6 Lenovo Storage N4610 User Guide and Hardware Maintenance Manual ...
Page 48: ...34 Lenovo Storage N4610 User Guide and Hardware Maintenance Manual ...
Page 62: ...48 Lenovo Storage N4610 User Guide and Hardware Maintenance Manual ...
Page 158: ...144 Lenovo Storage N4610 User Guide and Hardware Maintenance Manual ...
Page 162: ...148 Lenovo Storage N4610 User Guide and Hardware Maintenance Manual ...
Page 175: ......
Page 176: ......


