


Groups
Groups Overview
Groups consist of one or more users, and administrators can grant each group rights to Shares on the px2-
300d Network Storage. Users can belong to more than one group. The Groups page enables
administrators to create one or more groups, and grant each group rights to Shares on the px2-300d.
Security must be enabled before you can create groups.
page to enable security permissions and create an administrator account, if
you have not done so already.
By default, there are no groups defined. Once an administrator defines one or more groups, the Groups
functionality is dynamically available when creating, modifying, and viewing users, Shares, and groups.
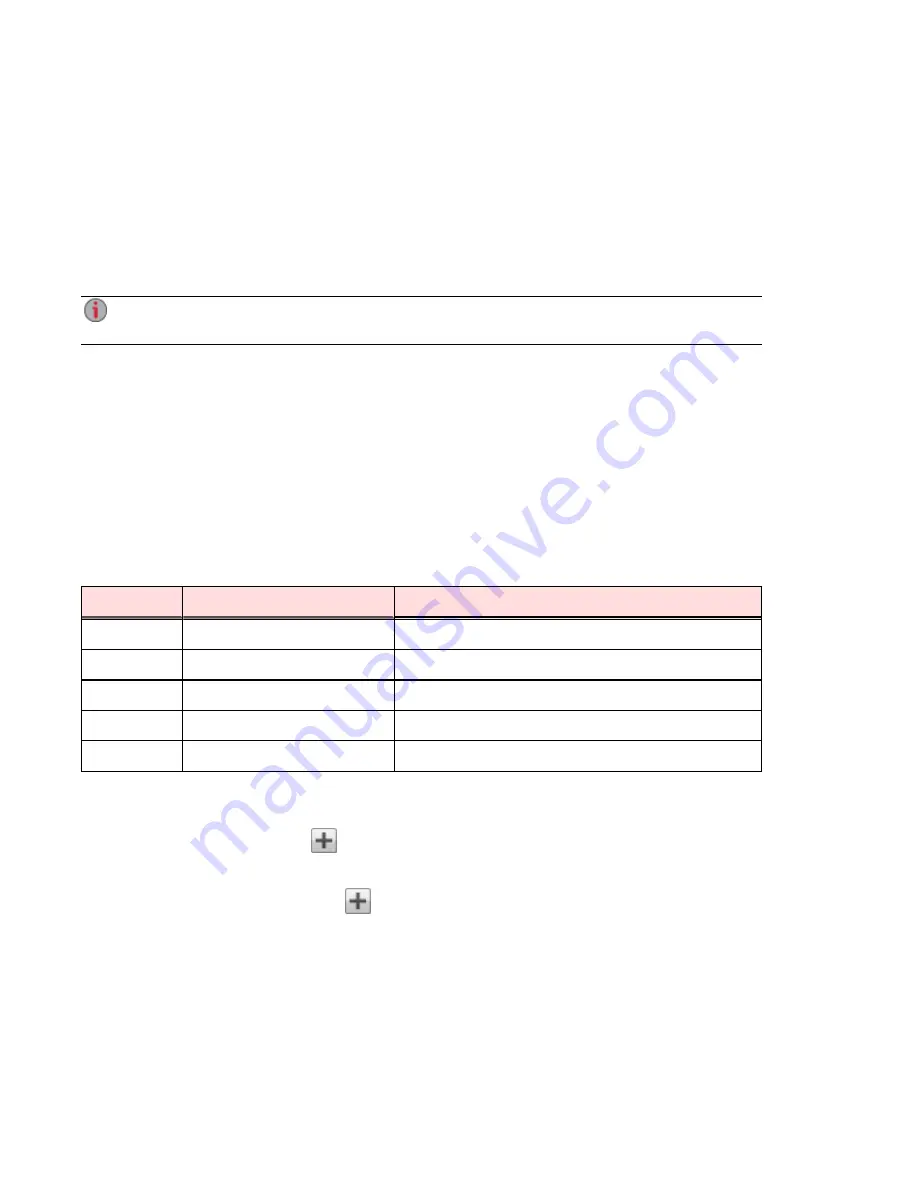
How Access Rights Are Granted Using Groups in Workgroup Mode
When groups are defined in Workgroup mode, a user's access rights are the most rights granted to the
user and all groups to which the user belongs. For example, assume 3 Shares exist (SF1, SF2, and SF3),
two users (UserA and UserB), and three groups (Group1, Group2, Group3). When created, UserA was not
granted access rights to any Share, and UserB was granted Read rights to SF3. Group1 has Read/Write
rights to SF1, Group2 has Read/Write rights to SF2, and Group3 has Read/Write rights to SF3. If UserA is
added to Group1, UserB is added to Group2, and Group1 is added to Group3, the table below shows the
resulting access rights for each user and group defined:
Name
Member of Group
Access Rights
UserA
Group1, Group3
SF1 - Read/Write SF3 - Read/Write
UserB
Group2
SF2 - Read/Write SF3 - Read
Group1
Group3
SF1 - Read/Write SF3 - Read/Write
Group2
none
SF2 - Read/Write
Group3
none
SF3 - Read/Write
Adding Groups
1. On the Groups page, click
Add a group. The Information section opens.
2. From the Information section, give the new group a name.
3. To add users to the group, click
Add users. Select a user or users to include in the group.
Select the checkbox in the title bar to add all listed users.
4. Click Apply to save your changes.
Managing Groups
The page describes how to:
●
●
Securing Your px2-300d Network Storage and Contents
84
Groups
Summary of Contents for px2-300d
Page 1: ...px2 300d Network Storage with LifeLine 4 0 User Guide ...
Page 11: ...Setting up Your px2 300d Network Storage Setting up Your px2 300d Network Storage 1 CHAPTER 1 ...
Page 33: ...Sharing Files Sharing Files 23 CHAPTER 2 ...
Page 52: ...Sharing Files 42 One touch Transferring of Content from a USB Device ...
Page 58: ...iSCSI Creating IP Based Storage Area Networks SAN 48 Deleting iSCSI Drives ...
Page 59: ...Storage Pool Management Storage Pool Management 49 CHAPTER 4 ...
Page 72: ...Storage PoolManagement 62 Changing RAID Protection Types ...
Page 73: ...Drive Management Drive Management 63 ...
Page 76: ...Drive Management 66 Managing Drives ...
Page 77: ...Backing up and Restoring Your Content Backing up and Restoring Your Content 67 CHAPTER 6 ...
Page 115: ...Sharing Content Using Social Media Sharing Content Using Social Media 105 CHAPTER 9 ...
Page 121: ...Media Management Media Management 111 CHAPTER 10 ...
Page 133: ... Delete a torrent job Click to delete the torrent download Media Management Torrents 123 ...
Page 138: ...Media Management 128 Videos ...
Page 146: ...Upgrading Your px2 300d Network Storage 136 Software Updates ...
Page 149: ...Hardware Management Hardware Management 139 CHAPTER 14 ...
Page 160: ...Hardware Management 150 Troubleshooting Routers ...
Page 161: ...Additional Support Additional Support 151 CHAPTER 15 ...
Page 164: ...AdditionalSupport 154 Support ...
Page 165: ...Legal Legal 155 CHAPTER 16 ...


