background image

506470-01

Issue 1007

1. Install line voltage power supply to unit from a properly
sized disconnect switch.  Any excess high voltage field
wiring should be trimmed or secured away from the low
voltage field wiring.

2. Ground unit at unit disconnect switch or to an earth
ground.  To facilitate conduit, a hole is in the bottom of
the  control box.  Connect conduit to the control box
using a proper conduit fitting.  Units are approved for
use only with copper conductors.  24V Class II circuit
connections are made in the low voltage junction box.
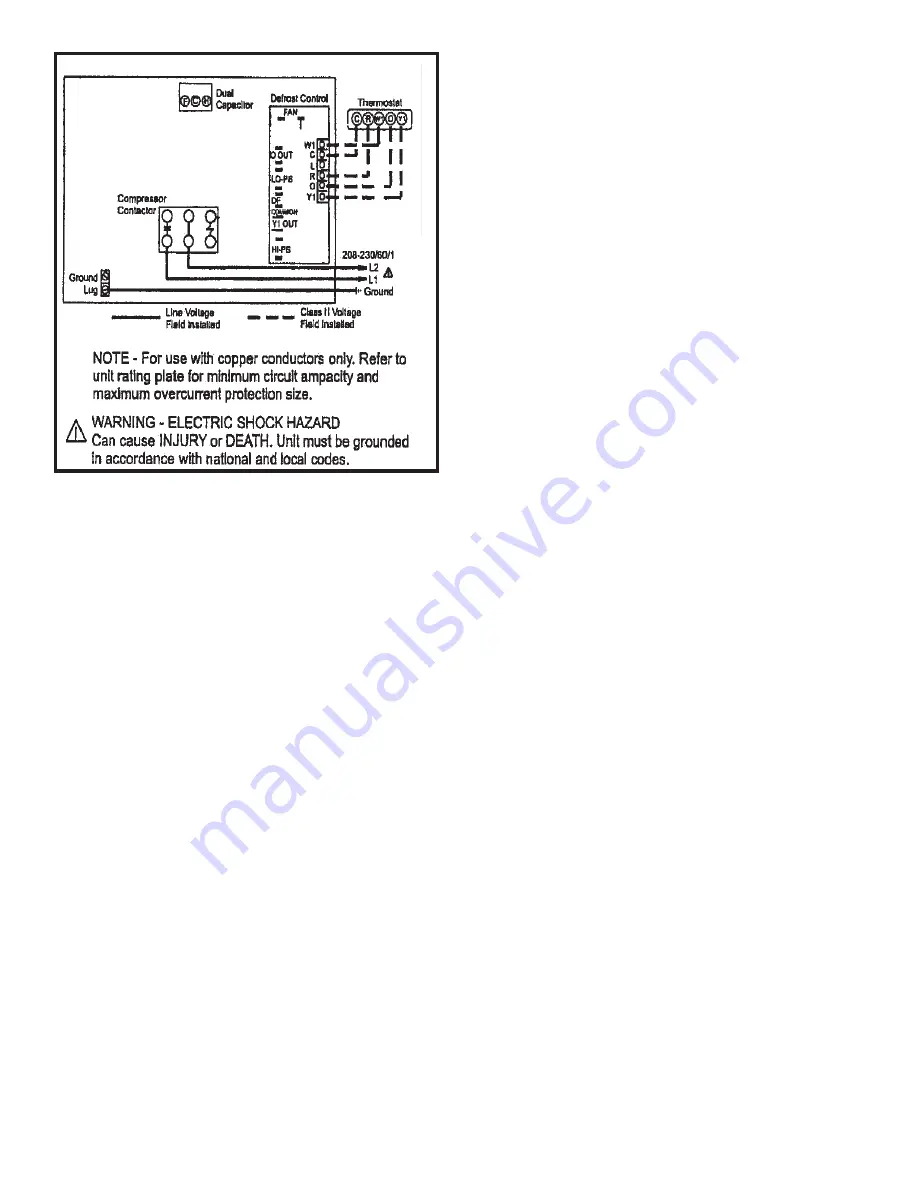
Refer to Figure 4 for high voltage field wiring diagram.
A complete unit wiring diagram is located inside the unit
control box cover.

3. Install room thermostat on an inside wall that is not
subject to drafts, direct sunshine, or other heat sources.

4. Install low voltage wiring from outdoor to indoor unit
and from thermostat to indoor unit.   (See Wire Diagram
on page 27.)

5. Do not bundle any excess 24V control wire inside
control box.  Run control wire through installed wire tie
and tighten wire tie to provide low voltage strain relief
and to maintain seperation of field-installed low and high
voltage circuits.

Refrigerant Piping

If the 4HP18LT unit is being installed with a new indoor coil
and line set, the refrigerant connections should be made as
outlined in this section.  If an existing line set and/or indoor
coil will be used to complete the system, refer to this section
as well as the section that follows entitled - 

Flushing

Existing Line Set and Indoor Coil

.

If this  unit is being matched with an approved line set or
indoor coil which was previously charged with R-22
refrigerant, the line set and coil must be flushed prior to
installation.  If the unit is being used with and existing indoor
coil which was equipped with a liquid line which served as a
metering device (RFCI), the liquid line must be replaced prior
to the installation of the 4HP18LT unit.

Field refrigerant piping consists of liquid and suction lines
from the outdoor unit (sweat connections) to the indoor coil
(flare or sweat connections).

Select line set diameters from Table 2 to ensure that oil
returns to the compressor.  Size vertical suction riser to
maintain minimum velocity at minimum capacity.
Recommended line length is 50’ or less.  If more than 50’
line set is required, contact Technical Services.  Table 2
shows the diameters for line sets up to 100’ although vertical
lift applications and trapping requirements need to be
reviewed with Technical Services for line sets over 50’.

Installing Refrigerant Line

During the installation of an air conditioning system, it is
important to properly isolate the refrigerant line to prevent
unnecessary vibration.  Line set contact with the structure
(wall, ceiling, or floor) may cause objectionable noise when
vibration is translated into sound.  As a result, more energy
or vibration can be expected.  Close attention to line set
isolation must be observed.

Following are some points to consider  when placing and
installing a high-efficiency outdoor unit:

Page  4

Figure 4

Summary of Contents for 4HP18LT

Page 1: ...may cause personal injury death or property damage Use appropriate safety gear including safety glasses and gloves when installing this equipment WARNING Installation and servicing of air conditioning...

Page 2: ...S or Canadian Electrical Code Canada Compliance should be determined prior to installation 4HP18LT condensing units use R410A which is an ozone friendly HFC refrigerant The unit must be installed wit...

Page 3: ...This will prevent ice from building up under the unit during a defrost cycle Refer to following roof mounting section for barrier construction if unit must face prevailing winter winds If unit coil ca...

Page 4: ...tion as well as the section that follows entitled Flushing Existing Line Set and Indoor Coil If this unit is being matched with an approved line set or indoor coil which was previously charged with R...

Page 5: ...a tion and the introduction of moisture into the system 3 Use silver alloy brazing rods 5 or 6 silver alloy for copper to copper brazing or 45 silver alloy for copper to brass or copper to steel brazi...

Page 6: ...sure to empty all existing traps Residual mineral oil can act as an insulator preventing proper heat transfer It can also clog thethermalexpansionvalve reducingsystemperformance and capacity Failure...

Page 7: ...Vertical to Horizontal Outside Wall Wood Block Between Studs IMPORTANT Refrigerant lines must not contact wall Vapor Line Liquid Line Wire Tie Inside Wall Strap Sleeve Wire Tie Wire Tie Strap Wood Blo...

Page 8: ...existing system Refer to the gauges after shutdown to confirm that the entire system is completely void of refrigerant Disconnect the liquid and suction lines from the existing outdoor unit If the exi...

Page 9: ...Close the valve on the inverted R 22 cylinder and the gauge set valves Pump the remaining refrigerant out of the recovery machine and turn the machine off 10 Use nitrogen to break the vacuum on the r...

Page 10: ...ak seal To Access the Schrader Port 1 Remove the service port cap with an adjustable wrench 2 Connect gauge to the service port 3 When testing is completed replace service port cap Tighten finger tigh...

Page 11: ...erant requirements will vary with lenths Check all joints for leaks Purge nitrogen and R410A mixture Correct any leaks and rechecks Evacuation Evacuating the system of noncondensables is critical for...

Page 12: ...nter port hose to a nitrogen cylinder with pressure regulator set to 150 psig and purge the hose Open the manifold gauge valves to break the vacuum in the line set and indoor unit Close the manifold g...

Page 13: ...ing plate This charge is based on a matching indoor coil and outdoor coil with 15 line set For varying lengths of line set refer to Table 4 for refrigerant charge adjustment A blank space is provided...

Page 14: ...ure is cool use the weigh in method to charge the unit Do this after any leaks have been repaired 1 Recover the refrigerant from the unit 2 Conduct a leak check then evacuate as previously outlined 3...

Page 15: ...ure from the liquid line temperture to determine the approach temperature Page 15 Table 6 Subcooling Values Table 5 R410A Temperature Pressure Chart T em p F P ressure P sig T em p F P ressure P sig T...

Page 16: ...ecover refrigerant from the system to increase the approach temperature Check Charge Using Normal Operating Pressures Use Table 7 to perform maintenance checks Table 7 is not a procedure for charging...

Page 17: ...506470 01 Issue 1007 Page 17 Table 8 L Liquid S Suction Values provided above are typical pressures Indoor unit matchup indoor air quality equipment and indoor load will case pressures to vary...

Page 18: ...below 50 F System should be left in the emergency heat mode at least 6 hours to allow the crankcase heater sufficient time to prevent compressor slugging Defrost System The defrost system includes two...

Page 19: ...rost mode when the compressor delay jumper is removed NOTE The 30 second off cycle is not functional when jumpering the TEST pins Time Delay The timed off delay is 5 minutes long The delay helps to pr...

Page 20: ...er of times consecutively pause and then repeat the process The number of consecutive flashes correlates to a paticular abnormal condition TRIP LED Red indicates there is a demand signal from the ther...

Page 21: ...removed from the module TRIP and ALERT LEDs flashing at the same time means control circuit voltage is too low for operation 24VAC Power Wiring The diagnostic module requires a constant nominal 24VAC...

Page 22: ...When the coil is not energized the demand signal input should be less than 0 5VAC Miswired Module Codes Depending on the system configuration some ALERT flash codes may not be active The presence of...

Page 23: ...at the outdoor fan motor compressor and indoor blower motor Values should be compared with those given on unit nameplate Check clean or replace indoor unit filters Check the refrigerant charge and ga...

Page 24: ...t urine cottonwood seeds etc Heat Pump Operation Heat pump units have several characteristics you should be aware of Heat pumps satisfy heating demand by delivering large amounts of warm air into the...

Page 25: ...y heat Indicating Light Most heat pump thermostats have an amber light which indicates when the heat pump is operating in the emergency heat mode Temperature Indicator The temperture indicator display...

Page 26: ...__________ Maximum Fuse or Circuit Breaker ________________________ Electical Connections Tight Indoor Filter Clean Supply Voltage Unit Off __________ Indoor Blower RPM ___________________ S P Drop Ov...

Page 27: ...UIPMENT GROUND HR1 L2 208 230 60 1 L1 K1 1 BLACK YELLOW RED RED C12 ORANGE B4 PURPLE B1 GROUND LUG GROUND L2 L1 208 230 60 1 DUAL CAPACITOR RED COMPRESSOR CONTACTOR BLACK COMPRESSOR CRANKCASE HEATER R...

Page 28: ...506470 01 Issue 1007 Page 28 NOTES...

Reviews: