background image


5


Note on Disc 

This section shows you how to handle, clear, and store discs.                                                                    

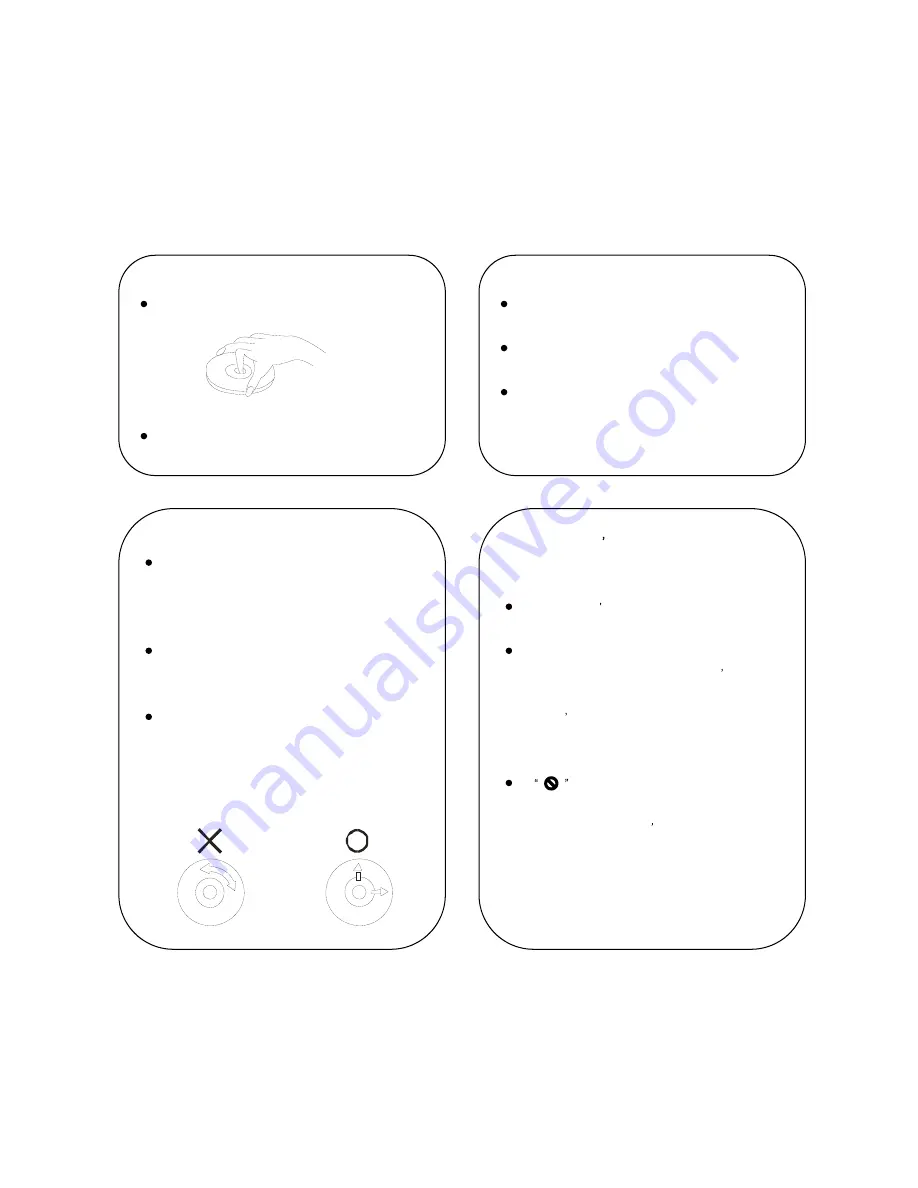
On Handling Discs 

Do not touch the playback side of the disc.      

Do not attach paper or tape to discs. 

On Clearing Discs 

Fingerprints  and  dust  on  the  disc  cause  picture 

and  sound  deterioration.  Wipe  the  disc  from  the 

center outward with a soft cloth. Always keep the 

disc clear. 

If  you  cannot  wipe  off  the  dust  with  a  soft  cloth, 

wipe the disc lightly with a slightly moistened soft 

cloth and finish with a dry cloth. 

Do not use any type of solvents such as


thinner, 

benzene,  commercially  available  cleaners  or 

anti-static spray for vinyl LPs. They may damage 

the disc.      

On Storing Discs 

Do  not  store  discs  in  a  place  subject  to  direct 

sunlight or near heat sources. 

Do  not  store  discs  in  places  subject  to  moisture 

and dust such as a bathroom or near a humidifier.


Store discs vertically in a case. Stacking or placing 

objects  on  discs  outside  of  their  case  may  cause 

warping. 


About This Owner s Manual   

This  owner s  manual  explains  the  basic 

instructions of this DVD player. 

Some  DVD  video  discs  have  functions  that  may 

not  be  explained  in  this  owner s  manual. 

Therefore, some instructions may differ from this 

owner s  manual  and  there  may  be  extra 

instructions.  In  this  case,  follow  the  instructions 

displayed on the TV screen or package.      

may  appear  on  the  TV  screen  during 

operation.  This  icon  means  the  function 

explained in this owner s manual is not available 

on that specific DVD video disc.    

Summary of Contents for DVP-715

Page 1: ...INSTRUCTION MANUAL MODEL NO DVP 715 PORTABLE DVD PLAYER ...

Page 2: ... USE OF CONTROLS ADJUSTMENTS OR THE PERFORMANCE OF PROCEDURES OTHER THAN THOSE SPECIFIED MAY RESULT IN HAZARDOUS RADIATION EXPOSURE TO PREVENT DIRECT EXPOSURE TO LASER BEAM DO NOT TRY TO OPEN THE ENCLOSURE VISIBLE LASER RADIATION WHEN OPEN THE ENCLOSURE DO NOT STARE INTO BEAM THE APPARATUS SHALL NOT BE EXPOSED TO DRIPPING OR SPLASHING AND THAT NO OBJECTS FILLED WITH LIQUIDS SUCH AS VASES SHALL BE ...

Page 3: ... player is a high technology precision device If the optical pick up lens and disc drive parts are dirty or worn down the picture quality becomes poor To obtain a clear picture we recommend regular inspection and maintenance cleaning or parts replacement every 1 000 hours of use depending on the operating environment For details contact your nearest dealer Note on Moisture Condensation Moisture co...

Page 4: ... 15 Playing in Slow Motion 15 Advanced Operations Using a Display 16 Using a Title Menu 17 Using a DVD Menu 17 Changing Subtitle 18 Changing Audio Soundtrack Language 19 Viewing from another Angle 20 Repeat Play 21 Search a Specific Title Chapter 22 Zoom Feature 22 Program Play 23 Playback with MP3 24 Playback with DIVX 25 Initial Settings Selection of Initial settings 26 27 General Setup Page 26 ...

Page 5: ...he disc On Storing Discs Do not store discs in a place subject to direct sunlight or near heat sources Do not store discs in places subject to moisture and dust such as a bathroom or near a humidifier Store discs vertically in a case Stacking or placing objects on discs outside of their case may cause warping About This Owner s Manual This owner s manual explains the basic instructions of this DVD...

Page 6: ...6 Identification of Controls Main Unit ...

Page 7: ... Controls Cont d Place a disc with the playback side down on the spindle and push gently on the center of the disc so it goes into position You can press ENTER button on the main unit to achieve the PLAY effect Main Unit ...

Page 8: ...te a menu screen follow the instructions in Using a Title Menu MENU button Use the MENU button to display the menu screen included on a DVD disc To operate a menu screen follow the instructions in Using a DVD Menu CURSOR button up down left right for use in highlighting a selection on a menu screen TITLE and MENU screen Remote Control ...

Page 9: ...emote the battery holder 2 Insert the battery with the facing in the same direction as the on the battery holder 3 Replace the battery holder with battery into the remote control unit making sure that it is fully inserted Replace remote control unit battery with 3V micro lithium cells Dispose of battery safety in accordance with local laws Do not dispose of in fire Warning The battery used in this...

Page 10: ...nnect or disconnect the power plug with wet hands Doing so may cause electric shock Do not use an AC adapter other than one specified as it can cause a fire or damage to the player AC adapter This AC adapter operates on 100 240V 50 60Hz DC OUT 12V DC current 2A Contact an electrical parts distributor for assistance in selecting a suitable AC plug adapter or AC cord set AC Adapter ...

Page 11: ...table DVD player Detaching the battery pack 1 Make sure the unit is powered off and unplugged 2 Slide the UNLOCK LOCK button to UNLOCK Then slowly remove it from the portable DVD player in reverse direction Battery Pack ATTENTION The product that you have purchased contains a rechargeable At the end of it s useful life under various state and local laws it may be illegal to dispose of this battery...

Page 12: ...ive impact may cause the unit to malfunction Do not incinerate Do not disassemble dispose of properly Recharging times Recharging times without player with player Approx 3 0 hour Approx 3 0 4 0 hour Times shown above depend on operating conditions Confirm the battery change on the unit s screen The screen will appear BATTERY LOW when the battery is low If play time dramatically reduces after recha...

Page 13: ...tly on the center of the disc so it goes into position When a menu screen appears on the TV screen In case of interactive DVDs with control a menu screen appears on the TV screen Example of interactive DVD On screen Menu Press and press ENTER or press the numeric button s to select the desired item Play of the selected item now begins For further information also refer to the jacket or case of the...

Page 14: ...reen saver mode you can push the screen saver switch to return to normal playback mode Still picture Press PAUSE during playback DVD The player will be placed in the still picture mode CD The player will be placed in the pause mode Frame Advance DVD only Press PAUSE during still playback Each time you press PAUSE the picture advances one frame To resume normal playback press PLAY Skipping Chapters...

Page 15: ...ss PLAY button to return to normal play The speed will be retained even after the button is released To return to normal playback press PLAY or ENTER on the main unit The DVD player does not play back sound during fast forward or fast reverse playback Playing in Slow Motion DVD only Press SLOW during playback The playback speed becomes 1 2 of the normal speed TV screen 1 2 1 4 1 8 1 16 1 16 1 8 1 ...

Page 16: ... Chapter Elapsed TT 01 12 CH 006 039 0 03 50 Chapter Remain TT 01 12 CH 006 039 0 10 40 Display Off Note The different disc has different display CD With this function you can view on your TV the following Current title Track number Total playing time Current Title Total Elapsed Track 03 18 0 09 20 Playing time Total Title Total Remain Track 03 18 0 50 36 Single Elapsed Track 03 18 0 01 54 Single ...

Page 17: ...n s to select desired title The selected title now starts playing Using a DVD Menu Some DVD have unique menu structures called DVD menus For example DVD programmed with complex contents provide guide menus and those recorded with various languages provide menus for audio and subtitle language Although the DVD menu s contents and operation differ from disc to disc the following explains the basic o...

Page 18: ... on the disc When the power is turned on or the disc is removed subtitles appear in the language selected at the initial settings If this language is not recorded on the disc the disc s priority language appears 1 Press SUBTITLE during playback When no subtitles are recorded will be displayed on the TV screen 2 Press SUBTITLE repeatedly until the desired language is selected The alternative langua...

Page 19: ...mes it means that the language is not available on the disc When the power is turned on or the disc is removed the language heard is the one selected at the initial settings If this language is not recorded on the disc only the available language on the disc will be heard Some discs may not respond to Audio feature DVD 1 Press AUDIO during play Audio 1 2 AC 3 2CH Audio 2 2 AC 3 5 1CH 2 Press AUDIO...

Page 20: ... discs the same scene can be viewed from each of these different angles using the ANGLE button The recorded angles differ depending on the disc used 1 3 2 3 3 3 1 Press ANGLE during playback 1 3 2 3 3 3 2 Press ANGLE repeatedly until the desired angle is selected This function only works for discs having scenes recorded at different angle ...

Page 21: ...epeat A B Repeating sections between two specific points Press the A B button on the remote at the point where you wish the repeat play to start The display will show Rep A Press A B button again at the point where you wish the repeat play to finish The display will show Rep A B SET The A B segment will now repeat continuously until the A B button is pressed for a third time A Set point A AB Set p...

Page 22: ...e needed item and press ENTER then use NUMERIC or UP DOWN buttons to change For example search for chapter 2 in title 6 Press SEARCH on the remote the screen show the menu above Then press ENTER PLAY button to change the TITLE Press 06 to select title 6 TITLE 06 11 CHAPTER 02 04 Repeat the steps above select chapter 2 Some subtitle recorded around the marker may fail to appear DVD Zoom Feature Zoo...

Page 23: ...ress ENTER to begin program playback The selected title chapter track is stored in the memory and play now begins in the programmed sequence It will automatically stop when finished Clearing the program Press to select the unwanted number and then press CANCEL The programs are also cleared when the power is turned off or the disc is removed PROGRAM TT 01 CH 01 01 TT __CH __ 06 TT __CH __ 02 TT __C...

Page 24: ...t faster speed press PLAY to return normal playback Press PAUSE to enter the pause mode press PLAY to return normal playback Press STOP to stop the playback If your MP3 includes a lot of folders and you want to broadcast all contents folders inside continuously please press the PROGRAM button If you want to return press this button once again There are some information displayed in the TV screen w...

Page 25: ...or share amony the 2 billion existing DIVX videos and play them on your DVD player The DIVX codec short for compress decompression is based on the MPEG 4 compression standard This codec is ao advanced that it ca reduce an MPEG 2 video the same format used for DVD to 10 of its original size Video on regular VHS tapes can be reduced to about 1 30 th of their original size For more information on DIV...

Page 26: ...anged even if the power is switched off THIS UNIT ALLOWS YOU TO CUSTOMIZE THE PERFORMANCE TO YOUR PERSONAL PREFERENCE 1 Press SETUP 2 Press to select category highlight then press ENTER 3 Press SETUP to quit the menu General Setup Page Audio Setup Page Video Quality Setup Preference page Preference page control is not available when unit at pause model Unit must remain completely stop before you c...

Page 27: ...PASSWORD 1 Press SETUP then select Password Setup page press ENTER to select password change 2 Enter old password 3 Enter new password 4 Re enter to confirm your new password 5 Press ENTER 6 Press SETUP to exit The pre set password is 1234 ...

Page 28: ...he DVD player to your TV be sure to turn off the power and unplug both units from the wall outlet before making any connections Connect the DVD player to your TV directly If you connect the DVD player to a VCR the playback picture will be distorted because DVD video discs are copy protected ...

Page 29: ... If your A V receiver has a Dolby Pro Logic decoded refer to the following connection diagram With a received equipped with Dolby Digital Connect the equipment Refer to that receiver s owner s manual and set the receiver so you can enjoy Dolby Pro Logic Surround sound Be sure to set Digital Audio Output of this DVD player to PCM from the SETUP menu when you enjoy sounds of Dolby Pro Logic Surround...

Page 30: ...s forbidden by law to copy broadcast show broadcast in cable play in public and rent copyrighted material without permission DVD video discs are copy protected and any recordings made from these discs will be distorted This produce incorporates copyright protection technology that is protected by method claims of certain U S patents and other intellectual property rights owned by Macrovision Corpo...

Page 31: ... DVD player does not work No disc is inserted Insert a disc The video cable is not connected securely Connect the video cable into the jacks securely Check that Brightness control is set to low Adjust the brightness The TV is not set to receive DVD signal output Select the appropriate video input mode on the TV so the picture from the DVD player appears on the TV screen No picture on the LCD or TV...

Page 32: ...erted Insert a playable disc Check the disc type color system and Regional code The disc is placed outside down Place the disc with the playback side down The disc is not placed within the guide Place the disc on the disc tray correctly inside the guide A menu is on the TV screen Press the SETUP button to turn off the menu screen The DVD player does not start playback The Rating level is set Cance...

Page 33: ...tput 500 mV p p 75 Audio output 1 5 Vrms 1KHz 0 dB ø3 5mm mini jack x1 0 5 Vrms connectors Earphone terminal ø3 5mm stereo mini jack x1 Panel size 7 inches 16 9 Driving system TFT active matrix Liquid Crystal Display Resolution 480 x 234 effective pixel rate more than 99 99 supplied Accessories RCA Audio Cable 1 RCA Video Cable 1 AC Adapter 1 Car DC Adapter 1 Battery Pack 1 Remote Control 1 Batter...

Reviews: