background image

Introduction

-6-

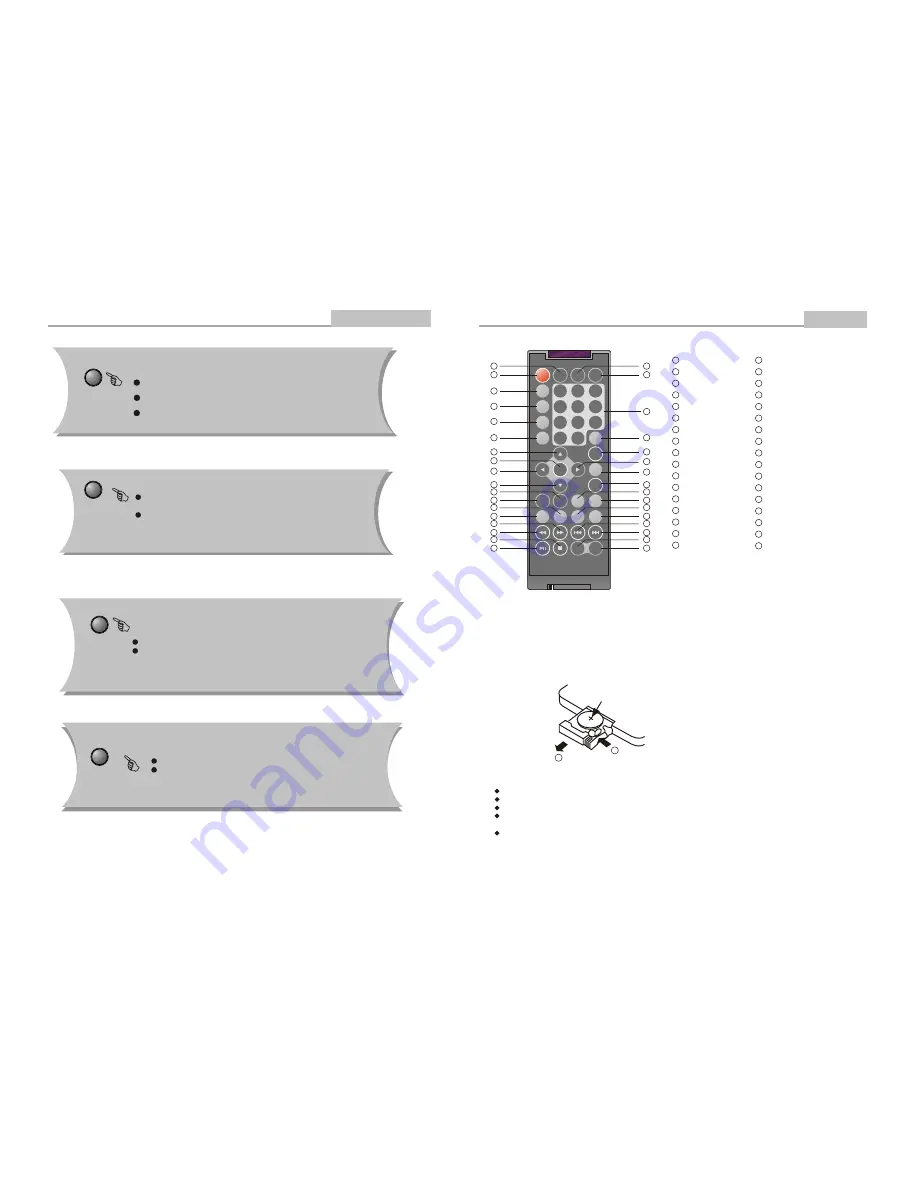
Remote Control 

 1

2

CR2025

HOW TO REPLACE THE BATTERY

STEP 1: PUSH THE BUTTON TOWARD LEFT;

STEP 2: PULL THE BATTERY LOADER OUT.

PROGRAM

NTSC/PAL

SUBTITLE

LANGUAGE

ANGLE

UP

LEFT

ENTER

L/R CHANNEL

DOWN

RESUME

STOP

REV

FORWARD

MUTE

SETUP

ZOOM

DISPLAY

NUMBER KEY SELECT

TIME

MENU/PBC

TITLE

FUNCTION

RIGHT

SLOW

STEP

A-B REPEAT

REPEAT

VOLUME -

NEXT

PREV

TFT POWER ON/OFF

34

33

32

31

30

29

28

26

27

25

24

23

22

21

20

PLAY/PAUSE

19

18

17

16

15

14

13

12

11

10

9

8

7

6

5

4

3

2

1

Using the Remote Control
Point the remote control at the remote sensor in order for the player to function correctly. The 
remote will function to approximately 21' from the remote sensor at an angle of approximately 
30 each direction.
Note: Directing the remote sensor toward any light source, such as direct sunlight, may cause
the unit to malfunction. Do not spill water or put wet items on the remote control. Never 
disassemble remote control.

BATTERIES
INCORRECT USE OF BATTERIES MAY CAUSE THEM TO LEAK, CORRODE OR EXPLODE.
    Be sure to place the batteries in the correct direction.
    It is dangerous to charge/heat/open or short-circuit the batteries.
    Do not leave dead or expired batteries or mix old/new batteries.
    When not using the remote control for a long duration of time, remove the batteries. When 
    operating range becomes reduced, replace all batteries with new, fresh ones.
    If leakage from the battery occurs, wipe the battery liquid from the battery compartment, then 
    replace.


PROG

DISPLAY

A-B

N

/

P

SUBTITLE

ANGLE

SETUP

MENU

/

PBC

STEP

L

/

R

TITLE

REPEAT

ZOOM

MUTE

ENTER

SLOW

FUNCTION

1

2

3

4

5

6

7

8

9

+

10

0

Resume

LANGUAGE

TIME

VOL

-

VOL

+

TFT

ON

/

OFF

1

2

3

4

5

6

7

8

9

10

11

12

13

14

15

16

17

18

19

20

21

22

23

24

25

26

27

28

29

30

31

32

33

34

Remote Control Operation

-25-

Advanced Features

STEP

 Press 

STEP

 during playback to pause playback.  

 Press STEP repeatedly  to play frame.

 Press PLAY  to resume normal playback.

 Select to press REPEAT to select Repeat Title, Repeat 

    chapter, Repeat off During DVD playback.

 Press REPEAT to select Repeat Single, Repeat All and 

    Repeat off (  CD or Others).

REPEAT

MUTE

 Press MUTE to mute the Audio output 
 Press MUTE again to resume normal audio output

VOL+ VOL-

Press  <VOL+> button to increase Volume
Press <VOL-> button to reduce volume till to no volume output.

Summary of Contents for DVP-713

Page 1: ... carefully to ensure proper use of this product and keep this manual for further reference DVP 713 DIGITAL VIDEO DIGITAL AUDIO ENTER MODE OSD SETUP MENU VOL DC IN 12V DC IN 12V PO WE R PO WE R ON OF F ON OF F OP TIC AL OP TIC AL VID EO VID EO ...

Page 2: ...isc mode Video characteristic Video S N ratio Resolution Audio characteristic Frequency response Audio S N ratio Dynamic range Distortion D A Converter Output characteristic Video output Audio output Power Voltage Power consumption Size Weight DVP 713 NTSC PAL DVD CD MP3 MPEG4 CD R W HDCD JPEG DVD R W 65dB 500 lines fs 96KHz 20Hz 20KHz 1dB 90dB 90dB 0 01 96KHz 24bit 1Vp p 75 W Optical DC IN 6 12V ...

Page 3: ...NEL TO PREVENT ELECTRIC SHOCK MATCH WIDE BLADE PLUG WITH WIDE SLOT AND FULLY INSERT THE APPARATUS SHALL NOT BE EXPOSED TO WATER AND NO OBJECTS FILLED WITH LIQUID SUCH AS VASES SHALL BE PLAC ED ON THE APPARATUS DO NOT USE THE BATTERY TO DRIVING THE PLAYER WHILE BATTERY IS CHARGING 29 BAD DISC DISPLAYED Ensure the disc is not warped damaged or deformed Ensure the disc is not badly stained or damaged...

Page 4: ...ng current line plug a plug having one blade wider than the other This plug will fit into the power outlet only one way This is a safety feature If you are unable to insert the plug fully into the outlet try reversing the plug If the plug should still fail to fit contact your electrician to replace your obsolete outlet Do not defeat the safety purpose of the polarized plug 13 Power Cord Protection...

Page 5: ...Unauthorized substitutions may result in fire electric shock or other hazards 22 Safety Check Upon completion of any service or repairs to this product ask the service technician to perform safety checks to determine that the product is in proper operating condition 23 Wall or Ceiling Mounting The product should be mounted to a wall or ceiling only as recommended by the manufacturer 24 Heat The pr...

Page 6: ...GITAL VIDEO DIGITAL AUDIO ENTER MODE OSD SETUP MENU VOL POWER ON OFF VIDEO DC IN 6 12V AUDIO OPTICAL POWER LED 26 Advanced Features Remote Control Operation LANGUAGE Note This function is disc specific During DVD playback Press LANGUAGE repeatedly to select from up to 8 audio languages formats ANGLE During DVD playback Press ANGLE to view scenes from different camera angles Press ANGLE repeatedly ...

Page 7: ... batteries in the correct direction It is dangerous to charge heat open or short circuit the batteries Do not leave dead or expired batteries or mix old new batteries When not using the remote control for a long duration of time remove the batteries When operating range becomes reduced replace all batteries with new fresh ones If leakage from the battery occurs wipe the battery liquid from the bat...

Page 8: ...in the order you would like them to play When finished select Play Program and then press ENTER to play the tracks in the new programmed order Select Clear All and press ENTER to clear all the numbers you have input Input the title number and the chapter number in the desired order Then select Play Program and press ENTER to play the chapters in the order you have set Select Clear All and press EN...

Page 9: ...ITLE to display the DVD title menu or play the first title MENU PBC Note This function is subject to the disc During DVD playback press MENU to return to the program menu In the Setup Menu press MENU to return to the main menu or stop mode Any time press MENU to cancel the current OSD or some menus Note MP3 discs and some DVD discs do not have a 10 second review feature Press PLAY PAUSE from stop ...

Page 10: ...reparation before playing MODE function Push the MODE button once the combination icon shown in the display screen then press up button down button you want then left button or right button select thefunction press ENTER button the operation can be efficient X2 X4 X8 X20 X2 X4 X8 During DVD or CD playback press and hold to scan forward The playe r will review the disc at 2 4 8 and 20 times normal ...

Page 11: ...any of the following options as you like 1 1 GENERAL SETUP This option is used to setup TV screen format videofunctions and DVDfunctions With options of TV Display Angle Mark OSD Lang SPDIF Output Captions Screen saver LB On ENG On On Go To General Setup Page TV Display Angle Mark OSD Lang SPDIF Output Captions Screen saver General Setup Page Dolby 1 DVD menu setting 1 1 1 TV DISPLAY Follow the op...

Page 12: ...Mark OSD Lang SPDIF Output Captions Screen saver Set Angle Mark General Setup Page Dolby LB On ENG On On On Off TV Display Angle Mark OSD Lang SPDIF Output Captions Screen saver LB On ENG On On Set OSD Language English French Dutch General Setup Page Dolby Follow the operating instructions stated in DVD MENU SETUP in combination with the desired option in the following figure 20 Advanced Features ...

Page 13: ...l digital from the Optical digital audio outputs e g to a Mindisc recorder RAM To output the raw 5 1 channel digital bitstream form the coaxial digital audio audio outputs e g to an external amplifier Off To disable digital out Note 1 During CD playback points A and B must be within the same track During DVD playback points A and B can be selected from different chapters 2 This function is subject...

Page 14: ...ombination with the desired option in the following figure Follow the operating instructions stated in DVD MENU SETUP in combination with the desired option in the following figure 1 5 7 DEFAULTS This option will resume the original settings of this machine Preference Page Load Factory Setting Dolby TV Type Audio Subtitle Disc Menu Parental Password Default PAL ENG ENG ENG Reset Preference Page Ch...

Page 15: ... the desiredoption in the following figure 1 5 4 DISC MENU LANGUAGE This machine provides as the film s menu language options Follow the operating instructions stated in DVD MENU SETUP in combination with the desired option in the following figure English French Spanish Portuguese Chinese Italian German and Japanese English French Spanish Portuguese Chinese Italian German and Japanese Preference P...

Page 16: ...SETUP button to access the INITIAL SETUP menu which includes itemsof TV TYPE AUDIO SUBTITLE DISC MENU PARENTAL PASSWORD and DEFAULT Preset values are essential to a DVD player The user may change these items as desired 1 5 1 TV TYPE Follow the operation instructiops stated in DVD MENU SETUP in combination with desired option in the following figure Preference Page PAL ENG ENG ENG Dolby TV Type Aud...

Reviews: