


LARGE AND SMALL THROUGH DOVETAILS
30
Chapter 9
D4R Pro User Guide
9-5
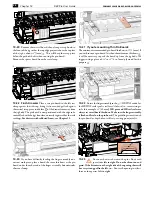
Remove one front cam clamp, lower the clamp bar and
attach the block to the jig face using the screw (No. 287) into the
entrapped square nut. Replace the clamp bar and cam clamp.
9-6
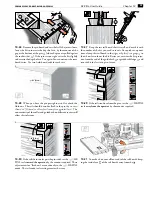
For boards up to
1
⁄
4
"[6mm] thick use dovetail bit 50-8 and
pin bit 140-8 with the
e7
or a
7
⁄
16
"[11,1mm] guidebush. To cut pins
matching the sockets made with bit 50-8, begin with the setting shown
here. Cut test pins in scrap stock and test for fit. Adjust as necessary.
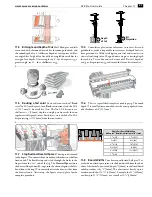
9-7
For boards up to
3
⁄
8
"[9,5mm] thick use dovetail bit 60-8 and
pin bit 140-8 with the
e7
or a
7
⁄
16
"[11,1mm] guidebush. To cut pins
matching the sockets made with bit 60-8, begin with the setting shown
here. Cut test pieces in some scrap stock and test for fit, then adjust as
necessary. Record the actual settings for bits 50-8 and 60-8 on these
scale reproductions below.
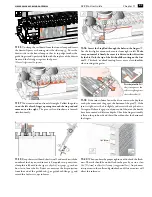
Note: You may also rout joints in boards
5
⁄
16
" to
3
⁄
8
"[8,0 to 9,5mm]
with bits No. 70-8 and 140-8 without the use of the shop-made
block.
PROJECT SETTINGS
IN
CH
ES
ME
TR
IC
Summary of Contents for D4R Pro
Page 14: ...JIG ASSEMBLY MOUNTING AND USING THE CLAMPS 6 Chapter 1 D4R Pro User Guide ...
Page 24: ...WOOD PREPARATION 16 Chapter 6 D4R Pro User Guide ...
Page 86: ...BIT SELECTION 78 Appendix II D4R Pro User Guide ...
Page 90: ...JIG PARTS 82 Appendix III D4R Pro User Guide ...
Page 92: ...PRINTED IN CANADA Joining Tradition with Today Printed in Canada ...


