


25
THROUGH DOVETAILS
Chapter 8
D4R Pro User Guide
8-27
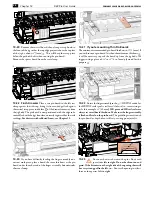
Unplug the router and remove the dovetail bit. Mount the
No. 140-8 straight bit to the router. If you are using two routers,
see concentricity concerns, Figures 7-6 thru 7-8.
REMEMBER SAFETY!
8-28
Place the router on the finger assembly and adjust the router
until the tip of the bit is level with the center of the pencil line.
Check to make sure the bit rotates freely.
8-29
Check that the scales are set one increment above the
1
⁄
2
"[12,7mm] mark
➀
. Rout out the waste between the pins.
Check to make sure no parts have been missed. See 17-1 to 17-5,
"Hints and Tips" on how to minimize tearout.
Use only light side pressure on the guide fingers.
1
1
8-30
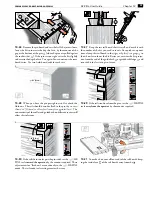
Remove the test pin board from the jig and test it for fit in
one of the tail boards. Make sure the outside faces
o
face outward
on both pieces. The joint will probably be too tight. A firm push
fit is perfect, perhaps a tap with the heel of your hand. But having
to use a mallet means the joint is too tight to take glue.
90o
8-31
If it is much too tight, move the finger assembly in (away
from you) by one division on the scale. If it is only a little tight,
adjust the scale by only half a division. If it is too loose, go to
8-33.
8-32
Replace the same pin board back in the jig, carefully aligned
against the same side stop. Rout off the sides of the pins and test
it again for fit.
Summary of Contents for D4R Pro
Page 14: ...JIG ASSEMBLY MOUNTING AND USING THE CLAMPS 6 Chapter 1 D4R Pro User Guide ...
Page 24: ...WOOD PREPARATION 16 Chapter 6 D4R Pro User Guide ...
Page 86: ...BIT SELECTION 78 Appendix II D4R Pro User Guide ...
Page 90: ...JIG PARTS 82 Appendix III D4R Pro User Guide ...
Page 92: ...PRINTED IN CANADA Joining Tradition with Today Printed in Canada ...


