5
Rugby 200-3.2.1en
Introduction and general operation
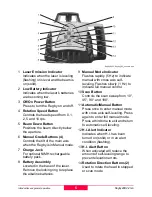
Rugby200-1 Rugby_200_overview.eps
1
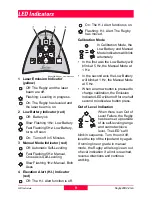
Laser Emission Indicator
Indicates when the laser is leveling
(flashing) or is level and the beam is
on (solid).
2
Low Battery Indicator
Indicates when the laser’s batteries
are becoming low.
3
Off/On Power Button
Press to turn the Rugby on and off.
4
Rotation Speed Button
Controls the head speed from 0, 1,
2, 5 and 10 rps.
5
Beam Down Button
Positions the beam directly below
the aperture.
6
Manual Grade Buttons (4)
Controls the tilt of the main axis
when the Rugby is in Manual mode.
7
Charge Jack
For optional NiMH rechargeable
battery pack.
8
Battery Assembly
Located in the base of the laser.
Remove the locking ring to replace
the alkaline batteries.
9
Manual Mode Indicator
Flashes rapidly (5 Hz) to indicate
manual with cross axis self-
leveling. Flashes slowly (1 Hz) to
indicate full manual control.
10
Scan Button
Controls the scan sweep from 10°,
45°, 90° and 180°.
11
Automatic/Manual Button
Press once to enter manual mode
with cross axis self-leveling. Press
again to enter full manual mode.
Press a third time to exit and return
to automatic self-leveling.
12
H.I. Alert Indicator
Indicates when H.I. has been
turned on (solid) or in an alert
condition (flashing).
13
H.I. Alert Button
When activated will reduce the
amount of self-leveling range to
prevent elevation errors.
14
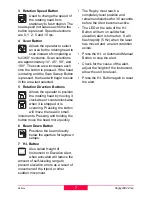
Rotation Direction Buttons (2)
Used to rotate the head in stopped
or scan mode


