background image

Split screens

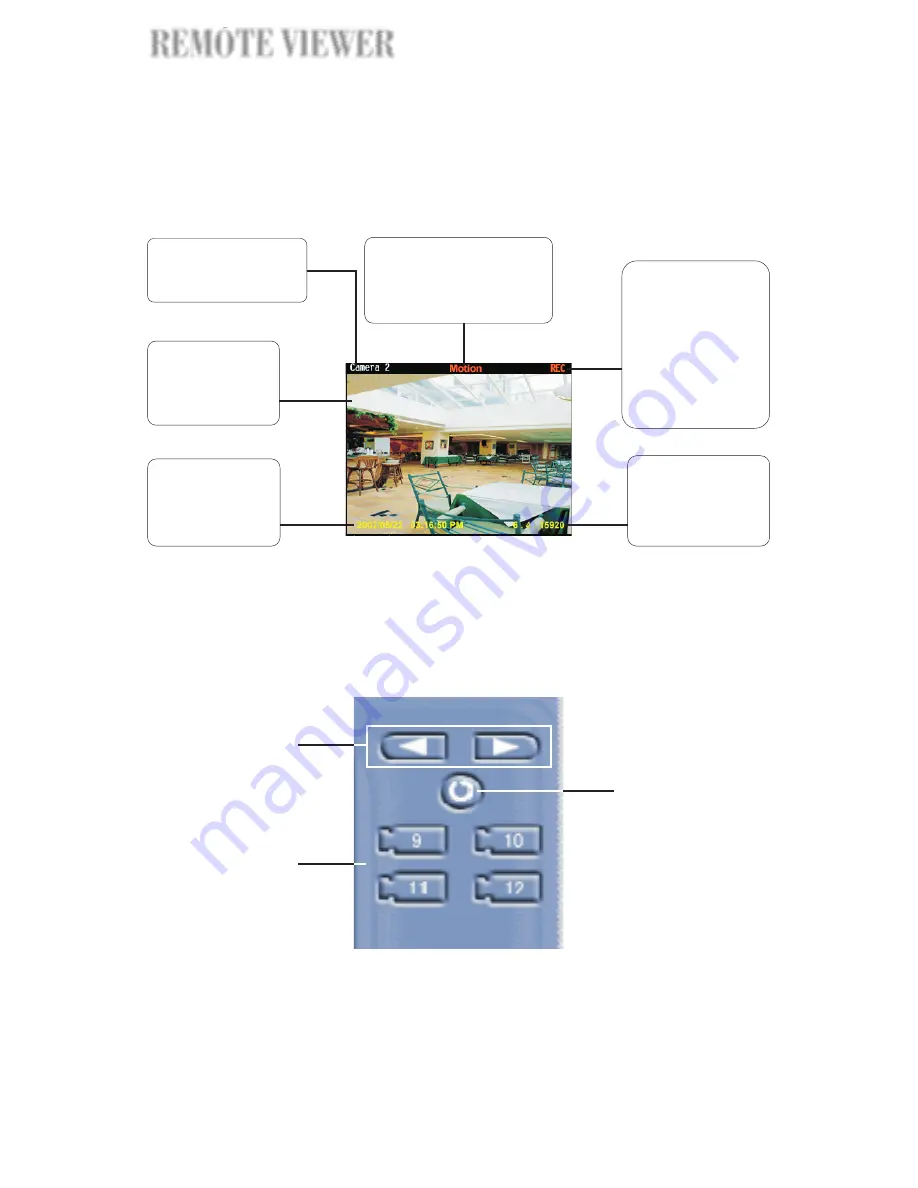
Each split screen on the Remote Viewer interface shows the camera name
and the current status of the video camera.

Video Control Panel

The Video Control Panel provides button controls for connecting to the remote
site, viewing remote cameras, and for looping through all cameras.

1. Previous and Next

buttons

Use these buttons to move to the previous or next
set of four cameras. Cameras are displayed on
Remote Viewer as follows: camera numbers (1, 2, 3,
4), (5, 6, 7, 8), (9, 10, 11, 12) and (13, 14, 15, 16).

This shows the name
of the remote video
camera.

An "Motion" status
message is displayed
when the remote camera
has detected an event.

A "REC" (record)
status message is
displayed when
displayed when the
remote camera is
currently in video
recording mode at
the remote site.

This displays the
frame rate and the
average data size
per second.

Each split screen
shows live video
from a remote
video camera.

This displays the
current date and
time of the
remote cameras.

1

2

3

72

REMOTE VIEWER

EWER

EWER

REMOTE VIEWER

Summary of Contents for WinFast Guard Pro

Page 1: ...WinFast Guard Pro User s Manual...

Page 2: ...nt may be copied or reproduced in any form or by any means without the prior written consent of Leadtek Research Inc Leadtek makes no warranties with respect to this documentation and disclaims any im...

Page 3: ...Operation Panel 9 Other button controls 11 Creating a site map 11 Viewing the site map 13 General settings General tab 14 Changing split screen position 6 Maximizing split screen size 6 Camera Panel 7...

Page 4: ...s 22 Specifying the methods for detecting events 23 Responding to events 24 Digital recording 29 Fine tuning motion detection settingsSplit Screens Configuring input devices Input tab 33 Configuring o...

Page 5: ...back Web page 74 Snapshot Web page 75 Saving video 52 Capturing image snapshots 52 Using Remote Viewer through Internet connection 57 Using Remote Viewer through direct modem Connection 58 The Operati...

Page 6: ...ut to a phone etc You can have the same configuration options for all camera sensor devices or specify different settings for each device allows you to play back previous recorded events This program...

Page 7: ...tment of compression ratios from the scene complexity and achieves optimal quality and high compression ratio Supports 640 x 480 640 x 240 and 320 x 240 video window sizes Supports 1 4 6 7 9 10 13 16...

Page 8: ...ng your warehouse through 24 hour or month long recording Office surveillance Monitor entrance and exit to keep track of who goes in and out of your office Automated bank machine and teller counter su...

Page 9: ...nsole will allow any user to have access to the program To restrict the program s access rights only to privileged users click to open the dialog box then click the User tab and select the Enable acce...

Page 10: ...s to show live video from different video cameras Click this arrow button to minimize the Guard Console program window onto the Windows Taskbar Status indicators video recording video source event det...

Page 11: ...nlarge its size and temporarily cover its three neighboring screens To restore the split screen back to its normal size double click on it again How split screens are maximized depends on the total nu...

Page 12: ...er button Input Output Device Panel Input Output Device Panel displays light indicators that show whether the input output devices are connected to the Site Server To monitor a video camera click its...

Page 13: ...ted and turned on When a light indicator appears red in color it means that connection to the video camera is lost Event Signal Stands for event signal which could have been activated by motion detect...

Page 14: ...and Stop buttons are available only when the current camera motion detection function has not been configured to be performed on a scheduled basis Click here to switch to the Camera Adjustment Panel C...

Page 15: ...ion Panel Click here to set contrast back to the default setting This is the Pan and Tilt control Click one of the four arrow buttons to adjust the camera angle up down left or right Click the cross b...

Page 16: ...dit mode place the camera sensor and output device icons on the site map according to their actual installed locations See the figure next page for step by step instructions on how to load a picture o...

Page 17: ...dy been plotted on the site map When you are done positioning icons click this button to return to Map mode Click this button to switch to sensor icons These are sensor icons Drag them onto the map an...

Page 18: ...and see what is happening live at the site Configuring the Guard Console Click on the Guard Console program to open the Preferences dialog box and choose which video cameras and sensors to monitor ena...

Page 19: ...to enable other users to remotely monitor the site from a Internet Intranet or direct modem connection Allocate disk drives and folders for saving digitally recorded videos See page 19 for more detail...

Page 20: ...to be used Select this option to restart the computer after a specified number of days Generate and e mail reports about detected events periodically in a daily weekly or monthly basis See page 23 for...

Page 21: ...all Clear all Details of the allocated disk space remaining disk space and the specific cameras assigned to each folder are displayed in the list in the tab To change the assignments of a folder clic...

Page 22: ...re large in size and may eat up disk space fast When the option is selected Guard Console deletes old recordings and frees up disk space for reuse Click the button to open the and specify how to recyc...

Page 23: ...lecting the option This is how Guard Console displays video when this option is selected When displaying a single split screen in full screen view video screen resolution will be changed to 640x480 Wh...

Page 24: ...reports will be sent Report 1 Daily Weekly Monthly report 2 Events detected by 3 SMTP server 4 E mail from 5 E mail to Choose whether to send reports on a daily weekly or monthly basis Select which e...

Page 25: ...tings for a video camera Type in a name for identifying a video camera for instance the location where the camera is installed Assign each camera with a privilege level to restrict unauthorized users...

Page 26: ...Select this option to enable digital recording See page 33 for more details Specify the methods to use for detecting events There are three methods sensor detection motion detection or manual trigger...

Page 27: ...gs To display information such as camera name number etc on the split screens select the option and click Then in the choose the information to be displayed Display captions Settings Captions dialog b...

Page 28: ...and ignored event duration See page 34 for more details Sensor detection This allows sensors in the site to monitor and detect suspicious activities Click the button to choose which sensors in the si...

Page 29: ...ications for more details Select this option to enable Guard Console to send out signals to external devices when events have been auto detected or manually triggered Click the button to choose which...

Page 30: ...mail addresses that will receive the event notification Click on an e mail address to select it for deletion or modification Click this button to add an e mail address Click this button to remove the...

Page 31: ...r list To modify a fax number first select that number in the fax number list then make the changes in the edit box at the bottom Click the button to update the fax number Modify Phone Notifies by pho...

Page 32: ...odify a telephone number first select that number in the telephone number list then make the changes in the edit box at the bottom Click the button to update the telephone number Modify Pager Notifies...

Page 33: ...Displays an Event indicator on the Remote Viewer interface of users who are remotely viewing your video cameras from a Web browser A blinking Event indicator will be displayed on the top central port...

Page 34: ...und the clock digital recording Records only live events If no event has been detected by default the recording frame rate will be 1 frame per 5 seconds If there is an event detected the recording fra...

Page 35: ...following options and controls in the can be adjusted to mask out areas and exclude them from motion detection Motion detection Camera Setting Motion Detection Settings dialog box Motion Detection Set...

Page 36: ...vent High sensitivity means that even the smallest movement will be detected but it could be a false event Careful testing and fine tuning of the sensitivity setting is recommended Set the tolerance l...

Page 37: ...cameras will take turns and each camera will be displayed for a specified amount of time 1 Split screen 2 Split screens list 3 Camera assignments Choose a split screen layout on which to assign video...

Page 38: ...select an I O card and set up the connections to security devices such as sensors and alarms Under the tab click the Input tab to configure sensor devices and click the tab to enable devices to recei...

Page 39: ...g input will be monitored Or clear the checkboxes to disable connections to the sensors Specify the interval in seconds for scanning input ports periodically Specify the sensor name for instance the l...

Page 40: ...nd Guard Console are well connected Sensor test dialog box Configuring output devices Output tab In the tab at most 16 output devices can be enabled and customized The following describes the settings...

Page 41: ...or NO Normal Open Specify the output voltage Specify the interval for sending the specified output voltage to the device Specify the valid time period for activating the output device Click this butt...

Page 42: ...on 3 From the drop down list select 4 To add a new schedule click 5 In the dialog box that opens set a time schedule for monitoring the camera and select the checkboxes of tasks to be performed within...

Page 43: ...from the drop down list See page 33 for more details on digital recording Select the detection methods motion detection sensor detection or Manual trigger See page 27 for details on detection methods...

Page 44: ...mera 1 Choose a video camera by clicking the number button that corresponds to that camera 2 Select the option 3 From the drop down list select 4 The calendar shows the current month with the current...

Page 45: ...of privilege remotely through a Web browser or remote viewer tool Remote user A user who is assigned with a privilege can view cameras that were assigned with Manager Operator or Remote user privileg...

Page 46: ...g button controls to check recorded logs of events and inspect the hard disk storage space in the server computer that runs Site Server Event Log This button shows the number of new events that have b...

Page 47: ...k space Click this button to open the dialog box and view details on disk usage Record Storage Information Click the button to delete all recorded logs Only users with privileges have rights to delete...

Page 48: ...cord Viewer Launching Record Viewer Basically these are the controls that you will need to use when you retrieve history records and playback previously recorded videos Program Interface An Overview T...

Page 49: ...databases contain daily manual backup copies of recorded surveillance video Each day s digital recordings can be backed up in a separate database using WinFast Guard Pro s program Refer to Chapter 4...

Page 50: ...n the calendar to select it 3 Click to close the 4 The history records of the selected date are automatically retrieved Calendar dialog box To select a date OK Calendar dialog box History records of t...

Page 51: ...the Camera buttons on the Camera Selection Panel are toggle buttons and allow multiple selection of video cameras To view recorded videos from selected cameras choose the video cameras by clicking the...

Page 52: ...tically be selected according to the stored combinations Camera buttons Camera Selection Panel Memory buttons To store a combination of camera selections to a Memory button Camera buttons Camera Selec...

Page 53: ...anually triggered recordings of a specified date and displays them in the History list The History list shows the actual time of video recording and the camera device from which surveillance video was...

Page 54: ...creens You can also enable quick display and loop playback features Click the button to open the Preferences dialog box and customize these settings 1 Timeline interval 2 Captions This setting determi...

Page 55: ...e All records list this shows the start time of the selected time segment When playing events 00 00 00 will be shown as the Start Time Shows the timecode of the current video scene When playing record...

Page 56: ...speed The maximum speed is 16 x Zooming the video during playback When playing recorded surveillance video in single view you can zoom in or out of the video with ease Click the button repeatedly to...

Page 57: ...file will be saved in AVI a compressed video file format that provides good video quality Start time End time Start time End time Preview File name OK If a video recording clearly shows suspicious act...

Page 58: ...ill be prompted to provide login information To be able to use the Backup Scheduler program the login name and password entered must belong to an existing user account that has been assigned with eith...

Page 59: ...recorded surveillance videos in Guard Console s Main database See Performing manual backups below for more details Enables the Backup Scheduler program to perform automatic backups on a daily basis Se...

Page 60: ...rogram backs up the video recordings that fall within the specified date and time range and retains them in the Main database after the backup process is complete When selected the program deletes the...

Page 61: ...estination folder for saving the daily backups Each day s surveillance videos recorded by will be saved as an individual backup database Specify the time period to back up the previous day s video rec...

Page 62: ...screens and sixteen split screens for Internet connection To invoke four split screens Remote Viewer click on the appropriate command in the Start Programs WinFast Guard Pro Remote Viewer Four Split...

Page 63: ...s been assigned a unique IP address Your client machine runs Remote Viewer should connect to Internet also 2 Web browser needs Microsoft Internet Explorer version 5 5 or later versions Remote Viewer s...

Page 64: ...ccept domain name also 5 Select the Internet bandwidth type of local machine 6 You can select a historical connection to fill out the connection information automatically 7 Click on OK button to start...

Page 65: ...n your Windows taskbar select Control Panel menu item to invoke Control Panel window 4 Click the Network Connections icon in the Control Panel window to open Network Connections window 60 REMOTE VIEWE...

Page 66: ...phone number for the telephone line connected to the modem 6 Click the Create a new connection item to launch the New Connection Wizard window Click the Next button 7 Select the Set up an advanced con...

Page 67: ...8 Select the Accept incoming connections option and click the Next button 9 In the Connection devices list select the modem driver and click the Next button 62 REMOTE VIEWER EWER EWER REMOTE VIEWER...

Page 68: ...ct Allow virtual private connections or Do not allow virtual private connections option and click the Next button 11 Click the Add button to open New User dialog box 63 REMO REMO REMOTE VIEWER REMOTE...

Page 69: ...tring DVR Click the OK button to close the dialog box Click the Next button 13 In the Networking software list select Internet Protocol TCP IP item and press Properties button to open Incoming TCP IP...

Page 70: ...ling computer to specify its own IP address option Click the OK button to close the dialog box 15 Click the Next button and then click the Finish button to complete the settings 65 REMO REMO REMOTE VI...

Page 71: ...ard Console machine 2 Install the modem driver for the modem device 3 Click the Start Settings Network and Dial up Connections Make New Connection menu item to invoke Network Connection Wizard window...

Page 72: ...and the telephone number for the telephone line connected to the modem 5 Select the Accept incoming connections option and click the Next button 6 In the Connection devices list select the modem driv...

Page 73: ...ct Allow virtual private connections or Do not allow virtual private connections option and click the Next button 8 Click the Add button to open New User dialog box 68 REMOTE VIEWER EWER EWER REMOTE V...

Page 74: ...ing DVR Click the OK button to close the dialog box Click the Next button 10 In the Networking components list select Internet Protocol TCP IP item and press Properties button to open Incoming TCP IP...

Page 75: ...ling computer to specify its own IP address option Click the OK button to close the dialog box 12 Click the Next button and then click the Finish button to complete the settings 70 REMOTE VIEWER EWER...

Page 76: ...s record video etc See Video Control Panel below for more details Use this PTZ Camera Control Panel to adjust the angle of PTZ cameras on the remote site See page 65 for more details This displays the...

Page 77: ...displayed on Remote Viewer as follows camera numbers 1 2 3 4 5 6 7 8 9 10 11 12 and 13 14 15 16 This shows the name of the remote video camera An Motion status message is displayed when the remote ca...

Page 78: ...m camera you can use the PTZ Camera Control Panel to adjust the angle of the camera Use the buttons beneath this panel to start stop video recording 1 Zoom control 2 Record button 3 Stop button Click...

Page 79: ...video recordings Select a log entry that shows details about the recorded surveillance video you want to view Then click the button to open the and play back the recorded video Play Playback Web page...

Page 80: ...urrent video frame save it as a JPEG file and then display it on the Snapshot Web page for printing Snapshot Web page The Snapshot Web page displays the captured image The site name camera name date a...

Reviews: