background image

21

20

PowerReclineXR

®

& PowerReclineXRw

Operating Instructions

PowerReclineXR

®

& PowerReclineXRw

Operating Instructions

– To reduce the risk of electric shock, serious 

injury or death:

•   Plug directly into a wall outlet. Do not use an extension cord, adapter or surge protector.

DANGER

– To reduce the risk of serious injury:

•   Sit down in the unit slowly. To avoid tip over, do not throw your weight against the back

of the unit. Move the unit into or out of the reclining position slowly, making sure that 
no children or pets are in close proximity.

•   Keep hands, arms and body parts away from the open area between a reclined back and 

an upright back on a motion sofa or modular. This area must remain clear at all times to 
provide unobstructed movement and prevent injury that could occur when a reclined back 
is returning toward the upright position.

•   The PowerReclineXR

®

and PowerReclineXRw

units are intended for a single occupant not 

exceeding 300 pounds per seat. Do not operate an individual seat with more than one 
occupant in or on any part of the individual seat.

•   To safely exit the unit and prevent a tripping hazard, bring the back upright 

and close the legrest.

WARNING

To avoid product damage, the back recline and legrest extension features should not be operated continuously 
for extended periods of time. After 1 minute of continuous operation, allow these features to rest for 9 minutes.

Plug the power cord directly into a wall outlet. 

Make sure there is enough slack in the cord running

from the chair to the outlet to allow for rocking and reclining. Never stretch or strain a cord.

The PowerReclineXR

®

and PowerReclineXRw

offers three reclining options:

•   Only recline the back. When the back is reclined, the PowerReclineXR

® 

chair can be rocked.

•   Only extend the legrest. When the legrest is extended, the chair body tilts backward.
•   Operate both the back recline and legrest extension simultaneously. 

Back Recline:

Press and hold down the top, front button. Release the button when you have reached a comfortable position.

To return the back to the upright position, press and hold down the top, back button. Release the button 
when you have reached a comfortable position, or when the back is fully upright.

Legrest Extension:

Press and hold down the bottom, front button. Release the button when you have reached a comfortable position.

To return the legrest to the closed position, press and hold down the bottom, back button. Release the 
button when you have reached a comfortable position, or when the legrest is fully closed.

Back Recline and Legrest Extension:

The back recline and legrest extension can move simultaneously by pressing and holding both front buttons 
at the same time, releasing the buttons when you have reached a comfortable position.

The reclined back and extended legrest can also be returned simultaneously by pressing and holding both 
back buttons at the same time, releasing them when you have reached a comfortable position, or the back is
fully upright and the legrest is fully closed.

The function of each button is explained in greater detail on the following page.

Unplug the power supply if you are going to be away from your residence for an extended period of time.

NOTICE:

After 1 minute of continuous operation, allow the back recline
and legrest extension features to rest for 9 minutes.

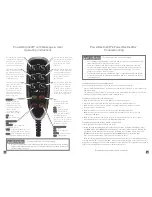
Press and hold down the top, back button to return the
back to the upright position. Release the button to stop
the back in any reclined position or when fully raised.

Back
Return

Legrest 
Extension

Back 
Recline

Charging
USB Port

Press and hold down the top, front button to recline
the chair back. Release the button to stop the back
in any reclined position or when fully reclined.

Press and hold down the bottom, back button to
close the legrest. Release the button to stop the
legrest in any extended position or when fully closed.

Press and hold down the bottom, front button to
extend the legrest and tilt the chair body backward.
Release the button to stop the legrest in any 
extended position or when fully raised.

USB Charging Port Instructions

Plug a small portable electronic device into the USB charging port. 

The USB port is for charging only

and does not have data transferring capabilities.

USB Output Specifications:

5VDC, 2.1A

Legrest 
Return

Press and hold down the
back top and bottom 
buttons to raise the back 
and close the legrest and
return the chair body.
Release the buttons to 
stop the chair in any 
position or when the 
back is fully raised and 
the legrest is fully closed.

Press and hold down 
the front top and 
bottom buttons to 
recline the back and
extend the legrest 
and tilt the chair body
backward. Release 
the buttons to stop the
chair in any position 
or when the back is 
fully reclined and the
legrest is fully raised.

– To reduce the risk of serious injury:

•   Do not use unit if power control is damaged or wet. Do not use unit if the button activation

switch or hand wand has been exposed to, or dropped in, water or any liquid. Contact your
La-Z-Boy

®

dealer for service. 

WARNING

Summary of Contents for PowerReclineXRw

Page 1: ...cker Recliner Wall Recliner Motion Sofas ________ Sillón reclinable y mecedor Sillón reclinable para espacios pequeños Sillón con movimiento ________ Fauteuil inclinable à bascule Fauteuil inclinable mural Canapés inclinables ...

Page 2: ...veseat Assembly Instructions 12 13 PowerReclineXRw Motion Sofa Assembly Instructions 14 17 Battery Backup Assembly Instructions 18 PowerReclineXR PowerReclineXRw Operating Instructions 20 21 PowerReclineXR PowerReclineXRw with Optional Hand Wand Operating Instructions 22 23 PowerReclineXR with Massage and Heat Operating Instructions 24 26 PowerReclineXR PowerReclineXRw Troubleshooting 27 28 Furnit...

Page 3: ...and legrest extension features to rest for 9 minutes 5 4 To reduce the risk of electric shock serious injury or death Disconnect the electrical plug from the wall outlet before cleaning moving servicing or when not in use for an extended period of time Do not use this product if it is wet in water around water or any liquid Do not handle the plug or remote control with wet hands To prevent suffoca...

Page 4: ... power supply to the furniture Align the power supply connector to the motor connector routed behind the unit FIGURE 5 Push the connectors together until fully seated and close the locking cover to secure the connection 5 Connect the 120 volt power cord to the power supply FIGURE 6 Do not plug in until instructed in the Operating Instructions 6 If assembling a PowerReclineXR Rocking Loveseat proce...

Page 5: ...ne or both sides move out of position the brackets are not engaged FIGURE 4 Remove the back and repeat the steps above If you are unable to install the back properly contact your La Z Boy dealer for assistance Lock the brackets by using a screwdriver to push down the locking levers FIGURE 5 4 To access the connectors gently roll the chair forward to rest on the arms and the top of the back The con...

Page 6: ...gn the power supply connector to the motor connector routed behind the chair FIGURE 9 Push the connectors together until fully seated and close the locking cover to secure the connection 10 Connect the 120 volt power cord to the power supply FIGURE 10 Do not plug in until instructed in the Operating Instructions 11 Proceed to the Battery Backup Assembly Instructions 12 To remove the back unplug th...

Page 7: ...uce the risk of serious injury Provide a clear path for operation of the back and legrest Place tables and area rugs at a distance to allow the legrest to fully extend without rubbing or interference WARNING To reduce the risk of serious injury The front of the unit must be raised to engage the front bracket Please seek assistance if you are unable to lift at least 21 pounds Keep feet clear of the...

Page 8: ...al FIGURE 3 Hold the back at a slight angle to the seat and align the brackets on the back with the brackets on the body FIGURE 4 Rotate the back upright and lower the back onto the body FIGURE 4 making sure the back and body brackets are completely engaged To make sure the back is properly installed with both sets of back and body brackets engaged stand behind the unit and twist the back from sid...

Page 9: ...t FIGURE 7 Connect the Y cable to the motor connectors and to the power supply Align one motor connector to a long lead Y cable connector push the connectors together until seated and close the locking cover to secure the connection FIGURE 8 Repeat this for the other motor connector and Y cable long lead Then align the short lead of the Y cable to the power supply connector push the connectors tog...

Page 10: ...ith the product 2 Depending on the style purchased the battery compartment is located in either the bottom or side of the power supply Locate the battery compartment and slide the battery cover over to access the battery compartment Your power supply will look like FIGURE 1 or FIGURE 2 3 Snap the connection caps on the battery terminals Place the batteries in the power supply 4 Slide the battery c...

Page 11: ...ck button Release the button when you have reached a comfortable position or when the legrest is fully closed Back Recline and Legrest Extension The back recline and legrest extension can move simultaneously by pressing and holding both front buttons at the same time releasing the buttons when you have reached a comfortable position The reclined back and extended legrest can also be returned simul...

Page 12: ... reclining option buttons on the right side of the hand wand Release the button when you have reached a comfortable position To return to the upright position press and hold down one of the three return buttons on the left side of the hand wand Release the button when you have reached a comfortable position or when the back is fully upright and the legrest is fully closed The function of each hand...

Page 13: ...duce the risk of electric shock serious injury or death Plug directly into a wall outlet Do not use an extension cord adapter or surge protector DANGER To reduce the risk of serious injury Sit down in the unit slowly To avoid tip over do not throw your weight against the back of the unit Move the unit into or out of the reclining position slowly making sure that no children or pets are in close pr...

Page 14: ... connectors are secured refer to the Assembly Instructions If the PowerReclineXR or PowerReclineXRw still does not operate properly contact your dealer for instructions on returning the unit for examination and repair Except for the replacement of the power supply never attempt to make any repairs or adjustments yourself Troubleshooting Instructions Continued 27 26 PowerReclineXR with Massage Heat...

Page 15: ...The finish on the cup holder can be damaged during use or cleaning It is recommended that a coaster be used to reduce the chance for damage and that the cleaning instructions be followed Use water and mild soap such as dish soap to clean the cup holders Dry immediately and thoroughly with a soft clean cloth to maintain the finish The use of harsh abrasive cleaners is not recommended and must be av...

Page 16: ...eclineXR 42 43 Instrucciones de armado del sillón con movimiento PowerReclineXRw 44 47 Instrucciones de armado de las baterías de reserva 48 Instrucciones de operación del PowerReclineXR y del PowerReclineXRw 50 51 Instrucciones de operación del PowerReclineXR y el PowerReclineXRw con control remoto opcional 52 53 Instrucciones de operación del PowerReclineXR con masajeador y calor 54 56 Resolució...

Page 17: ...er líquido No toque el enchufe o el control remoto si sus manos están mojadas Mantenga bolsas de plástico alejadas de los niños para que éstos no se asfixien Enchufe directamente en un tomacorriente en la pared No utilice un cordón de extensión un adaptador o protector de sobretensión Mantenga el cordón alejado de los niños pequeños y no lo use si puede implicar riesgo de tropiezos Para reducir el...

Page 18: ...ortes es conectar las unidades y evitar que se separen mientras están en el suelo El sistema de soportes no brinda un soporte estructural adecuado para el movimiento de las unidades conectadas Nunca hacer funcionar la unidad a menos que se encuentre sobre su base en posición recta Algunas unidades contienen portavasos Tenga cuidado de evitar derrames de las bebidas lo cual puede ocasionar daño en ...

Page 19: ... los conectores de manera conjunta hasta que queden totalmente asentados y cierre la cubierta de bloqueo para asegurar la conexión 5 Conecte el cable eléctrico de 120 voltios a la fuente de alimentación FIGURA 6 No enchufe antes de lo indicado en las instrucciones de operación 6 Si se está armando un sillón de dos piezas reclinable PowerReclineXR continúe con las instrucciones de armado del sillón...

Page 20: ...y para solicitar asistencia Con un destornillador empuje hacia abajo las palancas de seguro para asegurar los soportes FIGURA 5 4 Para acceder a los conectores empuje con suavidad el sillón hacia adelante para que descanse sobre los apoyabrazos y la parte superior del respaldo Los conectores se encuentran en la parte posterior del sillón debajo del asiento trasero 5 Identifique los conectores eléc...

Page 21: ...l motor que va por detrás del sillón FIGURA 9 Empuje los conectores de manera conjunta hasta que queden totalmente asentados y cierre la cubierta de bloqueo para asegurar la conexión 10 Conecte el cable eléctrico de 120 voltios a la fuente de alimentación FIGURA 10 No enchufe antes de lo indicado en las instrucciones de operación 11 Proceda a las instrucciones de armado de las baterías de reserva ...

Page 22: ...que el sillón mecedor y reclinable derecho área para sentarse FIGURA 2 aproximadamente a 2 al costado de la consola Coloque el sillón mecedor y reclinable derecho área para sentarse con los pasadores roscados levemente detrás de la consola Separe los frentes de las unidades que se conectarán a aproximadamente 6 de distancia Mueva el sillón mecedor y reclinable área para sentarse hacia adelante has...

Page 23: ... sillón y alinee los soportes del respaldo con los soportes del cuerpo del sillón FIGURA 4 Rote el respaldo hacia arriba y bájelo sobre el cuerpo del sillón FIGURA 4 mientras verifica que los soportes del respaldo y el cuerpo encajen por completo Para asegurarse de que el respaldo esté correctamente instalado con todos los soportes para el respaldo y el cuerpo párese detrás de la unidad y gire el ...

Page 24: ...l motor y cable largo del cable en Y Luego alinee el cable corto del cable en Y con el conector de la fuente de alimentación y empuje los conectores de manera conjunta hasta que queden totalmente asentados y cierre la cubierta de bloqueo para asegurar la conexión FIGURA 9 7 Conecte el cable eléctrico de 120 voltios a la fuente de alimentación FIGURA 10 No enchufe hasta que lo indiquen las Instrucc...

Page 25: ... comprado el compartimiento de baterías se encuentra en la parte de abajo o lateral de la fuente de alimentación Localice el compartimiento de baterías y deslice la cubierta para acceder al compartimiento Su fuente de alimentación lucirá como la FIGURA 1 o la FIGURA 2 3 Coloque las tapas de los conectores en las terminales de la batería Coloque las baterías en la fuente de alimentación 4 Deslice l...

Page 26: ... inferior posterior Suelte el botón cuando haya logrado una posición cómoda o cuando el apoyapiernas esté completamente cerrado Cómo reclinar el respaldo y extender el apoyapiernas Puede reclinar el respaldo y extender el apoyapiernas al mismo tiempo presionando y manteniendo presionados los botones frontales a la vez y suelte los botones cuando logre una posición cómoda También puede volver el re...

Page 27: ...á recto por completo y el descansapiernas está cerrado por completo La función de cada botón del control remoto se explica con mayor detalle en la siguiente página Desenchufe la fuente de alimentación si no estará en su residencia durante un período prolongado Instrucciones de operación del PowerReclineXR y el PowerReclineXRw con control remoto opcional Para reducir el riesgo de choque eléctrico l...

Page 28: ...gina Desenchufe la fuente de alimentación si no estará en su residencia durante un período prolongado FUNCIÓN DE CALOR O MASAJE Presione el botón MSG para comenzar y detener el masaje Presione el botón para seleccionar el modo de masaje La luz del botón se pondrá verde para masaje Constante Constant ámbar para masaje por oleadas Wave y roja para masaje por pulsación Pulse El programa de masaje dur...

Page 29: ... el respaldo en cualquier posición reclinada o cuando está elevado por completo Presione por tres segundos el botón hacia abajo para cerrar el descansapiernas y volver a la estructura del sillón Deje de presionar el botón para detener el descansapiernas en cualquier posición extendida o cuando está cerrado por completo Presione por tres segundos el botón hacia abajo para elevar el respaldo y cerra...

Page 30: ... portavasos iluminado El terminado en el portavasos puede ser dañado durante su uso o limpieza Se recomienda que sea utilizado un mantel protector para reducir la probabilidad de daños y que se sigan las instrucciones de limpieza Use agua y jabón suave por ejemplo detergente para vajillas para limpiar los portavasos Seque inmediata y minuciosamente con un paño limpio y suave para mantener el acaba...

Page 31: ... de la causeuse à bascule PowerReclineXRMD 72 73 Instructions d assemblage pour le canapé inclinable PowerReclineXRwMC 74 77 Directives d assemblage de la batterie de sauvegarde 78 Instructions d utilisation pour le PowerReclineXRMD et le PowerReclineXRwMC 80 81 Instructions d utilisation pour le PowerReclineXRMD et le PowerReclineXRwMC avec commande manuelle facultative 82 83 Mode d emploi du fau...

Page 32: ...rancher la fiche électrique de la prise murale avant de nettoyer déplacer le meuble ou en assurer l entretien ou lorsqu il n est pas utilisé pendant une période prolongée Ne pas utiliser ce produit s il est mouillé dans l eau près de l eau ou de tout autre liquide Ne pas manipuler la fiche ou la télécommande avec les mains mouillées Pour prévenir la suffocation garder les sacs de plastique loin de...

Page 33: ... de crochets ne fournit pas un soutien structurel adéquat afin de déplacer des unités reliées Ne jamais faire fonctionner l unité sauf lorsqu elle est sur son socle et en position verticale Certains meubles sont munis de porte gobelets S assurer d empêcher les déversements de boissons qui pourraient endommager le revêtement Après 1 minute de fonctionnement en continu permettre à l inclinaison du d...

Page 34: ...ensemble jusqu à ce qu ils soient entièrement emboîtés puis fermerle couverc le de verrouillage afin de sécuriser la connexion 5 Brancher le cordon d alimentation de 120 volts du transformateur d alimentation FIGURE 6 Ne pas effectuer le branchement avant d en avoir reçu la directive 6 Si vous effectuez l assemblage d une causeuse à bascule PowerReclineXRMD suivre les directives d assemblage de la...

Page 35: ... sa position les crochets ne sont pas engagés FIGURE 4 Retirer le dossier et répéter les étapes ci dessus Si vous ne parvenez pas à installer correctement le dossier communiquer avec votre revendeur La Z BoyMD pour obtenir de l aide Verrouiller les supports en utilisant un tournevis pour pousser les leviers de verrouillage vers le bas FIGURE 5 4 Pour accéder aux connecteurs pencher lentement le si...

Page 36: ...r toupillé qui se situe derrière le fauteuil FIGURE 9 Imbriquer les connecteurs en les pressant ensemble jusqu à ce qu ils soient entièrement emboîtés puis fermer le couvercle de verrouillage afin de sécuriser la connexion 10 Brancher le cordon d alimentation de 120 volts du transformateur d alimentation FIGURE 10 Ne pas effectuer le branchement avant d en avoir reçu la directive 11 Passer aux dir...

Page 37: ...és pour assurer un dégagement adéquat 5 Placer le côté droit en position assise de la berceuse inclinable FIGURE 2 à environ 5 08 cm 2 po à côté de la console Positionner le côté droit en position assise de la berceuse inclinable avec goujons filetés légèrement derrière la console Séparer le devant des unités à raccorder à environ 15 2 cm 6 po d intervalle Tirer le fauteuil inclinable de droite en...

Page 38: ...Faites tourner le dossier verticalement et baissez le sur l unité FIGURE 4 en vous assurant que le dossier et les fixations sont complètement engagés Afin de s assurer que le dossier est installé et engagé correctement avec l ensemble du dossier et celui des fixations tenez vous debout derrière l unité et tournez le dossier d un côté vers l autre Si un des deux 2 côtés se déplace les fixations ne ...

Page 39: ...connecteur du moteur et le long cordon de câble Y Aligner ensuite le court cordon du câble Y avec le connecteur du transformateur électrique pousser les connecteurs en les pressant ensemble jusqu à ce qu ils soient entièrement emboîtés puis fermer le couvercle de verrouillage afin de sécuriser la connexion FIGURE 9 7 Connectez le cordon d alimentation 120 volts au transformateur FIGURE 10 Ne pas b...

Page 40: ...ment du meuble 2 Suivant le style acheté le compartiment à piles se situe soit en bas soit sur le côté du transformateur électrique Trouver le compartiment à piles et faire glisser le couvercle pour y avoir accès Votre transformateur électrique ressemblera à la FIGURE 1 ou la FIGURE 2 3 Enclencher les capuchons sur les bornes de la batterie Placez les piles dans le bloc du transformateur électriqu...

Page 41: ...se jambes est complètement fermé Dossier inclinable et extension repose jambes Le dossier inclinable et l extension repose jambes peuvent être bougés simultanément en appuyant et en tenant en même temps les deux 2 boutons avant et en relâchant ces boutons lorsque vous avez atteint une position confortable Le dossier incliné et l extension repose jambes peuvent aussi être bougés simultanément en ap...

Page 42: ...foncé Relâcher le bouton lorsque vous avez atteint une position confortable ou lorsque le dossier est bien droit et que le repose jambes est complètement fermé La fonction de chaque bouton de commande manuelle est expliquée plus en détail à la page suivante Débrancher le transformateur électrique si vous vous absentez de votre résidence pendant une période prolongée Instructions d utilisation pour...

Page 43: ...ctrique si vous vous absentez de votre résidence pendant une période prolongée AVIS Après une minute de fonctionnement continu mettre en pause les fonctions d inclinaison et de levée du repose jambes pendant neuf minutes POUR FAIRE FONCTIONNER LE MODE MASSAGE OU LE MODE CHALEUR Appuyer sur le bouton MSG pour commencer et arrêter la fonction massage Appuyer sur le bouton pour sélectionner le type d...

Page 44: ...u lorsqu il est complètement relevé Appuyer sur le bouton et le maintenir enfoncé pour fermer le reposejambes et remettre la chaise en position Relâcher le bouton pour immobiliser le dossier en position inclinée ou lorsqu il est complètement fermé Appuyer sur le bouton et le maintenir enfoncé pour relever le dossier fermer le repose jambes et remettre la chaise en position Relâcher le bouton pour ...

Page 45: ...re endommagé durant l utilisation ou le nettoyage Il est recommandé d utiliser un sous verre pour réduire les risques de dommages et de respecter les instructions de nettoyage Utiliser de l eau et un savon doux comme un savon à vaisselle pour nettoyer les porte gobelets Sécher immédiatement et complètement avec un linge propre et doux pour préserver l apprêt L utilisation d un nettoyant fort ou ab...

Reviews: