espresso coffee machines
Dream - Dream T
74
LSC 024 - Rev. 00 - Ed. 11/2014
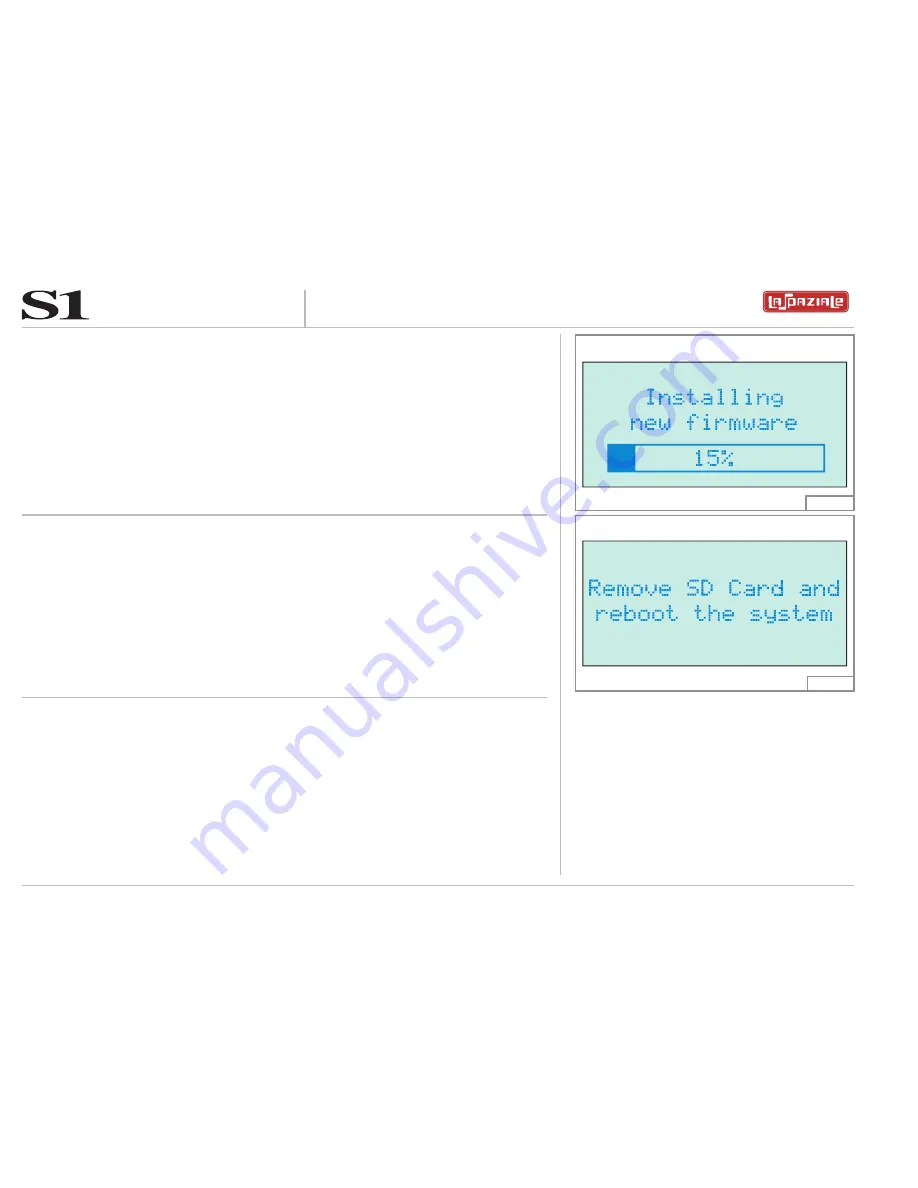
remove the sD carD rEaDEr, disconnect the plug and then riconnect the plug and switch on the appliance.
Fig. 122
Fig. 123
Page 1: ...TANTI STILI UNA PASSIONE INSTRUCTION MANUAL LSC 024 Rev 00 Ed 11 2014 Dream DreamT...
Page 2: ...m all the other waste The separate collection of this equipment coming at the end of its lifetime is organized and run by the importer distributor The user who should have to dispose of such equipment...
Page 3: ...TANK 15 6 2 FIRST TIME APPLIANCE INSTALLATION 15 6 3 Filling the coffee boiler 15 6 4 Turning the machine on for the first time 16 7 DREAM FIRST SET UP 17 8 MAKING COFFEE 18 9 DISPENSING STEAM 19 10 P...
Page 4: ...SENSOR 70 10 28 PASSWORD 71 10 29 SOFTWARE UPDATE 73 10 30 DEFAULT SETTING 75 10 31 SET CALIBRATION BOILER TEMPERATURE PROBE 76 10 32 FULL POWER 77 10 33 GROUP TEMPERATURE OFFSET 78 10 34 P I D 79 10...
Page 5: ...Dream DreamT 1 GENERAL DESCRIPTION OF THE MACHINE 1 1 DESCRIPTION OF THE MACHINE DREAM KEY 1 Steam Wand 2 Hot Water Outlet 3 Steam Knob 4 Cup Warming Tray 5 Touchpad Display 6 Card Reader Interface 7...
Page 6: ...ream DreamT KEY 1 Steam Wand 2 Hot Water Outlet 3 Steam Knob 4 Cup Warming Tray 5 Touchpad Display 6 Card Reader Interface 7 Pressure Gauge 8 Water Reservoir 9 Grouphead 10 Drip Tray Fig 2 1 2 DESCRIP...
Page 7: ...am DreamT 1 3 DESCRIPTION OF THE CONTROL PANEL KEY a Power Button b Display c Menu Ok Button d Up Arrow Button e Down Arrow Button f Double Shot Button g Manual Button h One Shot Button i Boiler Butto...
Page 8: ...em put in place by the customer See chapter 2 2 installation Attention The appliance must be installed where use and maintenance are restricted to trained staff Attention CAREFULLY READ THE FOLLOWING...
Page 9: ...rity with the appliance itself especially in terms of safety and hygiene The device is not intend to be used by people children included whose physical sensory or mental capability are reduced unless...
Page 10: ...that the plug to disconnect it from the mains power supply remains accessible This appliance must only be used for the purpose for which it was designed All other uses are to be considered improper an...
Page 11: ...f the system arranged by the customer corresponds to the highest rating indicated on the rating plate of the equipment Danger The appliance must be supplied exclusively with cold drinking water Maximu...
Page 12: ...ufacturer cannot be held liable Attention The appliance must be installed on a flat bearing surface the stability of which needs to be checked Attention The appliance must be installed where use and m...
Page 13: ...rying out the electric connections please take into consid eration all warnings and indications provided so far in this manual Furthermore in order to avoid dangerous overheating unwind com pletely th...
Page 14: ...without water in the boiler so as to prevent the boiler from being badly damaged should the equipment be exposed to temperatures lower than 0 Attention THE INSTALLATION OF THE WATER SOFTENER IS RECOM...
Page 15: ...cate the time necessary to familiarise yourself with these labels Ensure that they are readable and keep them clean or replace those that have deteriorated or illegible both the text and the graphics...
Page 16: ...ppliance weight is more than 30 kg and therefore it cannot be moved by a single person alone Take note Dispose of the packaging as per the norms in force of the country in which the machine is utilise...
Page 17: ...rn the machine on until the steps below have been completed Failure to do so will damage the machine and will not be covered under warranty Fig 7 Plug the machine into the electrical outlet but do NOT...
Page 18: ...k then press the button The boiler autofill function will be enabled automatically until the factory set water level is reached When the automatic water refill system is working the display shows the...
Page 19: ...If at any time the message Low Water Pressure or Missing Water Connection show on the display then check to make sure the water is turned on to the machine and then repeat step 1 again 5 After the pum...
Page 20: ...ammed shot time and the 6s indicates that we are 6 seconds into the shot The final time value at the end of the shot remains for 10 seconds or until the next shot is started whichever comes first The...
Page 21: ...clockwise to stop the steam flow 4 Remove the jug from the steam wand 1 and clean the wand immediately with a wet sponge to remove all residues of the heated drink Attention Do not turn the knob 3 to...
Page 22: ...ter faucet 2 B Press the button for hot water faucet 2 C The water will be delivered for the programmed time set MANUAL SYSTEM TO DELIVERY HOT WATER A Place the pitcher underneath the hot water faucet...
Page 23: ...10 1 NAVIGATION MENU Press the up down arrow button to move through the menu each time the buttons are pressed next icon get bigger and the name of the function appears on the top of the display Pres...
Page 24: ...out feature to turn the display off when not in use TIMER The timer feature allows the user to have the machine be turned on and off at 3 different time Intervals COUNTER The counters keep track of th...
Page 25: ...y the parameters coffee group temperature volume etc from the appliance to the SD CARD WRITE Allows the user to copy the parameters coffee group temperature volume etc from the SD CARD to the machine...
Page 26: ...the display This function is available only for DREAM models PASSWORD Allows the user to create a password to block access to the main menu SOFTWARE UPDATE Allows the user to update the firmware in th...
Page 27: ...ect the desired month Then press the menu button to lock in this value and move to the day field Once again use the arrow keys to select the desired value and lock it in with the menu button Then repe...
Page 28: ...Down arrow to cycle through the hours Then press the Menu key to lock in the Hours and also highlights the Minutes field Again use the arrow keys to select the desired time and then press Menu to loc...
Page 29: ...BEEP as a further indication Press the ok button once to enter the BEEP set function Use the Up Down arrows to select beep ON or beep OFF then press the menu button to lock in the value and return to...
Page 30: ...row once to highlight the LANGUAGE icon Press the ok button once to enter the LANGUAGE set function Press the up down button to choose the desired language The following languages are available ITALIA...
Page 31: ...nce to enter the menu This setting adjusts the amount of time the display stays backlit after that last front panel button press The maximum is 60min which is shown on the display The options are 5 10...
Page 32: ...p programmable On Off times and change this set ting to Off the programmed values are not lost and will become active again when this switch is later turned back On The display shows MONDAY press the...
Page 33: ...e Time Scroll to select the On Hour press the Menu button to move to the On minutes scroll to select minutes press the Menu button to select Off Hour scroll to select the de sired hour press Menu agai...
Page 34: ...firm with the ok button Tuesday as well as any other days are programmed just the same as Monday the cur rently active day of the week shows in the top bar If you don t really want to change Tuesday j...
Page 35: ...e last time the Counters were reset The tot line shows the total times the one and two cup buttons have been pressed since the machine was born The values under the tea cup icon represent the similar...
Page 36: ...SC 024 Rev 00 Ed 11 2014 10 9 PROGRAM Press the UP down arrow once to highlight the PROGRAM icon Press the ok button once to enter the menu Press the UP down arrow to chose USER 1 NEW USER and BACK to...
Page 37: ...Press the OK button to enter in the menu Use the up or down arrows to increase or decrease the indicated temperature until the desired espresso temperature is showing Then press the Menu button to loc...
Page 38: ...n to enter in the menu Use the up or down arrows to increase or decrease the indicated temperature until the desired boiler temperature is showing Then press the Menu button to lock in this value and...
Page 39: ...al coffee press supplied Re insert the filter holder firmly Place one or two cups below the filter holder Press one cup button if you want to set one coffee or the two cup button if you want to set a...
Page 40: ...e Hot Water button to turn it on and press it again to turn it off i e manual operation If you select Automatic then you see the next menu The displayed value shows the current number of seconds that...
Page 41: ...f you press the Ok button with the preinfusion OFF the display return to the USER 1 menu On this screen you select the number of seconds you desire for preinfusion If the preinfusion is activated the...
Page 42: ...ess the OK button to enter in the menu This function allow the user to personalize the name of the profile instead of the stand ard USER 1 Use the Up and Down arrows to scroll through the alphabet and...
Page 43: ...Fig 55 When you press the Menu button after the eighth character the string is locked in and you return to the main Profile menu Any periods you entered are converted to spaces The name you gave this...
Page 44: ...tion allow to add a new profile it is possible to add 4 users Press the ok button the display shows It is possible to set the parameters coffee temperature boiler temperature coffee doses preinfusion...
Page 45: ...isplay shows the HOME menu press and hold press the down arrow button for 3 second the display will show the user menu Press the up and down arrow buttons to shift from the users and press the ok butt...
Page 46: ...espresso coffee machines Dream DreamT 44 LSC 024 Rev 00 Ed 11 2014 Now the HOME MENU shows the new USER selected Fig 61 Fig 62...
Page 47: ...ss the up down arrow button to highlight the DELETE PROFILE ICON Press the OK button to enter in the menu the display shows Press the OK Button to delete the user 2 With the same procedure it is also...
Page 48: ...o do the service Press the up down arrow button to highlight the SERVICE ICON Press the OK button to enter in the menu Press the down arrow button and then the ok button to activate the service functi...
Page 49: ...press the ok button the display will show the MAIN MENU without activate the function Each time one of the buttons to delivery coffee is pressed the programmed cycle decrease of one unit When the pro...
Page 50: ...u The display shows the cycle remaining 935 before shows the alarm SERVICE press the OK button to change the programmed parameters the display shows Press the up down arrow button to choose the three...
Page 51: ...RS After doing the maintenance replace gasket double shower etc the counters can be reset When the display shows the SERVICE COUNTERS MENU press and hold press the OK button the display will show Pres...
Page 52: ...lly the instructions included in the softener Press the down arrow button and then the ok button to activate the service function the display will show If the ok button is pressed with the SERVICE OFF...
Page 53: ...ght the FILTER ICON Press the OK button to enter in the menu The display shows the number of litres remaining 2512 before shows the alarm FILTER press the OK button if you want to change the programme...
Page 54: ...SET COUNTERS After replacing the water softener cartridge the counter can be reset When the display shows the FILTER COUNTER MENU press and hold press the OK button the display will show Press the OK...
Page 55: ...RMS icon Then press the OK button to enter in the menu The display shows the last alarm detected by the appliance stored by date and time It is also possible to scroll the other alarms detected by the...
Page 56: ...e in a SD CARD Press the UP down arrow once to highlight the READ icon then press the OK button the display shows Connect the SD CARD READER in the SD CARD INTERFACE and press the ok but ton The displ...
Page 57: ...oup temperature F boiler temperature C boiler temperature F number of pulses 1st dose number of pulses 2nd dose 0 o 1 on FUNCTION NOT AVAILABEL ON THE DREAM T time of preinfusion MAT temperatu re C MA...
Page 58: ...CALIB T BOILER F x10 OFFSET T GROUP C OFFSET T GROUP F PID PAR P PID PAR I PID PAR D TIMER ON 0 0 0 0 0 1 0 0 1 0 0 3 0 0 0 0 PROPORTIONAL INTEGRAL DERIVATIVE omatic anual hot water time delivering 5...
Page 59: ...OSHOUT DOWN EGS GRIND CHECK TIMER ON write 0 for OFF and 1 for ON SET T GROUP C range 85 C 125 C SET T GROUP F range 185 217 F SET T BOILER C range 115 128 C SET T BOILER F range 239 262 F If the numb...
Page 60: ...E US 0 EUROPEAN 1 AMERICAN FULL POWER 0 ECONOMY 1 FULL POWER AUTO SHUTDOWN 0 OFF 1 ON SHUTDOWN TIME 0 30 minutes 1 45 minutes 2 60 minutes 3 90 minutes EGS write 0 OFF 1 ON GRIND CHECK 0 OFF 1 ON GRIN...
Page 61: ...07 00 and switch OFF at 09 00 switch ON again at 12 00 and switch OFF again at 14 00 then switch ON at 19 00 and switch OFF at 21 30 TUE on off 07 00 09 00 12 00 14 00 19 00 21 30 Copy the file in th...
Page 62: ...T 60 LSC 024 Rev 00 Ed 11 2014 Connect the SD CARD READER in the SD CARD INTERFACE and press the ok but ton The display shows copying for few seconds while the parameters stored in the SD are being wr...
Page 63: ...p and Down Arrows to select OFF ON or AUTO then press the Menu but ton to store the selection and return to MAIN Menu OFF The two lights next to the group are always OFF ON The two lights next to the...
Page 64: ...ton to enable the function the display will show Use the Up or Down arrows to chose the tolerance of the extraction time and then press the ok button to stored it The tolerance steps are 5 10 or 15 se...
Page 65: ...arrow once to highlight the EGS icon then press the OK button the display shows Press the down button and then the ok button to enable the function the display come back to the MAIN MENU When this fu...
Page 66: ...ht the AUTOMATC SHOUT DOWN icon then press the OK button the display shows Press the down button to enable the function the display will show Press the down arrow button to chose the desired value and...
Page 67: ...u Press the UP down arrow once to highlight the GROUP CLEANING icon then press the OK button the display shows Press the FREE FLOW button to enable the function the display will show the next screen a...
Page 68: ...tes of inactiv ity Press the UP down arrow once to highlight the SCREENSAVER icon then press the OK button the display shows Press the down button to enable the function the display will show Press th...
Page 69: ...SC 024 Rev 00 Ed 11 2014 Dream DreamT When this function is enable after 2 minutes of inactivity the display shows the se lected picture instead of the HOME MENU If MIX is selected the display scroll...
Page 70: ...ction the display will show Use the Up or Down arrows to select either the European or the American Daylight Savings time Then press the OK button to store it and return to the main menu EUROPEAN The...
Page 71: ...ction allows to change the contrast setting of the display Press the UP down arrow once to highlight the CONTRAST icon then press the OK button the display shows Use the Up or Down arrows to change th...
Page 72: ...odels Press the UP down arrow once to highlight the DEACT PRESSURE SENSORE icon then press the OK button the display shows Press the UP arrow button to disable the function Then press the ok button to...
Page 73: ...cursor is placed next to the OFF by pressing the ok button it is possible to return in the MAIN MENU ON the password is enable on default the password is 1234 When the cursor is placed next to the OF...
Page 74: ...024 Rev 00 Ed 11 2014 Through the UP Down arrows buttons Insert the NEW password and press the OK button to store it and return to the main menu When the password function is enable the password must...
Page 75: ...ress the UP down arrow once to highlight the SOFTWARE UPDATE icon then press the OK button the display shows Connect the SD CARD READER with the SD CARD in the SD CARD CONNECTOR and then press the ok...
Page 76: ...espresso coffee machines Dream DreamT 74 LSC 024 Rev 00 Ed 11 2014 Remove the SD CARD READER disconnect the plug and then riconnect the plug and switch on the appliance Fig 122 Fig 123...
Page 77: ...ING This function allows to restore the machine to its original factory settings Press the UP down arrow once to highlight the DEFAULT SETTING icon then press the OK button the display shows Press the...
Page 78: ...to calibrate the BOILER temperature sensor Press the UP down arrow once to highlight the SET CALIBRATION BOILER TEM PERATURE PROBE icon then press the OK button the display will show Use the Up or Dow...
Page 79: ...the OK button the display will show Use the Up or Down Arrow buttons to select the desired selection then press the OK button to store it and return to the main menu When FULL POWER is ON both heating...
Page 80: ...the temperature detected by the coffee group temperature probe It is possible to change this value by the OFFSET function Press the UP down arrow once to highlight the OFF SET icon then press the OK...
Page 81: ...button the display will show Use the Up down arrows button to set the P and press the ok button to store it and highlight the I Use the Up down arrows button to set the I and press the ok button to s...
Page 82: ...Rev 00 Ed 11 2014 10 35 ECONOMY FUNCTION When the machine is set to FULL POWER it is possible to activate the ECONOMY way by press and hold press for 5 seconds the BOILER button the display will show...
Page 83: ...he active alarms To enter in the information center press and hold press the up arrow button for three seconds the display will show the serial number and the firmware version of the ap pliance Press...
Page 84: ...emperature probe detects 125 C It is a block alarm LOW WATER PRESSURE the PRESSURE SENSOR not available in the DREAM T detects a water pressure less than 1 bar for 3 consecutive seconds It is a no blo...
Page 85: ...ppliance requires the replacement of the softener cartridge FINE GRIND the extraction time is more than the value set in the GRINDIG CONTROL FUNCTION COARSE GRIND the extraction time is less than the...
Page 86: ...sconnect the appliance from the electricity mains and from the gas system if fitted Cleaning and routine maintenance operations must be carried out when the machine is cold and using protective gloves...
Page 87: ...oles are clean Then reassemble the parts following the sequence shown in the figure 138 A Fastening screw B Small shower head C Large shower head D Diffuser E Delivery group E D B C A Fig 138 Take not...
Page 88: ...oup Coffee Group EV LIV BOILER EV H20 ST VE F G2 TP KEY R Water net supply tap P Motor pump TP Pressor sensor VU No return valve VE Expansion valve EV LIV Water refill solenoid F Flowmeter EV Coffee g...
Page 89: ...C EV LIV BOILER EV H2O ST PV TANK G1 G2 VU GR Fig 140 KEY TANK Tank VU No return valve VE Expansion valve PV Vibration pump G1 Pump pressure gauge EV LIV Water refill solenoid F Flowmeter RC Coffee gr...
Page 90: ...024 Rev 00 Ed 11 2014 Dream DreamT 15 WIRING DIAGRAM F2 F1 TS CV M6 M5 M4 RS1 RS2 RC RB M2 M1 M7 M2 M4 SD CARD M1 TOUCHPAD ST1 ST2 ST3 LD1 LD2 RS232 SLLT M9 M8 M7 M6 M3 MAIN CPU EV LIV EV GR EV H2O MP...
Page 91: ...level probe LT Tank water level control not present in the DREAM machine LD1 LD2 Groups lighting ST3 M A T temperature probe optional not available yet ST2 Boiler temperature probe ST1 Coffee group te...
Page 92: ...00 Ed 11 2014 Dream DreamT 16 TECHNICAL DATA L P H Fig 142 DIMENSIONS AND WEIGHT L mm P mm H mm kg DREAM 415 415 385 28 DREAM T 415 415 385 28 POWER SUPPLY RATING AND ABSORPTION VOLT Hz W DREAM 230 11...
Page 93: ...espresso coffee machines 91 LSC 024 Rev 00 Ed 11 2014 Dream DreamT...
Page 94: ...espresso coffee machines 92 LSC 024 Rev 00 Ed 11 2014 Dream DreamT...
Page 95: ......
Page 96: ...Ed 11 2014 Dream DreamT La Spaziale S p A Via E Duse 8 40033 Casalecchio di Reno Bologna Italy 39 051 611 10 11 39 051 611 10 40 info laspaziale com www laspaziale com Creation layout and styling Typ...