background image

NOTE:

• During play of

a

CDV's audio part, the selected picture quality settings

for the video part are stored in memory.

• Picture quality settings are stored in memory until the power cord is

disconnected

from the wall socket.

• You can adjust V-DNR 3D settings even when not playing

a

disc, but

you won't notice the effect of these adjustments

until images are

displayed on screen.

• Depending on the disc and the scene, it may be difficult to see the Y-

NR, C-NR noise reduction

effect, 3D Y/C cross color reduction, and

sharpening

of edges with Sharp.

• With pictures of still images, Y-NR and C-NR are OFF, regardless of

settings, and 3D Y/C is set to minimum.

Which means that adjust-

ments for still images will change setting values (displayed values)
but not picture quality. (CAV disc Y-NR, C-NR, Sharp are also effective

for still images.)

• When you set V-DNR 3D to STANDARD OFF, adjustments

are not

possible,

but pressing

the Select button

displays settings

for two

seconds.

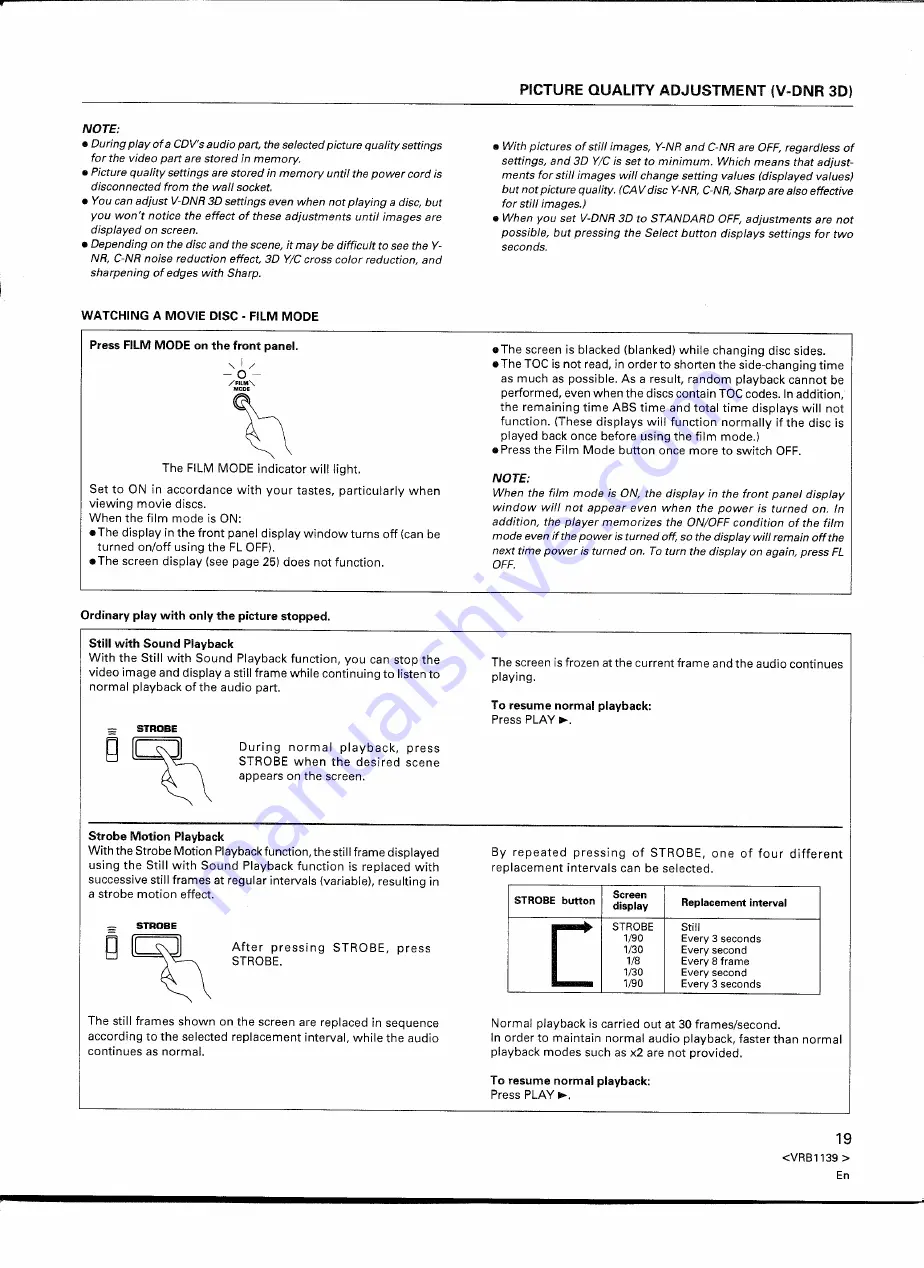
Press FilM

MODE on the front panel.

,,1/

-0-

/FILM"

MODE

\\

The FILM MODE indicator

will light.

Set to ON in accordance

with your tastes, particularly

when

viewing

movie

discs.

When the film mode is ON:
• The display in the front panel display window

turns off (can be

turned on/off using the FL OFF).

• The screen display (see page 25) does not function.

• The screen is blacked (blanked) while changing

disc sides.

• The TOC is not read, in order to shorten the side-changing

time

as much as possible. As a result, random

playback cannot be

performed,

even

when the discs contain TOC codes. In addition,

the remaining

time ABS time and total time displays will not

function.

(These displays

will function

normally

if the disc is

played back once before using the film mode.)

• Press the Film Mode button once more to switch OFF.

NOTE:

When the film mode is ON, the display in the front panel display
window

will not appear

even when the power

is turned

on. In

addition,

the player memorizes

the ON/OFF condition

of

the film

mode even if the power is turned off, so the display will remain off the
next time power is turned on. To turn the display on again, press FL

OFF.

Still with Sound Playback
With the Still with Sound Playback function,

you can stop the

video

image and display a still frame while continuing

to listen to

normal playback of the audio part.

_

STROBE

g~

During

normal

playback,

press

STROBE when

the desired

scene

appears on the screen.

The screen is frozen at the current frame and the audio continues

playing.

To resume normal playback:

Press PLAY~.

Strobe Motion

Playback

With the Strobe Motion Playback function, the still frame displayed

using the Still with Sound Playback function

is replaced with

successive still frames at regular intervals (variable), resulting in
a strobe motion

effect.

STROBE

-

g~

After

pressing

STROBE,

press

STROBE.

The still frames shown on the screen are replaced in sequence

according

to the selected replacement

interval, while the audio

continues

as normal.

By repeated

pressing

of STROBE,

one

of four

different

replacement

intervals

can be selected.

STROBE

button

Screen

Replacement

interval

display

[

STROBE

Still

1/90

Every 3 seconds

1/30

Every second

1/8

Every 8 frame

1/30

Every second

1/90

Every 3 seconds

Normal playback is carried out at 30 frames/second.
In order to maintain

normal audio playback, faster than normal

playback modes such as x2 are not provided.

To resume normal playback:

Press PLAY~.

19

<VRB1139

>

En

Summary of Contents for CLD-99

Page 1: ...E FICHE POLARISEE AVEC UN PROLONGA P UN PRISE DE COURANT OU UNE AUTRE SORTIE DE _ PANT SAUF SI LES LAMES PEUVENT ETRE INSEREES A FOND S S N LAiSSER AUCUNE PARTIE A DECOUVERT C AUT ON e c _ satisfies F...

Page 2: ...than the other ThiS plug will fit into the power outlet only one way ThiS is a safety feature If you are unable to insert the plug fully Into the outlet try reversing the plug If the plug should stil...

Page 3: ...me to consider how you can maximize the fun and excitement your equipment offers This manufacturer and the Electronic Industries Association s Consumer Electronics Group want you to get the most out o...

Page 4: ...NOTES FOR USING THE REMOTE CONTROL UNIT If a plug is connected to the CONTROL IN terminal at the rear of the player remote control operations cannot be done with the remote control unit aimed at the p...

Page 5: ...or Strong force against movement of the disc table may cause breakdown Take the following precautions to avoid accidents Be careful not to catch your finger in the disc table section while the disc ta...

Page 6: ...ds the conventional limits of the digital recording format Legato Link Conversion achieves music reproduction closer to the original sound by deducing the original signal based on the recorded signal...

Page 7: ...s on a disc If chapter numbers are recorded on a disc it is also indicated on the jacket of the disc etc Frame number Frame numbers are the numbers assigned to each picture frame on a CAV disc Time nu...

Page 8: ...audio signals differ in content This allows the user to enjoy two different audio soundtracks by switching between the digital and analog audio These are compact discs which also contain video signals...

Page 9: ...rol jack for system remote control Align the plug correctly and push into the S VIDEOjack O A Splug R If you use an S VIDEO cable refer to your TV s operation manual Finally connect the power cord to...

Page 10: ...rt the plug to make a secure connection NOTES When making optical digital connections this player can only be connected to an amplifier which uses the same type of optical transmissions reception modu...

Page 11: ...control unit at the projection monitor or component display PERFORMING SYSTEM CONTROL WHEN THE PLAYER IS COMBINED WITH A PRODUCT THAT HAS THE MARK System control can be performed when the player is c...

Page 12: ...play ON FILM MODE button indicator P 19 Switch ON if desired when watching a movie disc When you switch it ON The display window turns OFF You can switch it ON OFF with the FL OFF display button D Scr...

Page 13: ...button P 23 CLEAR button P 21 24 Number button P 14 21 24 STEP buttons II II P 16 MULTI SPEED buttons P 16 SKIP buttons I ll P 15 PLAY button P 14 SCAN buttons P 17 PAUSE button II P 14 STOP button II...

Page 14: ...Normal search Chapters can also be searched using CHP TM Example To search chapter No 17 ICHPfTM IICHPfTM IIJJOJ The 0Qj button cannot be used in this case Convenient function When power is OFF STAND...

Page 15: ...channel R channel J To exit Direct CD mode Press DIRECT CD again To play an LD Cancel the Direct CD mode Otherwise the LD cannot be set on the disc table NOTE During LD play the player does not enter...

Page 16: ...tarts from the point slightly before where II is pressed 16 VRB1139 En speed dislay 1 8 1 2 x2 1 2 1 8 1 30 Playback speed 1 8 of the normal playback half the normal playback twice the normal playback...

Page 17: ...comes about x5 the normal playback speed Low Scan mode Further rotate the SHUTTLE ring Scan speed becomes about x10 the normal playback speed High Scan mode Further rotate the SHUTTLE ring Scan speed...

Page 18: ...the SELECT This puts you in the Picture Quality Adjustment mode J l mmv2 J L When you plug in the power cord and first switch power ON the settings in MEMO are STANDARD Select Y NR with the SELECT an...

Page 19: ...not function These displays will function normally if the disc is played back once before using the film mode Press the Film Mode button once more to switch OFF NOTE When the film mode is ON the displ...

Page 20: ...e scene displayed on the TV screen does not change To cancel the One Shot Memory function in order to play the video from another disc press ONE SHOT MEMORY again With CDV discs the following operatio...

Page 21: ...apsed time from the beginning of the specified track with the digit buttons 0 9 1 Press CHP TM so that Ab appears in the front panel display window On the monitor screen ASS appears 2 Enter the elapse...

Page 22: ...ds to 1 minute 8 seconds of every track in sequence The Hi lite is displayed during this operation When the desired track is played press The unit enters play mode Search Track 1 Time 1 30 Search Trac...

Page 23: ...I Random Repeat To repeat a random play Press REPEAT during random playback With the random repeat function you can repeatedly play the chapters or tracks in random order Press REPEAT twice When play...

Page 24: ...g program playback or in stop mode press PGM to display the program contents on the monitor screen When PGM is pressed again the program contents disappear I To modify the program contents To delete O...

Page 25: ...Elapsed playing time CLV and Display off mode are switched alternately on the display I I I lPLAY 3 12 49 Disc Time ABS 3 12 Chapter track No Time or frame number display Disc side Audio output level...

Page 26: ...hours until it is dry Disc is warped Change the disc 3 Remote control does not work The CONTROL IN terminal on the rear panel is Aim the remote control unit at the projection connected to Pioneer proj...

Page 27: ...not be obtained but this does not mean that the player or the disc is defective 11 CHAPTER SKIP CHAPTER Disc in which no chapter numbers are Press DISPLAY to check if chapter number is PROGRAM PLAY an...

Page 28: ...s ofthe Clean the plugs and terminals and connect connection cords are dirty again The plugs of the connection cords are not fully Push the plug in firmly pushed in When troubles occur When some troub...

Page 29: ...DiSC Diameter 12 cm Thickness 1 2 mm Rotation direction pickup side Counterclockwise Linear speed Audio portion 1 2 1 4 m sec Video portion 11 12 m sec Maximum playing time Video portion 5 mill CLV A...

Page 30: ...ES 1 YES YES Trick play Still Step YES YES YES 5 NO Multi speed Forward reverse 4 level variable YES YES YES 5 NO Jog dial Shuttle ring YES YES YES YES Time display Elapsed time display NO YES YES YES...

Page 31: ...h California 90801 1540 PIONEER ELECTRONICS OF CANADA INC 300 Allstate Parkway Markham Ontario L3R OP2 Canada PIONEER ELECTRONIC EUROPE N V Haven 1087 Keetberglaan 1 9120 Melsele Belgium TEL 03 570 05...

Page 32: ...REMOVED SERIAL NUMBERS VOID THIS WARRANTY YOUR RIGHTS Pioneer limits its obligations under any implied warranties under state laws to a period not to exceed the warranty period Pioneer also excludes a...

Reviews: