background image


2.  A 10 A fuse and fuse holder 
3.  Vehicle cable with at least 1.5 mm

²

 cross-section 

4.  Fixture material and cable connector/shoe suitable for switch and relay 
First locate a suitable position on the vehicle to mount the LED working light. There are two fixture options:


1) 

Using the screw base.

 Use the screw base as a drill template to drill holes for fixing the LED working light at 

an  appropriate  location.  Pay  attention  to  ensure  that  you  do  not  damage  any  hidden  cables,  wires  or  other 
components  when  drilling.  It  is  not  permitted  to  drill  holes  in  carrying  parts  of  the  chassis  such  as  the 
longitudinal cross members or roof frames. 
a) 

When you have made the holes, screw the LED working light firmly and securely to the vehicle (fixture 

materials not included in the scope of delivery). 

2) 

Using the magnetic foot.

 To do this, remove the pre-mounted screw base by unscrewing the two Allen screws 

and the long hexagonal screw (from the hinge) on the underside of the LED working light. Now you can remove 
the central hexagonal screw from below the screw base. To mount the magnetic foot, use the supplied 20 mm 
long hexagonal screw with washer and nut with spring washer. Then connect the holder back up to the light 
housing. To protect painted surfaces, glue the supplied rubber ring to the bottom of the magnetic foot. The LED 
working light can now be placed on an even, magnetic surface. 

Connecting the LED working light 

1. 

First separate the battery from the on-board network of your vehicle. To do this, remove the ground cable 
from the minus pole of the battery, usually labelled (-). To do this, read the manual of your vehicle or ask 
your specialist workshop.


2. 

Mount the switch in your vehicle at a location easy for the driver to access. 

3. 

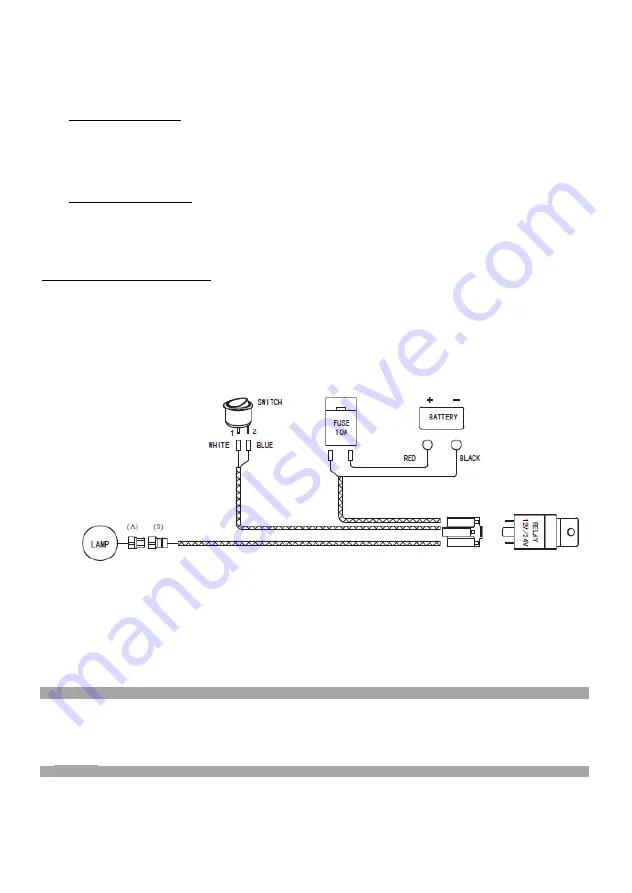
Now connect the LED working light and the switch to the on-board network of your vehicle with the help of 
the working current relay and a fuse (not included in the scope of delivery) in accordance with the sketch. 
Pay attention to ensure that the cable you use has a sufficient cross-section. 


Lay the cable without creating sharp bends and avoid running over sharp edges. Secure the wires firmly and without 
exerting considerable force on the cable. Use the existing cable harnesses to secure the wires. If possible lay cables 
behind cladding or under the floor carpets.


If you need to lay cables in the engine compartment of your vehicle make sure that sufficient space is left to avoid 
moving parts such as belt pulleys, drive belts, drive and steering shafts as well as the wiper drives, and do not lay the 
cable close to heat sources such as exhausts and catalytic converters. 
After installation of the LED working light connect the battery up again. 
Switch the LED working light on and check the functionality. 

7. Maintenance 

If used in accordance with the intended purpose, the device does not require maintenance. Clean the device carefully 
with a dry cloth.


In the event of damages to the housing or cables, immediately disconnect the power supply to the device and contact 
the manufacturer or your supplier. 

8. Disposal 

Packaging  materials  are  raw  materials  and  can  be  recycled.  Please  recycle  in  the  interests  of  environmental 
protection.


Summary of Contents for 13518

Page 1: ...rt Nr 13518 LED Arbeitsscheinwerfer Eingangsspannung 9 36 V DC Eingangsstrom 3 3 1 8 A Schutzklasse IP68 Abmessungen ca 80 x 145 x 155 mm Gewicht ca 1 5 kg EAL GmbH Otto Hausmann Ring 107 D 42115 Wuppertal ...

Page 2: ...von Kindern fern Es besteht Erstickungsgefahr Entfernen Sie vor der Inbetriebnahme alle Schutzfolien vom Gerät Verlegen Sie die Anschlusskabel so dass Sie nicht behindert werden und niemand versehentlich daran ziehen kann Setzen Sie das Gerät nicht der Nähe von Feuer Hitze und lang andauernder Temperatureinwirkung über 40 C aus Im Dauerbetrieb wird das Gehäuse der Arbeitsleuchte heiß Lassen Sie di...

Page 3: ...aum Ihres Fahrzeug verlegen müssen achten Sie auf ausreichenden Abstand zu beweglichen Teilen wie Riemenscheiben Keilriemen Antriebs und Lenkwellen sowie Scheibenwischerantriebe und verlegen Sie die Kabel nicht in der Nähe von Wärmequellen wie Abgasrohren und Katalysatoren Nach der Installation der LED Arbeitsleuchte klemmen Sie die Batterie wieder an Schalten Sie die LED Arbeitsleuchte ein und üb...

Page 4: ...owledge unless they are supervised by someone who is responsible for their safety or have been instructed by such a person with regard to how the unit is to be operated Children should be supervised to ensure that they do not play with the device Only connect the device to a voltage source that provides 9 36 V DC The voltage must match the specification on the type plate of the device Do not clamp...

Page 5: ...le To do this remove the ground cable from the minus pole of the battery usually labelled To do this read the manual of your vehicle or ask your specialist workshop 2 Mount the switch in your vehicle at a location easy for the driver to access 3 Now connect the LED working light and the switch to the on board network of your vehicle with the help of the working current relay and a fuse not include...

Page 6: ...ue d illuminer des endroits pas suffisamment éclairés depuis votre véhicule Veuillez attentivement lire le mode d emploi et respecter toutes les consignes de sécurité Conservez impérativement ce mode d emploi afin de pouvoir le consulter en cas de besoin et également pour tout utilisateur ultérieur 3 Utilisation conforme Le projecteur à DEL est destiné à assurer l éclairage en cas de travaux autou...

Page 7: ...s trous de fixation du projecteur de travail à DEL aux endroits appropriés Veillez minutieusement à ce qu aucun câble conduit ou composant caché ne soit atteint endommagé lors du perçage Il est cependant interdit de percer des trous dans des pièces portantes de votre carrosserie commeles longerons et traverses ou dans le cadre du toit a Après avoir percé les trous vissez le projecteur de travail à...

Page 8: ...maintenance Nettoyez l appareil avec précaution à l aide d un chiffon sec Si le boîtier ou les câbles sont endommagés coupez immédiatement l alimentation en énergie de l appareil et contactez le fabricant ou votre revendeur 8 Élimination Les matériaux d emballage sont des matériaux bruts et donc recyclables Veuillez les remettre aux services de recyclage afin de contribuer à la protection de l env...

Page 9: ...e een gebrek aan ervaring en of kennis tenzij ze door een voor hun veiligheid instaande persoon onder toezicht staan of van deze laatste aanwijzingen kregen hoe het apparaat te gebruiken is Kinderen moeten onder toezicht staan om te verhinderen dat ze met het apparaat spelen Sluit het apparaat uitsluitend aan op een spanningsbron met 9 36 V DC De spanning moet met de vermelding op het typeplaatje ...

Page 10: ...en kunt u de bijgevoegde rubberring onderaan op de magneetvoet plakken De LED werklamp kan nu op elk vlak magnetisch oppervlak geplaatst worden Aansluiten van de LED werklamp 1 Verwijder eerst de batterij van het boordnet van uw voertuig Daarvoor verwijdert u de aardkabel van de minpool gewoonlijk gemarkeerd met van de batterij Lees hiervoor het handboek van uw voertuig of contacteer uw servicewer...

Page 11: ...unten voor elektrisch en elektronisch schroot af U levert daarmee een belangrijke bijdrage aan de milieubescherming 9 Garantie Voor dit product verlenen wij een garantie van 2 jaar Deze garantie geldt bij een doelmatig gebruik en dekt geen beschadigingen die door een verkeerd gebruik ontstaan zijn 10 Contactinformatie EAL GmbH Otto Hausmann Ring 107 42115 Wuppertal Deutschland Duitsland Telefoon 4...

Page 12: ...räglichkeit EMV 2 Niederspannungs Richtlinie Electromagnetic compatibility emc Low voltage directive 2004 108 EC 2006 95 EC 3 Funkanlagen und 4 RoHS II Telekommunikationsendeinrichtungen Restriction of certain Hazardous Substances Radio and Telecommunication Terminal Equipment 2011 65 EU R TTE 1999 5 EC Harmonisierte EN Normen harmonised EN Standarts Dieser Artikel entspricht folgenden zur Erlangu...

Reviews: