
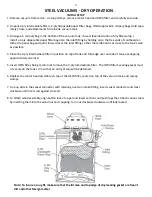


Steel VacuumS - Dry oPeration
initiAl SetUP
1. Remove vacuum from carton. Unsnap clamps, remove motor head and HEPA filter, and carefully set aside.
2. Unpack 2-ply intermediate filters, 2-ply disposable paper filter bags, oSHA approved 6 mil poly bags (sold sepa-
rately), hose, and attachments from inside vacuum tank.
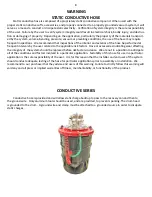
3. Arrange a 6 mil poly bag in the bottom of the vacuum tank, if used. (See illustration of dry filter setup.)
Install a 2-ply disposable paper filter bag onto the inlet fitting by holding on to the free ends of cardboard at-
tached to paper bag and pull it forward over the inlet fitting so that the cardboard is as close to the tank’s wall
as possible.
4. Place the 2-ply intermediate filter in position on top of tank and fold edge over outside of tank, overlapping
approximately one inch.
5. Insert HEPA filter, being careful not to move the 2-ply intermediate filter. The HEPA filter’s sealing gasket must
sit evenly on the tank’s rim so that an air tight seal will be obtained.
6. Replace the motor head assembly on top of the HEPA filter, seated on top of the vacuum tank, and resnap
clamps.
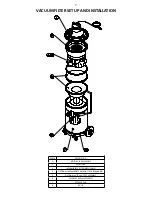
7. Line up slots in the swivel connector with retaining rivets on intake fitting. Insert swivel connector and twist
clockwise until rivets rest against slot end.
8. To attach wand assembly, align button lock of upper and lower sections and push together. Attach various tools
by inserting them into the wand nut and coupling. Turn nut clockwise clockwise until fully locked.
note: to insure a snug fit, make sure that the lid area and top edge of vinyl sealing gasket are free of
dirt and other foreign matter.
4


