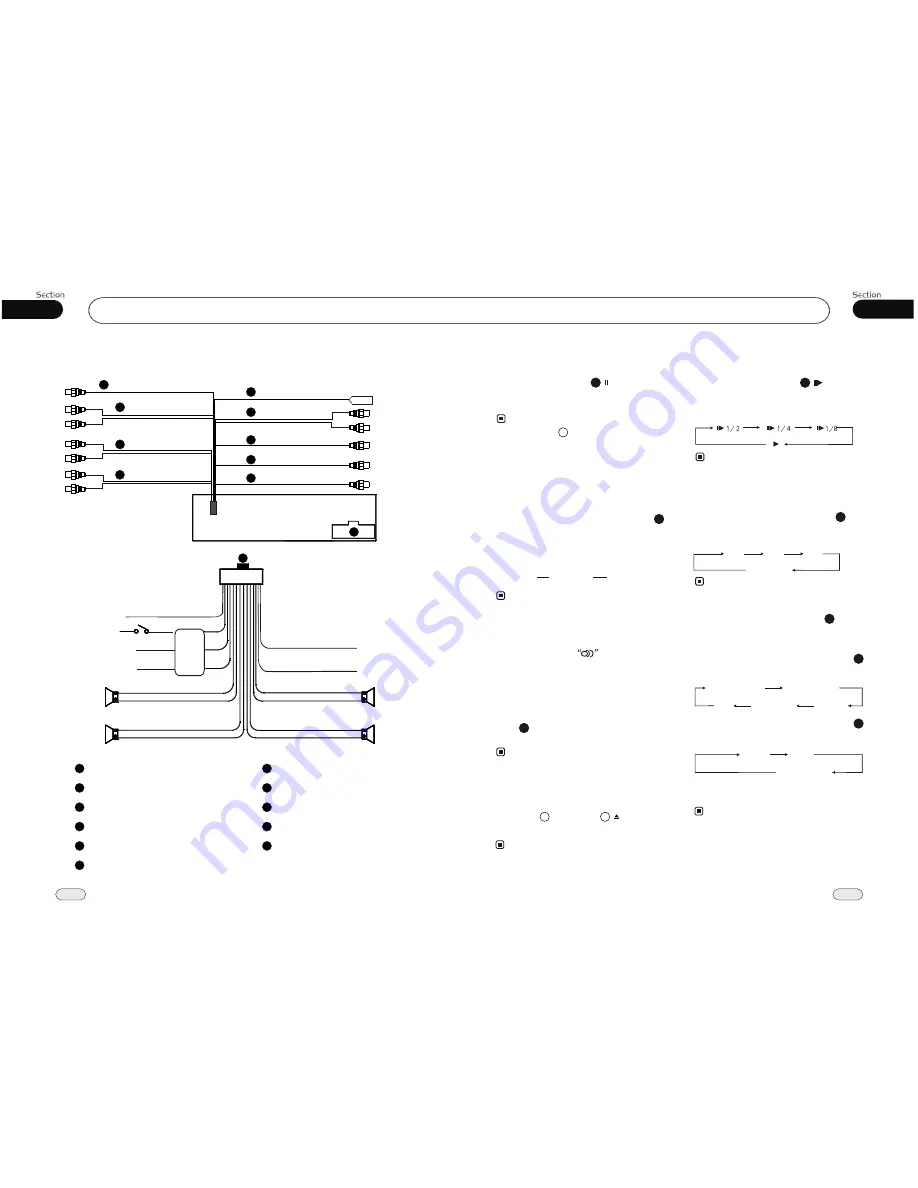
Lanzar SD34MIP Owner'S Manual Download Page 12

06

33

Installation 

12

02

VCD/CD/MP3/MPEG-4/USB/SD

Wiring Connection

1

Front RCA

Antenna 

3

2

Rear RCA

Video Out 

4

7

5

6

2

3

4

L white

R red

L white

1

Front RCA

Rear RCA

Light Grey

Dark Grey

Video Out

Yellow

Grey 

Antenna 

Black 

Output Plug (Male)

5

Output Socket (Female)

6

7

Subwoofer 

Brown

Brown

Subwoofer 

8

R red

Rear R
Speaker

Front R
Speaker

Reverse Gear

Parking Brake

Ignition Key

Rear L
Speaker

Front L
Speaker

Ground

Yellow

Red

Blue

Green/Black

Green

White/Black

White

Violet/Black

Violet

Grey/Black

Grey

Black

FILTER

&FUSE

BOX

8

Brown 

Orange 

Reversing Video In 

Brown

7

Reversing Video In

Yellow

B

Antenna 
Power +

9

IPOD link wire

White +5V

Yellow

Black 

Black 

AUX In 

10

Video In

11

L white

R red

Yellow

IPOD link wire

9

AUX In (Optional)

10

Video In (Optional)

11

(Optional)

(Optional)

2X

3X

4X

No Change

Slow motion playback

During VCD mode, press

to slow 

forward or slow backward. There are such 
speeds each pressing decreases the speed 
until the minimum speed is reached.

*    This function is operated by using 

 remote 

      control.

the

11

Note:

During VCD/MPEG-4 mode, press


ZOOM


to increase the picture in size. 

There are such sizes as following:

*    This function is operated by using 

 remote 

      control.

the

Picture Sizes

10

Note:

*    To perform this function with the       button.

22

On-screen display

During VCD/CD playback, briefly press      

OSD

,  the monitor shows: 

  *   This function is operated by using 

 remote 

       control.

the

Note:

8

Single elapsed time

Total 
elapsed time

Total 
remain time

Single remain time

OFF

Eject a Disc

First press      , then press            button to 
eject a disc.

* This function 

 only  be operated by the head 

unit.

can

Notes: 

2

13

File Selector 

During MP3/MPEG-4/USB/SD stop mode,
press      to select file or file document. Press 
ENTER to open it.

22

Note: 

This function is operated by using 

 remote 

control.

the

*

AUDIO 1 

AUDIO 2 

AUDIO 3...... 

Changing audio language 
(Multi-audio)

MPEG-4 can provide audio playback with 
different language. With discs featuring 
multi-audio recordings,repeatedly press

AUDIO


to switch between language and 

audio systems during playback.

Selection options switch as follows:

*    This function is operated by using 

 remote 

      control.

the

*    This function only operates with MPEG-4  
      featuring multi-audio recordings.
*    The number in the


mark on a MPEG-4 

      package indicates the number of recorded 
      languages/audio systems.


2

Note:

6

Press and hold this button to display the 
current source information.

Single 
elapsed time

Single 
remain time

OFF

During MPGE-4 playback, briefly press      

OSD

,  the monitor shows: 

8

Pause the Playback

During


playback, press          


button to pause 

the playback, Press it again to return to nor-
mal playback. 

Note: 

18

*    Briefly press       button on the head unit also
      performs the same function.

8

Summary of Contents for SD34MIP

Page 1: ...SD34MIP R CAR DVD VCD CD MP3 MPEG 4 PLAYER WITH USB PORT I POD AND AM FM TUNER...

Page 2: ...n 18 Force Disc Out 18 18 Main Menu Main Menu Setup 19 Audio Adjust 19 Video Adjust 20 Source Setup 21 Others 22 DVD Basic Operation of DVD Playing the Previous Next Track Playing the Track F F F REW...

Page 3: ...ng the Station DX LOC Selector MO ST Selector On screen Display Scanning Memorizing Stations Automatically Number Buttons Selecting Station Directly 38 38 38 38 38 38 39 39 39 Radio Menu 40 8 9 Additi...

Page 4: ...ated by the remote control there are also functions can be operated by the buttons provided for the main unit 41 Additional Information Simple Troubleshooting Guide No power Check and make sure whethe...

Page 5: ...button the monitor shows the radio setup menu you can press to select your desired item then press ENTER on the remote control Press or to select EXIT then press ENTER to exit the setup 22 21 Note Ro...

Page 6: ...rownintoafire This function is only operated by using rem ote control Scanning Memorizing Stations Automatically During radio status you can press AMS button on the remote control to scan each stored...

Page 7: ...rol Mono mode or Stereo to select mode DX LOC Selector During radio status press LOC button on the remote control to select or weak station reception strong Notes MO ST Selector Stereo reception is ch...

Page 8: ...can not be operated in this mode you can just operate IPOD to select video and picture Video or Picture Mode 6 This function is operated by using remote control only Note The IPOD TV should be set ON...

Page 9: ...Note This function is operated by using the remote control only Repeat Playing During playback press Press it again to cancel this function RPT to track repeat disc repeat off Pressing AMS on the head...

Page 10: ...OUD loudness button 0 9 number button CLEAR clear button LOC SUB T long distant or local station in radio mode back to last level in IPOD mode subtitle display button ZOOM briefly press it to zoom in...

Page 11: ...ack Number and then press to move the cursor to START press ENTER to start program playing move the cursor to EXIT and press ENTER to exit the program playing Move the cursor to and press ENTER to the...

Page 12: ...ction with the button 22 On screen display During VCD CD playback briefly press OSD the monitor shows This function is operated by using remote control the Note 8 Single elapsed time Total elapsed tim...

Page 13: ...tion performs Playing the Previous Next Track 12 Note Press or toplaythetrackfastforward orfastrewind Eachpressing willchange as following Playing Track F F F REW 20 Note 2X Stop the playback DuringMP...

Page 14: ...2 places on each side And then fasten them to the car screw become aligned tighten the 4 Outer Trim Frame Hook Mounting Sleeve are not used and for installa tion method 5 1 9 2 NOTE Bracket supplied t...

Page 15: ...edMenuLanguage TVType Audio Subtitle DiscMenu Parental Password Default Auto Eng Eng Eng PreferencePage TVType Audio Subtitle DiscMenu Parental Password Default Auto Eng Eng Eng Parental Example showi...

Page 16: ...dio Subtitle DiscMenu Parental Password Default Auto Eng Eng Eng PreferencePage TVType Audio Subtitle DiscMenu Parental Password Default Auto Eng Eng Eng PAL Auto Audio Example showing how to set Audi...

Page 17: ...ly start playing Keep pressing it to turn off the unit completely the the 1 During waiting status briefly press PWR on the head unit to turn on the unit press and hold it to turn off the unit Note 15...

Page 18: ...LEAR to clear the mistake input CLEAR Note This function is operated by using the remote control only 23 Turning Loudness On Off Witheout bluetooth briefly press LOUD activate LOUD function You can th...

Page 19: ...D BASS TREBLE AUDIO SETUP EQUALIZER BACK LOUDNESS 00 00 00 FLAT OFF 00 Example showing howto set picture mode Press Press or thenpressENTER Captions OSDLang OSDLang AngleMark TVDisplay GeneralSetupPag...

Page 20: ...o can set it as needed by moving he cursor and using buttons and then press ENTER to t execute the selecting or enter ing item The selections are the preferred options that will be chosen if they are...

Page 21: ...r pause is canceled and normal playback resumes but the viewing angle does not change Press and hold this button to display the current source information Setting the Playing Time During DVD mode pres...

Page 22: ...head unit also performs the same function 25 Note DuringDVDplayback firstpress to returntothebeginningofthecurrenttrack press againwithin3secondstoplay previoustrack press toplaynexttrack Briefly pre...

Reviews: