background image

G

ETTING

 S

TARTED

1.25

1

N

OTE

:

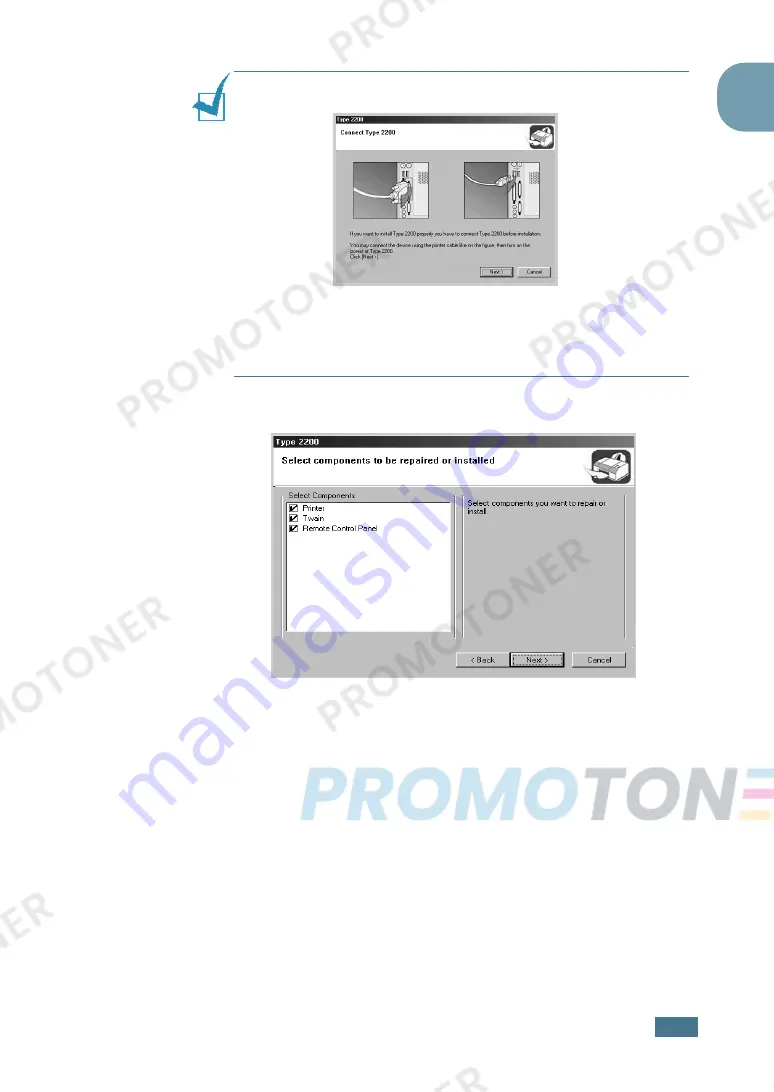
 If your machine is not connected to the computer, the 

following window will appear.

• After connecting the machine, click 

Next

.

• If you want to skip the connection status, click Next, and No to 

the following screen. Then the installation will start and the test 
page will not be printed at the end of the installation.

3

Select the components you want to reinstall and click 

Next

.

4

After the installation is finished, the window asking you to 
print a test page appears. If you choose to print a test 
page, select the check box and click 

Next

.

5

When the test page prints out correctly, click 

Yes

.

If not, click 

No

 to reprint it.

6

When the reinstallation is done, click 

Finish

.

Summary of Contents for LF215

Page 1: ...your document management partner Operator Manual LF215 User Guide...

Page 2: ...Operating Instructions Laser Facsimile For safe and correct use of this machine please be sure to read the Safety Information in this manual before you use it...

Page 3: ...o change without prior notice In no event will the company be liable for direct indirect incidental or consequential damages as a result of handling or operating the machine Copyright 2004 Centronics...

Page 4: ...g not the cable if the power cable or plug becomes frayed or otherwise damaged To avoid hazardous electric shock or laser radiation exposure do not remove any covers or screws other than those specifi...

Page 5: ...equirements of 21 CFR subchapter J for class 1 laser products This equipment contains a 5 milliwatt 760 800 nanometer wavelength AlGaAs laser diode Caution Use of controls or adjustment or performance...

Page 6: ...t is designed to be able to access analog PSTN in all EEA countries Local PSTN compatibility is dependent on software switch settings Please contact your service representative if relocating this prod...

Page 7: ...TION at the positions shown below For safety please follow the instructions and handle the machine as indicated This label is stuck to hot surfaces Be careful not to touch these areas In accordance wi...

Page 8: ...ges or modifications not expressly approved by the party responsible for compliance could void the user s authority to operate the equipment Notice about the Telephone Consumer Protection Act Valid in...

Page 9: ...tomer as soon as possible Also you will be advised of your right to file a complaint with the FCC if you believe it is necessary 6 The telephone company may make changes in its facilities equipment op...

Page 10: ...rge amount of copies the surface of the output tray may become hot Be careful not to touch the surface especially for children British English American English Re dialling Re dialing Colour Color Emph...

Page 11: ...18 Installing Software About Software 1 19 Printer Driver Features 1 20 Installing Software in Windows 1 21 System Requirements 1 21 Installing Software In Windows 1 22 Repairing Software 1 24 Removi...

Page 12: ...Copy 3 3 Setting Copy Options 3 4 Darkness 3 4 Original Type 3 5 Number of Copies 3 5 Reduced Enlarged Copying 3 6 Changing the Default Settings 3 7 Setting the Time Out Option 3 8 Collation Copying...

Page 13: ...20 Searching Sequentially through the Memory 4 20 Searching with a Particular First Letter 4 21 Printing a Phone Book List 4 21 Advanced Fax Functions Sending Broadcasting Faxes 4 22 Sending a Delaye...

Page 14: ...Page Overlay 5 22 Setting Up the Locally Shared Printer 5 23 In Windows 9x Me 5 23 In Windows NT 4 0 2000 XP 5 25 Chapter 6 SCANNING Scanning Basics 6 2 Scanning Process with TWAIN enabled Software 6...

Page 15: ...Problems 8 11 Paper Feeding Problems 8 11 Printing Problems 8 12 Printing Quality Problems 8 14 Copying Problems 8 19 Scanning Problems 8 20 Faxing Problems 8 21 Chapter 9 APPENDIX Installing an Optio...

Page 16: ...al product Your machine provides you with printing copying scanning and faxing functions This chapter gives you step by step instructions for setting up your machine This chapter includes Setting Up Y...

Page 17: ...king carton Make sure that the machine has been packed with the following items If there is a missing item contact the retailer where you bought the machine Starter Toner Cartridge AC Power Cord Telep...

Page 18: ...ape from the front back and sides of the machine Brand plaque May already be affixed to the machine in some regions Key layout sheet for Europe only May already be affixed to the machine in some regio...

Page 19: ...trays The area should be well ventilated and away from direct sunlight or sources of heat cold and humidity Do not set the machine close to the edge of your desk or table Clearance Space Front 482 6...

Page 20: ...omatic Document Feeder Toner Cartridge Paper Output Extension Manual Feeder Manual Feeder Guides Paper Level Indicator Document Guides Document Output Tray Optional Paper Tray Tray 2 Line Jack EXT Jac...

Page 21: ...Allows you to shift the one touch buttons to the numbers 21 through 40 2 Scrolls through the options available for the selected menu item Confirms the selection on the display Enters Menu mode and scr...

Page 22: ...ast number in Standby mode or inserts a pause into a fax number in Edit mode 5 Dials a number or enters alphanumeric characters 6 C O P Y Adjusts the brightness of the documents for the current copy j...

Page 23: ...t support into the slots on both sides of the paper output tray Fold out the extender if necessary NOTE When detaching the document output tray detach it by pressing the front portion of document outp...

Page 24: ...inside the cartridge Thoroughly rolling the cartridge will assure the maximum copies per cartridge NOTES To prevent damage do not expose the toner cartridge to light for more than a few minutes Cover...

Page 25: ...GETTING STARTED 1 10 3 Slide the toner cartridge into the machine until it locks into place completely 4 Close the front cover Make sure that the cover is securely closed...

Page 26: ...heets To load a stack of Letter sized paper 1 Pull open the paper tray and remove it from the machine 2 Push down on the pressure plate until it locks into place 3 Fan the edges of the paper stack to...

Page 27: ...he paper guides For details see page 1 13 5 Pay attention to the paper limit mark on the left inside wall of the tray Paper overloading may cause paper jams 6 Insert and slide the paper tray back into...

Page 28: ...guides to extend the paper tray 1 After pressing and unlatching the guide lock slide the paper length guide out completely to extend the paper tray to its full length 2 After inserting paper into the...

Page 29: ...h guide as shown move it toward the stack of paper until it lightly touches the side of the stack NOTES Do not push the paper width guide far enough to cause the materials to warp If you do not adjust...

Page 30: ...the telephone line cord into the LINE jack and the other end into the wall jack If you want to use your machine for receiving both faxes and voice calls you will need to connect a telephone and or ans...

Page 31: ...hone or answering machine is connected to the EXT jack on the machine the external equipment will fail to ring when receiving an incoming call as the machine is designed to operate with the latest tec...

Page 32: ...e Push the metal clips down to fit inside the notches on the cable plug NOTES You only need to connect one of the cables mentioned above Do not use the parallel and the USB cables at the same time If...

Page 33: ...grounded AC outlet 2 Press the power switch to turn the machine on To view your display text in another language see page 1 27 WARNINGS The fusing area inside the rear part of your machine becomes ho...

Page 34: ...Adobe Acrobat Reader The CD ROM provides you with the following software Type 2200 Driver To use your machine as a printer and scanner in Windows you must install the Type 2200 driver For information...

Page 35: ...nd media type number of copies The following table lists a general overview of features supported by your printer drivers Feature Printer Driver Win9x Me Win2000 XP WinNT4 0 Toner Save Y Y Y Print qua...

Page 36: ...Advanced Server Windows XP Home edition or Professional Minimal Requirements Disk space 120 MB for installation Memory 64 MB CPU Pentium II 233 or higher Required software Internet Explorer 4 01 Reco...

Page 37: ...nto your CD ROM drive The CD ROM should automatically run and an maintenance window appears If the maintenance window does not appear click Start and then Run Type X Setup exe replacing X with the let...

Page 38: ...fter selecting the language and the component s click Next View Operating Instructions Allows you to view this Operating Instructions If your computer doesn t have Adobe Acrobat click on this option a...

Page 39: ...tall the driver If your printer doesn t work properly reinstall the printer driver Repairing Software Repairing is required if your installation fails or software does not work properly 1 You can sele...

Page 40: ...installation will start and the test page will not be printed at the end of the installation 3 Select the components you want to reinstall and click Next 4 After the installation is finished the wind...

Page 41: ...e replacing X with the letter of your drive and click OK 2 Click Remove Then you will see a component list so that you can remove any of them individually If you want to uninstall the printer driver c...

Page 42: ...nu until Machine Setup appears on the top line of the display 2 Press the scroll button or until Language appears on the bottom line of the display 3 Press Enter The current setting appears on the bot...

Page 43: ...4 Press Enter when the number on the display is correct The display asks you to enter the ID 5 Enter your name or company name using the number keypad You can enter alphanumeric characters using the...

Page 44: ...s the button until the correct letter appears on the display For example to enter the letter O press 6 labeled with MNO Each time you press 6 the display shows a different letter M N O and finally 6 Y...

Page 45: ...cess code 9 for example and listen for a second dial tone In such cases you must insert a pause in the telephone number You can insert a pause while you are setting up one touch or speed dial numbers...

Page 46: ...31 Year requires all four digits Hour 01 12 12 hour mode 00 23 24 hour mode Minute 00 59 NOTE The date format may differ from each country You can also use the scroll button or to move the cursor unde...

Page 47: ...he paper tray you need to set the paper type and size using the control panel buttons These settings will apply to Fax and Copy modes For PC printing you need to select the paper type and size in the...

Page 48: ...il the remote machine answers You can adjust the speaker volume level using the On Hook Dial button Speaker Ringer Key Sound and Alarm Sound 1 Press Menu until Sound Volume appears on the top line of...

Page 49: ...use You can turn this mode on by selecting the length of time for which the machine waits after a job is printed before it switches to a reduced power state 1 Press Menu until Machine Setup appears o...

Page 50: ...r introduces you to the basics of selecting print materials and loading them into your machine This chapter includes Selecting Print Materials Selecting an Output Location Loading Paper in the Paper T...

Page 51: ...ports paper weights as follows 16 24 lb 60 90 g m2 bond for the standard paper tray Tray 1 and optional paper tray Tray 2 16 43 lbs 60 163 g m2 bond for the manual feeder Brightness Some papers are wh...

Page 52: ...ed materials at temperatures between 15 o C and 30 o C 59 o F to 86 o F The relative humidity should be between 10 and 70 During storage you should use moisture proof wrap such as any plastic containe...

Page 53: ...designed for one pass through the machine Do not use labels that are separating from the backing sheet or are wrinkled bubbled or otherwise damaged Do not use Carbonless paper and Tracing paper They c...

Page 54: ...for most print jobs Printing to the Rear Output Slot Face up Using the rear output slot paper comes out of the machine face up Printing from the manual feeder to the rear output slot provides the stra...

Page 55: ...y pulling it upward WARNING The fusing area inside the rear part of your machine becomes hot once the machine is turned on Be careful when you access this area 2 If you do not want to use the rear out...

Page 56: ...ll open the paper tray and load paper with the print side face down You can load letterhead paper with the design side face down The top edge of the sheet with the logo should be placed at the front s...

Page 57: ...lb and 32 lb NOTES Always load only the print materials specified in the Specifications on page 9 9 to avoid paper jams and print quality problems Flatten any curl on postcards envelopes and labels b...

Page 58: ...printing on previously printed paper from the manual feeder the printed side should be facing down with an uncurled edge to the machine If you experience problems with paper feed turn the paper aroun...

Page 59: ...1 Press Menu The display shows Paper Setting on the top line and the first item Paper Type on the bottom line 2 Press Enter to access the menu item 3 Use the scroll button or to find the paper type yo...

Page 60: ...ou step by step instructions for copying documents This chapter includes Loading Paper for Copying Preparing a Document Making a Copy Setting Copy Options Changing the Default Settings Setting the Tim...

Page 61: ...b for one job When you use the ADF Do not load documents smaller than 142 x 148 mm or larger than 216 x 356 mm Do not attempt to feed the following types of documents carbon paper or carbon backed pap...

Page 62: ...document size 4 Customize the copy settings including number of copies copy size contrast and image by using the control panel buttons See Setting Copy Options on page 3 4 Sorts the copy job For exam...

Page 63: ...to their default status Or they will automatically return to their default status after the machine completes the copy Darkness If you have an original document containing faint markings and dark ima...

Page 64: ...py a document containing color on the background such as a newspaper or a catalog you can get the background on your copy If you want to reduce the background change the Darknen setting to Lighten and...

Page 65: ...Press Enter to save the selection To fine tune the size of copies 1 Press Reduce Enlarge 2 Press Reduce Enlarge or the scroll button or until Custom 50 200 displays on the bottom line Press Enter 3 P...

Page 66: ...he first menu item Default Change appears on the bottom line 2 Press Enter to access the menu item The first setup option Darken appears on the bottom line 3 Press the scroll button or to scroll throu...

Page 67: ...eans that the machine does not restore the default settings until you press Start to start copying or Clear Stop to cancel 5 Press Enter to save the selection 6 To return to Standby mode press Clear S...

Page 68: ...4 FAXING This chapter gives you information about using your machine as a fax machine This chapter includes Sending a Fax Receiving a Fax Automatic Dialing Advanced Fax Functions Additional Features...

Page 69: ...r displays on the bottom line 2 Press the scroll button or until the menu item you want on the bottom line and press Enter 3 Use the scroll button or to find the status or use the number keypad to ent...

Page 70: ...empts 0 to 13 If you enter 0 the machine will not redial MSG Confirm You can set your machine to print a report showing whether the transmission was successful how many pages were sent and more The av...

Page 71: ...the data within the margin will be discarded Settings range from 0 to 30 mm Receive Code The Receive Code allows you to initiate fax reception from an extension phone plugged into the EXT jack on the...

Page 72: ...out Fold out the extender if necessary 2 Load the documents up to 50 pages face down into the ADF and adjust the document guides to the document size For detailed guidelines for preparing an original...

Page 73: ...For the memory transmission Super Fine mode is not available The resolution setting is automatically changed to Fine When your machine is set to Super Fine resolution and the remote fax machine does n...

Page 74: ...to change the darkness see page 4 3 3 Enter the remote fax phone number using the number keypad You can use the one touch keypad or speed or group dial numbers For details about storing a number see...

Page 75: ...remote fax machine s fax number using the number keypad You can use the one touch keypad or speed or group dial numbers For details about storing a number see page 4 9 5 When you hear a high pitched f...

Page 76: ...u can set your machine to print a confirmation report automatically each time sending a fax is completed For further details see the MSG Confirm item on page 4 3 Automatic Redialing When the number yo...

Page 77: ...line the call automatically switches to Fax mode In DRPD mode you can receive a call using the Distinctive Ring Pattern Detection DRPD feature Distinctive Ring is a telephone company service which ena...

Page 78: ...page 1 32 Receiving Automatically in Fax Mode Your machine is preset to Fax mode at the factory If you have changed the receiving mode take the following steps to receive faxes automatically 1 Press R...

Page 79: ...EXT jack your machine automatically goes into Fax mode after a predefined number of rings If your answering machine has a user selectable ring counter set it to answer incoming calls within 1 ring If...

Page 80: ...call you on is identified by different ringing patterns which consist of various combinations of long and short ringing sounds This feature is often used by answering services who answer telephones fo...

Page 81: ...ep 3 6 To return to Standby Mode press Clear Stop When the DRPD feature is set up the DRPD option is available in the Receive Mode menu To receive faxes in the DRPD mode you need to set the menu to DR...

Page 82: ...ouch dial buttons from 21 to 40 press and hold down the one touch dial button for about 2 seconds 2 Enter the number you want to store using the number keypad and press Enter To insert a pause between...

Page 83: ...it speed dial locations 0 149 Storing a Number for Speed Dialing 1 Press Phone Book on the control panel 2 Press Phone Book or the scroll button or to display Store Edit on the bottom line of the disp...

Page 84: ...de press Clear Stop Sending a Fax using a Speed Number 1 Feed the document s face up into the ADF For details about loading a document see page 4 5 2 Adjust the document resolution to suit your fax ne...

Page 85: ...when New displays on the bottom line The display prompts you to enter a location number showing the first available number 5 Enter a group number between 0 and 149 using the number keypad or scroll b...

Page 86: ...Enter 3 Press the scroll button or to display Group Dials on the bottom line and press Enter 4 Press the scroll button or to display Edit on the bottom line and press Enter 5 Enter the group number yo...

Page 87: ...ment loaded in the ADF and then dials each of the numbers included in the group Searching for a Number in the Memory There are two ways to search for a number in the memory You can either scan from A...

Page 88: ...ILE press the 6 button which is labeled with MNO 4 Press the scroll button or to display the next name 5 When the name and or the number you want displays press Start or Enter to dial Printing a Phone...

Page 89: ...number keypad You can use one touch keypad or speed dial or group dial numbers For details about storing a number see page 4 15 5 Press Enter to confirm the number The display asks you to enter anothe...

Page 90: ...machine using the number keypad You can use one touch keypad or speed dial or group dial numbers For details about storing a number see page 4 15 6 Press Enter to confirm the number on the display Th...

Page 91: ...s the or button or any number button If you set a time earlier than the current time the document will be sent at that time on the following day 12 Press Enter when the starting time displays correctl...

Page 92: ...e darkness see page 4 3 3 Press Menu until Fax Feature appears on the top line of the display 4 Press the scroll button or to display Priority Fax on the bottom line and press Enter 5 Enter the number...

Page 93: ...appears on the top line of the display 2 Press the scroll button or to display Delay Rx Poll on the bottom line and press Enter 3 Enter the number of the remote machine to be polled using the number k...

Page 94: ...machine will dial the numbers in the order you entered and receive documents from the remote machines Adding Documents to a Scheduled Fax You can add documents to the delayed transmission previously...

Page 95: ...s and then returns to Standby mode Canceling a Scheduled Fax 1 Press Menu until Fax Feature appears on the top line of the display 2 Press the scroll button or to display Cancel Job and press Enter Th...

Page 96: ...Advanced Fax appears on the top line of the display 2 Press the scroll button or until Secure Receive appears on the bottom line and press Enter 3 Press the scroll button or to display On on the bott...

Page 97: ...ress Enter The machine prints all of the faxes stored in the memory To turn Secure Receiving mode off 1 Access the Secure Receive menu by following steps 1 and 2 on page 4 29 2 Press the scroll button...

Page 98: ...This report shows information of the faxes you recently received System Data List This list shows the status of the user selectable options You may print this list to confirm your changes after changi...

Page 99: ...red after a power failure if there occurs any data loss due to the power failure NOTE The lists you have set to print out automatically don t print out when there is no paper loaded or a paper jam has...

Page 100: ...ge 4 31 Changing Setting Options 1 Press Menu until Advanced Fax appears on the top line of the display The first available menu item Send Forward displays on the bottom line 2 Press the scroll button...

Page 101: ...to set the machine to print the fax if fax forwarding is completed without any error Junk Fax Setup Using the Junk Fax Barrier feature the system will not accept faxes sent from remote stations of wh...

Page 102: ...n this feature off Select On to turn this feature on ECM Mode Error Correction Mode Error Correction Mode helps with poor line quality and makes sure any fax you send are sent smoothly to any other EC...

Page 103: ...tically installed For information about installing SF 565P software see page 1 19 To open the Remote Control Panel 1 Start your Windows 2 From the Start menu select Programs 3 Select Type 1200 and the...

Page 104: ...s Deletes all Phone Book entries Allows you to edit the selected Phone Book entry in a separate Edit window Allows you to set up group dial numbers See below Deletes the selected Phone Book entry Show...

Page 105: ...FAXING 4 38 The Firmware Update Tab Click the Firmware Update tab to update the firmware of your machine This feature should be used by an authorized technician Please consult with the purchase point...

Page 106: ...r includes Printing a Document in Windows Setting Paper Properties Setting Graphic Properties Printing Multiple Pages on One Sheet of the Paper Printing a Reduced or Enlarged Document Fitting Your Doc...

Page 107: ...may look slightly different depending on your application You can select the basic print settings within the Print window These settings include the number of copies and the print range 3 To take adv...

Page 108: ...Portrait prints across the width of the page letter style Landscape prints across the length of the page spreadsheet style If you want to turn the page upside down select 180 from the Rotate drop down...

Page 109: ...er depending on your operating system This Operating Instructions shows the Properties window on windows 98 Notes Most Windows applications overrides the settings you specified in the printer driver C...

Page 110: ...ch job To stop a print job from the Printers folder If the print job is waiting in a print queue or print spooler such as the Printer group in Windows delete the job as follows 1 Click the Windows Sta...

Page 111: ...ct it from the Favorites drop down list To delete a favorite setting item select it from the list and click Delete You can also restore the printer driver s default settings by selecting Printer Defau...

Page 112: ...opies Copies allows you to choose the number of copies to be printed You can enter up to 999 Size Size allows you to choose the size of the paper loaded in the tray If the required size is not listed...

Page 113: ...Default If you load a different type of print material select the corresponding paper type For more information about print materials see Chapter 2 Paper Handling If you use cotton paper set the paper...

Page 114: ...ting resolution by choosing from 600 dpi Normal or 300 dpi Draft The higher the setting the sharper the printed characters and graphics Higher settings may increase the time it takes to print a docume...

Page 115: ...is for normal documents Lighten This setting is for bolder line widths or darker grayscale images Dark This setting is for finer line width higher definition in graphics and lighter grayscale images...

Page 116: ...image the text in your document Select the appropriate setting according to the status of your document Download as Bit Image When this option is selected the driver downloads the font data as bitmap...

Page 117: ...drop down list if necessary Check Print Page Border to print a border around each page on the sheet NOTE Page Order and Print Page Border are enabled only when the number of pages per side is 2 4 9 or...

Page 118: ...from your software application access the printer s Properties See page 5 2 2 From the Layout tab select Reduce Enlarge on the Type drop down list 3 Enter the scaling rate in the Percentage input box...

Page 119: ...k the fine details on a small document 1 When you change the print settings from your software application access the printer s Properties See page 5 2 2 From the Layout tab select Fit to Page on the...

Page 120: ...om your software application access the printer s Properties See page 5 2 2 From the Layout tab select Poster on the Type drop down list 3 Configure the poster option You can select the page layout fr...

Page 121: ...T or CONFIDENTIAL printed diagonally across the first page or all of the pages of a document There are several predefined watermarks that come with your machine and they can be modified or you can add...

Page 122: ...x The message displays in the preview image window When the First Page Only box is checked the watermark prints on the first page only 4 Select the watermark options You can select the font name style...

Page 123: ...arks list to change the watermark message and the options Refer to page 5 17 4 Click Update to save the changes 5 Click Ok Deleting a Watermark 1 When you change the print settings from your software...

Page 124: ...ur company s letterhead you need only tell the machine to print the letterhead overlay on your document Creating a New Page Overlay To use a page overlay you must create a new page overlay containing...

Page 125: ...ct the destination path if necessary The default is C Formover 6 Click Save The name appears on the Overlay List 7 Click Ok or Yes to finish creating The file is not printed out Instead it is stored i...

Page 126: ...3 Click the Extras tab 4 Select the overlay you want to print from the Overlay drop down list box 5 When the overlay file you want doesn t appear on the Overlay List click Edit and Load Overlay and se...

Page 127: ...y will be automatically printed with your document 7 Click OK or Yes until the printing starts The overlay downloads with your print job and prints on your document NOTE The resolution of the overlay...

Page 128: ...or network connected you need to install the printer software on each computer that will print documents to the printer In Windows 9x Me Setting Up the Host Computer 1 Start Windows 2 From the Start m...

Page 129: ...3 Right click the shared name and select Capture Printer Port 4 Select the port you want check the Reconnect at log on box and then click OK 5 From the Start menu select Settings and then Printers 6 D...

Page 130: ...XP from the Start menu select Printers and Faxes 3 Double click your printer icon 4 From the Printer menu select Sharing 5 For Windows NT 4 0 check the Shared box For Windows 2000 check the Shared As...

Page 131: ...Settings and Printers For Windows XP from the Start menu select Printers and Faxes 5 Double click your printer icon 6 From the Printer menu select Properties 7 Press the Ports tab and click Add Port...

Page 132: ...and text into digital files on your computer Then you can fax or e mail the files display them on your web site or use them to create projects that you can print using software This chapter includes...

Page 133: ...you want to scan documents using other software you will need to use TWAIN compliant software such as Adobe PhotoDeluxe or Adobe Photoshop The first time you scan with your machine select it as your T...

Page 134: ...ENANCE This chapter provides information for maintaining your machine and the toner cartridge This chapter includes Clearing the Memory Adjusting Shading Cleaning Your Machine Maintaining the Toner Ca...

Page 135: ...to the factory default Fax Setup Restores all of the Fax Setup options to the factory default Fax Feature Cancels all of the scheduled fax jobs in the machine s memory Advanced Fax Restores all of th...

Page 136: ...quality follow the cleaning procedures below each time the toner cartridge is replaced or if print quality problems occur NOTES While cleaning the inside of the machine be careful not to touch the tr...

Page 137: ...the machine to cool down 2 Open the front cover and pull the toner cartridge out lightly pushing it down 3 With a dry lint free cloth wipe away any dust and spilled toner from the toner cartridge area...

Page 138: ...y as needed 1 Slightly dampen a soft lint free cloth or paper towel with water 2 Open the control panel by gripping its top and pulling it 3 Carefully wipe the scanning glass with a soft dry cloth If...

Page 139: ...mind Do not remove the toner cartridge from its package until ready for use Do not refill the toner cartridge The machine warranty does not cover damage caused by using a refilled cartridge Store tone...

Page 140: ...e print quality by redistributing the remaining toner in the cartridge 1 Open the front cover 2 Pull the toner cartridge out and gently roll the cartridge 5 or 6 times to distribute the toner evenly i...

Page 141: ...d the machine stops printing NOTE You can set the machine to ignore the Toner Empty message and continue printing See page 7 10 1 Open the front cover 2 Lightly pushing the used cartridge down pull th...

Page 142: ...the bottom line and press Enter 3 Press the scroll button or to change the setting Select On to enable this feature Selecting Off disables this feature 4 Press Enter to save the selection Cleaning the...

Page 143: ...splays and to continue printing the pages 1 Press Menu until Machine Setup appears on the display 2 Press the scroll button or until Ignore Toner appears on the bottom line and press Enter 3 Press the...

Page 144: ...OUBLESHOOTING This chapter gives helpful information for what to do if you encounter an error This chapter includes Clearing Document Jams Clearing Paper Jams Clearing LCD Error Messages Solving Probl...

Page 145: ...ll the jammed document gently out of the ADF and skip to step 5 If there is any resistance and the document does not move when you pull it continue to the next step 3 Open the control panel by grippin...

Page 146: ...machine If the paper does not exit continue to step 2 2 Pull Tray 1 open 3 Remove the jammed paper by gently pulling it straight out If there is any resistance and the paper does not move when you pu...

Page 147: ...g In Tray 2 1 Open and close the front cover The jammed paper automatically exits the machine If the paper does not exit continue to step 2 1 Pull Tray 2 open 2 Remove the jammed paper by gently pulli...

Page 148: ...2 Gently pull the paper out of the front output tray Skip to step 6 If there is any resistance and the paper does not move when you pull it or if you cannot see the paper in the front output tray con...

Page 149: ...by gently pulling it straight out 3 Replace the toner cartridge and close the front cover Printing automatically resumes In the Manual Feeder appears on the display when you try to print using the ma...

Page 150: ...e paper tray Do not remove the paper from the tray while your machine is printing Flex fan and straighten the paper before loading Do not use creased damp or highly curled paper Do not mix paper types...

Page 151: ...send the remaining pages later when memory is available Comm Error The machine has a communication problem Ask the sender to try again CRU Fuse Error The machine has a problem with recognizing the new...

Page 152: ...the line to clear and try again Or turn the ECM on See page 4 35 Load Document You have attempted to set up a copy or fax operation with no document loaded Load a document and try again Low Heat Erro...

Page 153: ...occurred in the manual feeder or the machine detects non feeding from the manual feeder Clear the jam See page 8 6 Paper Jam 2 Check Inside Paper has jammed in the fuser area Clear the jam See page 8...

Page 154: ...used a paper jam clear the paper jam See page 8 3 Paper does not feed into the machine Remove any obstructions from inside the machine Paper has not been loaded correctly Remove paper from the tray an...

Page 155: ...the computer and the machine is defective If possible attach the cable to another computer that is working properly and print a document You can also try using a different printer cable The port sett...

Page 156: ...t the text is wrong garbled or incomplete The printer cable is loose or defective Disconnect the printer cable and reconnect Try a print job that you have already printed successfully If possible atta...

Page 157: ...ton or to select Slow 4 Press Enter to save the selection 5 Press Clear Stop to return to Standby Mode Condition Possible cause Suggested solutions Condition Suggested solutions Light or faded print I...

Page 158: ...service representative Vertical lines If black vertical streaks appear on the page The drum inside the toner cartridge has probably been scratched Remove the toner cartridge and install a new one See...

Page 159: ...sary so that the paper does not absorb too much moisture If background scatter occurs on an envelope change the printing layout to avoid printing over areas that have overlapping seams on the reverse...

Page 160: ...he rear output slot Back of printouts are dirty Check for leaking toner Clean the inside of the machine See page 7 4 Black pages The toner cartridge may not be installed properly Remove the cartridge...

Page 161: ...ntal stripes If horizontally aligned black streaks or smears appear The toner cartridge may be installed improperly Remove and reinsert the cartridge The toner cartridge may be defective Remove the to...

Page 162: ...the ADF Image rubs off the copy easily Replace the paper in the paper tray with paper from a new package In high humidity areas do not leave paper in the machine for the extended periods of time Freq...

Page 163: ...on speed becomes slow in scan mode because of the large amount of memory required to analyze and reproduce the scanned image Set your computer to the ECP printer mode through BIOS setting It will help...

Page 164: ...ly Fax mode should be selected Make sure that there is paper in the tray Check to see if the display shows Memory Full The machine does not send Make sure that the document is loaded in the ADF TX sho...

Page 165: ...uments you no longer need from the memory and then restore the document Blank areas appear at the bottom of each page or on other pages with a small strip of text at the top You may have chosen the wr...

Page 166: ...A APPENDIX This chapter includes Installing an Optional Tray Specifications Scanner Specifications Printer Specifications Facsimile Specifications Paper Specifications...

Page 167: ...s 250 sheets of paper 1 Turn the machine off and unplug all cables from the machine 2 Remove the packing material from the tray and remove the tape fixing the interface cable to the tray 3 Find the lo...

Page 168: ...nter s Properties If you installed Tray 2 with your machine on the machine does not recognize it In this case you need to set the tray in the printer s Properties window so that you can use it for PC...

Page 169: ...ess Menu The display shows Paper Setting on the top line and the first menu item Paper Type on the bottom line 2 Press Enter to access the menu item 3 Use the scroll button or to find the paper type y...

Page 170: ...ray Plain paper 60 90 g m2 16 24 lb Manual feeder Plain paper Transparencies Labels Thick Thin Bond Preprinted Colored Card stock Envelopes 60 163 g m2 16 43 lb Consumables 1 piece toner cartridge sys...

Page 171: ...Scan length Maximum 15 7 inches 400 mm Scan width Maximum 8 5 inches 216 mm Effective 8 2 inches 208 mm Bit depth 1 bit for B W mode 8 bit for Gray mode 24 bit for Color mode Item Description Scan met...

Page 172: ...size Paper tray Letter A4 Legal Folio A5 A6 Manual feeder Letter Legal A4 Folio Executive A5 A6 A6 card Post Card 4x6 Hagaki Envelope 7 3 4 Envelope 9 Envelope 10 Envelope DL Envelope C5 Envelope C6...

Page 173: ...peed Approx 3 seconds page Transmission time applies to memory transmission of text data with ECM compression using only ITU T No 1 Chart Scan speed Approx 1 5 seconds LTR at standard fax resolution m...

Page 174: ...s of paper insure the paper meets the requirements specified in this operating instructions CAUTION Using paper that does not meet these specifications may cause problems requiring repairs These repai...

Page 175: ...use print quality deviations jamming or even damage to the machine Labels Letter 215 9 x 279 8 5 x 11 A4 210 x 297 8 27 x 11 69 120 to 150 g m2 1 sheet of paper for the manual feeder Transparency film...

Page 176: ...on or short grain construction Use the rear output slot Use long grain paper Jamming damage to machine Cutouts or perforations Do not use paper with cutouts or perforations Problems with feeding Ragge...

Page 177: ...bout 3 months Paper stored for long periods may experience heat and moisture extremes which can cause damage Planning is important to prevent damage to large supplies of paper Unopened paper in sealed...

Page 178: ...NOTES Use only the manual feeder to print envelopes You may experience some paper jams when using any media with a length less than 140 mm 5 5 in This may be caused by paper that has been affected by...

Page 179: ...erious jams always use the manual feeder to print labels and always use the rear output tray Never print on the same sheet of labels more than once and never print on a partial sheet of labels When se...

Page 180: ...rencies Transparencies used in the machine must be able to withstand 180 C 356 F the machine s fusing temperature CAUTION To avoid damaging the machine use only transparencies recommended for use in l...

Page 181: ...6 copying 3 3 default setting change 3 7 image 3 5 number of pages 3 5 time out set 3 8 D date and time set 1 31 delay receive polling 4 26 delayed fax 4 23 display language change 1 27 document jam c...

Page 182: ...17 polling 4 26 poster print 5 15 print order set 5 4 print resolution 5 9 printer properties windows 5 2 printing fitting to a selected paper size 5 14 from Windows 5 2 multiple pages on one sheet 5...

Page 183: ...9 6 facsimile 9 8 general 9 5 paper 9 9 printer 9 7 scanner 9 6 speed dial dialing 4 17 storing 4 16 system requirements Windows 1 21 T tel line connect 1 15 toner cartridge install 1 9 redistribute...

Page 184: ...H916 8650...

Page 185: ...splay Language 3 Setting the Date and Time 3 Printing a Report 4 Using Advanced Fax Settings 5 Changing Setting Options 5 Loading a Document 5 Sending a Fax Automatically 6 Confirming Transmission 7 A...

Page 186: ...g not the cable if the power cable or plug becomes frayed or otherwise damaged To avoid hazardous electric shock or laser radiation exposure do not remove any covers or screws other than those specifi...

Page 187: ...performance of procedures other than those specified in this Operating Instructions might result in hazardous radiation exposure Protect the machine from dampness or wet weather such as rain and snow...

Page 188: ...other country In the event of problems please contact your service representative in the first instance FAX2210L LF215m The CE declaration of Comformity is available on the Internet at URL http www ri...

Page 189: ...s you to shift the one touch buttons to the numbers 21 through 40 2 Scrolls through the options available for the selected menu item Confirms the selection on the display Enters Menu mode and scrolls...

Page 190: ...in Standby mode or inserts a pause into a fax number in Edit mode 5 Dials a number or enters alphanumeric characters 6 C O P Y Adjusts the brightness of the documents for the current copy job 1 This...

Page 191: ...Standby Mode press Clear Stop Setting the Date and Time The current date and time are shown on the display when your machine is on and ready to work All of your faxes will have the date and time prin...

Page 192: ...k mode to 24 hour format e g 01 00 PM as 13 00 5 Press Enter when the time and date on the display is correct When you enter a wrong number the machine beeps and does not proceed to the next step If t...

Page 193: ...til Advanced Fax appears on the top line of the display The first available menu item Send Forward displays on the bottom line 2 Press the scroll button or until you see the desired menu item on the b...

Page 194: ...t see page 5 2 Adjust the document resolution to suit your fax needs See Operating Instruction If you need to change the darkness see Operating Instruction 3 Enter the remote fax phone number using th...

Page 195: ...see the MSG Confirm item Operating Instruction Automatic Redialing When the number you have dialed is busy or there is no answer when you send a fax the machine automatically redials the number every...

Page 196: ...8 Memo...

Reviews: