MAINTENANCE AND LUBRICATION
4-35
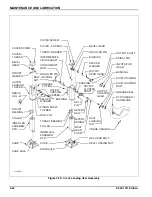
Crank Landing Gear
1.
The landing gear receives adequate lubrication
during manufacturing. Relubrication is possible
through grease fittings and is recommended at three
month intervals.
2.
The elevating screw is lubricated by the lower grease
fitting located on the upper housing
Prior to lubrication, extend the landing
gear as far as possible. During lubrication, slowly
retract the landing gear. The upper grease fitting
lubricates the gearing, shafts, and bushings. It is
recommended to use a high quality commercial
grade lithium EP-2 grease.
IMPORTANT
Shift crankshaft inward into high gear before
lubricating the upper grease fitting.
3.
When inspecting the landing gear, any parts which
are subjected to wear or damage, must be checked
and replaced if worn or damaged. The inspection
and maintenance intervals must be decreased if the
trailer is operated under arduous transport
conditions.
4.
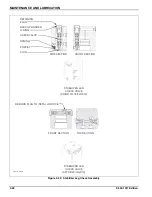
Repair Instructions
a.
In order to repair landing gear, the legs should be
taken off the trailer by removing the mounting
attachment bolts and cross shaft.
b.
For two speed leg assembly, remove cover by
removing cover screws.
IMPORTANT
The cover is sealed to the upper housing with a
silicone sealant. When replacing the cover a suitable
silicone sealant must be used. Dow Corning #700 or
equal is recommended.
c.
Remove grease before disassembly. Drive spiral
pins from output spur gear and input gear.
d.
Then drive out output shaft by placing a punch
through hole in output spur gear and driving the
shaft out. Now both items can be removed.
e.
Remove cap plug. Shift input gear shaft to the
high gear position. Then drive out roll pin with a
3/8” diameter punch, by using the .50 diameter
hole at the side of the shaft in the outer housing.
IMPORTANT
For two speed leg assemblies without the side
access hole, use a curved 3/8” diameter punch.
f.
Remove output cluster shaft.
g.
Shift input gear shaft to the low gear position.
Position mark on end of input gear shaft in a
vertical position. Remove locknuts from shift
housing. Pull out the input gear shaft and shift
housing as one unit.
h.
Remove bevel gear and output cluster gear by
lifting upwards on both parts at the same time.
Remove groove pin and thrust washer. Lift outer
housing off from inner leg assembly.
i.
Remove thrust bearing and collar.
IMPORTANT
Thrust bearing must be exchanged complete with
collar. New thrust bearing must be packed with
grease before assembly.
IMPORTANT
If elevating screw shows sign of wear, replace lower
leg assembly before mounting. Make sure elevating
screw and nut are sufficiently greased. If grease is
required, coat the entire surface of the screw with a
min. of 4 oz. of grease.
j.
If bushings are worn, they must be removed and
replaced. Install bushings with a step driver and
punch.
k.
Assemble shift housing and ball detent to input
gear. Apply a thin film of lithium grease to the
inside of the bushing before assembly.
Reassemble by compressing balls and spring
into hole in input gear. Then slide shift housing
onto the shaft, capturing the detent balls and
spring.
Summary of Contents for 425B Series
Page 2: ......
Page 6: ...iv F 543 1011 Edition...
Page 14: ...2 6 F 543 1011 Edition STANDARD SPECIFICATIONS...
Page 26: ...3 12 F 543 1011 Edition OPERATING INSTRUCTIONS Figure 3 7 Steps for Loading and Unloading...
Page 32: ...3 18 F 543 1011 Edition OPERATING INSTRUCTIONS Figure 3 12 Dock Leveler Operation...
Page 61: ...MAINTENANCE AND LUBRICATION 4 21 Figure 4 13 Axle and Brake Assembly...
Page 76: ...4 36 F 543 1011 Edition MAINTENANCE AND LUBRICATION Page Intentionally Blank...
Page 86: ...5 10 F 543 1011 Edition TROUBLESHOOTING GUIDE...
Page 87: ......


