background image

Section 7: Troubleshooting 

FC10 C-Tine Field Cultivator 335-043M

1/14/19

17

Table of Contents

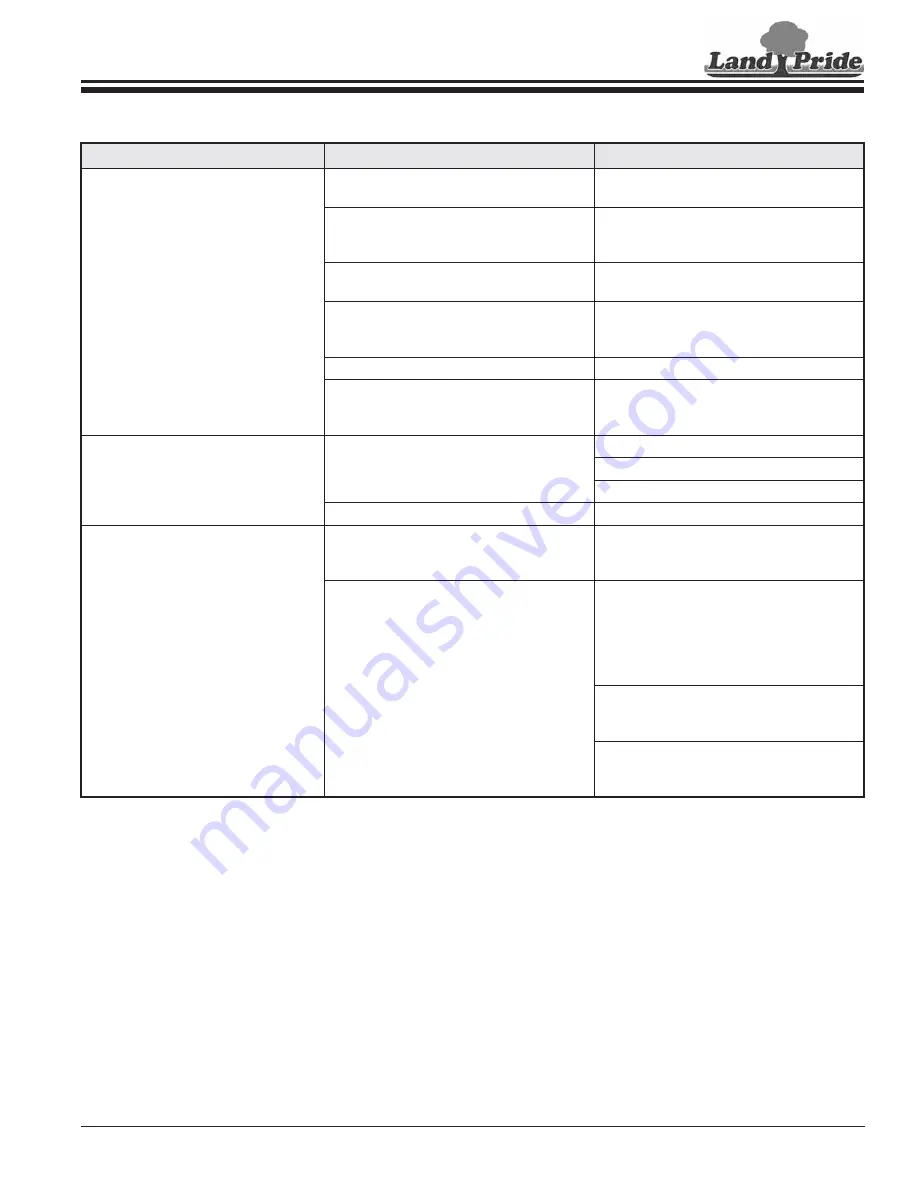
Troubleshooting Chart

Problem

Cause

Solution

Tractor cannot pull the cultivator.

Tractor horsepower is too small.

Attach cultivator to a higher horsepower 
tractor.

Ground is too wet causing tractor tires to 
slip and not allowing the soil to fracture into 
smaller particles.

Never work wet soil that wants to stick 
together. Wait  for  the  ground  to  dry  enough 
for the soil to fracture into smaller parts.

Ground is too dry.

Wait until ground is softened with moisture. 
Dry soil won’t fracture easily.

Ground is too hard to cultivate even when 
soil is moist.

Break soil with equipment design to 
fracture the soil such as a plow, disk, or 
scarifier.

C-tine blades are dull.

Rotate or replace C-tine blades.

Cultivating too deep.

Raise cultivator up until tractor can pull the 
unit. If needed, make several passes over 
the ground at the shallow depth.

Tractor tires slip excessively.

Tractor weight is too light.

Use a larger tractor that is heavier.

Increase 3-point draft at the control lever.

Add weights to the rear wheels.

Cultivating too deep.

Set cultivator at a shallower depth.

Clods are too hard and won’t 
fracture into smaller particles.

Clods are too dry to fracture easily.

Wait for moisture to make the clods moist. 
Note: Do not work ground while the soil 
and clods are sticky wet.

Soil was worked too wet causing soil 
compaction.

Note: Hard clods due to soil compaction 
reduce void spaces for holding water, does 
not allow good soil aeration, root 
penetration, and crop yields.

Check soil moisture content. Dig a small 
amount of soil and squeeze it in your hand. 
If the soil crumbles, it is ready to work. 
Give the soil time to dry if it forms a ball 
that bounces in your hand without breaking 
apart.

Try breaking the hard clods with a disk or 
other suitable cultivating tool to make the 
clods smaller. 

Allow time for winter freezing and thawing 
to change the soil structure back into 
workable soil that will fracture easily.

Section 7: Troubleshooting

Summary of Contents for FC10

Page 1: ...l Kit in French Language please see your Land Pride dealer Read the Operator s Manual entirely When you see this symbol the subsequent instructions and warnings are serious follow without exception Yo...

Page 2: ...d the weights and measurements are no longer accurate for your machine Update the record by adding the machine weight and measurements provided in the Specifications Capacities Section of this manual...

Page 3: ...tates of America FC10 C Tine Field Cultivator 335 043M Table of Contents Important Safety Information 1 Safety at All Times 1 Look for the Safety Alert Symbol 1 Safety Labels 4 Introduction 5 Applicat...

Page 4: ...ad the appropriate App on your smart phone open the App point your phone on the QR code and take a picture Dealer QR Locator The QR code on the left will link you to available dealers for Land Pride p...

Page 5: ...ldren to play on the power machine or implement Use extra caution when backing up Before the tractor starts to move look down and behind to make sure the area is clear Safety at All Times Careful oper...

Page 6: ...location Allow only enough slack in the chain to permit turning Always hitch the implement to the machine towing it Do not use the safety chain tow the implement Transport Safely Comply with federal s...

Page 7: ...ones while operating equipment Use Seat Belt and ROPS Land Pride recommends the use of a CAB or roll over protective structures ROPS and seat belt in almost all power machines Combination of a CAB or...

Page 8: ...dealer locator at www landpride com 3 Some new equipment installed during repair requires safety labels to be affixed to the replaced component as specified by Land Pride When ordering new components...

Page 9: ...in the direction the machine will operate while in use unless otherwise stated Definitions Owner Assistance The dealer should complete the Online Warranty Registration at the time of purchase This in...

Page 10: ...pins are spread Operator s Manual Make sure all safety labels are correctly located and legible Replace if damaged Page 4 Read and understand the operator s manual for your cultivator An understandin...

Page 11: ...13 and hex nuts 12 as shown Draw hex nuts up snug do not tighten at this time 6 Remove hex nut 3B lock washer 2 and hex head bolt 9 Keep removed hardware for reuse 7 Attach rear support channel 10 to...

Page 12: ...y I hitch is required The lower 3 point arms of the 3 point hitch must be stabilized to prevent side to side movement Most tractors have sway blocks or adjustable chains for this purpose Consult your...

Page 13: ...evel solid surface 3 Lower cultivator down until cultivator blades are on the ground 4 If unhooking from a Quick Hitch follow instructions in the Quick Hitch Operator s Manual Otherwise continue with...

Page 14: ...orrect torque 3 Repeat steps 1 2 for the same tine on the right hand side of the cultivator Level Cultivator Refer to Figure 2 2 1 Shut tractor down according to Tractor Shutdown Procedure on page 8 M...

Page 15: ...operly or meet OEM Original Equipment Manufacturer specifications They can weaken the integrity and impair the safety function performance and life of the implement Replace parts only with genuine OEM...

Page 16: ...sprinkler heads and other obstacles that you would not want to damage or encounter You should also have removed wire tree limbs rocks and other debris that can cause problems with your cultivator and...

Page 17: ...ds may not fit properly or meet OEM Original Equipment Manufacturer specifications They can weaken the integrity and impair the safety function performance and life of the implement Replace parts only...

Page 18: ...LT 5 820 616C C TINE SHANK Long Term Storage Clean inspect service and make necessary repairs to the implement when storing it for long periods and at the end of the season This will help to ensure th...

Page 19: ...l angle C channel support brace Formed out of heavy plate C tine support bracket 1 4 Formed plate holds C tines straight C tine shanks Heat treated 3 8 spring steel Shanks can be adjusted 4 1 4 horizo...

Page 20: ...h C channel support brace Angle frame stands up to rugged treatment C channel support brace helps stiffens the angle frame Stabilizing C tine support brackets Holds C tine shanks straight Adjustable C...

Page 21: ...e shallow depth Tractor tires slip excessively Tractor weight is too light Use a larger tractor that is heavier Increase 3 point draft at the control lever Add weights to the rear wheels Cultivating t...

Page 22: ...70 M16 X 2 145 105 225 165 315 230 5 8 11 130 97 205 150 285 210 M16 X 1 5 155 115 240 180 335 245 5 8 18 150 110 230 170 325 240 M18 X 2 5 195 145 310 230 405 300 3 4 10 235 170 360 265 510 375 M18 X...

Page 23: ...roperly maintain oil levels grease points and driveline shafts Claims under this Warranty should be made to the dealer which originally sold the product and all warranty adjustments must be made throu...

Page 24: ...Corporate Office P O Box 5060 Salina Kansas 67402 5060 USA www landpride com...

Reviews: