background image

18

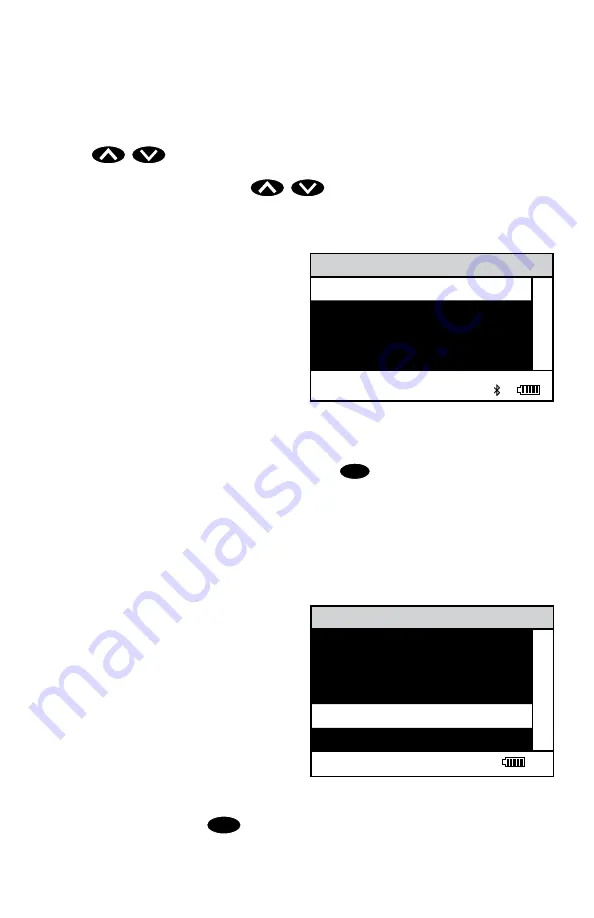
The display has a header line at the top and a footer line at the bottom. The header 

displays the title of the current menu. The footer line displays the time and the date, the 

data logger status and the battery status. The menu selection window is in the middle 

of the display between the header and the footer.
The menu selection window displays information in two general formats. In the first 

format only menu selections are displayed. Up to 4 lines of menu selections may be 

displayed. If more selections are available they can be viewed by pressing the arrow 

buttons 


 to scroll the other menu selections into the menu selection 

window. Think of the menu selections as a vertical list in the display that moves up 

or down each time an arrow button 


 is pressed. Some menus in the 

colorimeter are looping menus. The top and bottom menu choices are connected in 

a loop. Scrolling down past the bottom of the menu will lead to the top of the menu. 

Scrolling up past the top of the menu will lead to the bottom of the menu.

Header

Menu Title

Main Window Selection First Choice

Second Choice
Third Choice
Another

Footer

12:00:00                  001/500               P   

And Another
And So On

A light bar will indicate the menu choice. As the menu is scrolled through, the light bar 

will highlight different menu choices. Pressing the  

ENTER

 button will select the menu 

choice that is indicated by the light bar.
In the second format the menu choice window takes advantage of the graphical 

capabilities of the display. Large format graphic information, such as test results or 

error messages or the LaMotte logo is displayed. The top two lines of the display are 

used to display information in a large, easy to read format. The menus work in the same 

way as previously described but two lines of the menu are visible at the bottom of the 

display.

Header

Menu Title

Message or Result Window

Result or 

Message

Another

Main Window Selection

And Another

Footer

12:00:00                  001/500                 

And So On
Last Choice

As described previously, the 

EXIT

 button allows an exit or escape from the current 

menu and a return to the previous menu. This allows a rapid exit from an inner menu to 

Summary of Contents for DC1500 FLUORIDE

Page 1: ...DC1500 FLUORIDE Fluoride Colorimeter Kit Code 3243 ACCEPTED...

Page 2: ...r Connection Output 15 Computer Connection 15 WaterLink Connect 2 15 Battery Battery AC Operation 15 Battery Replacement 16 Maintenance Cleaning 16 Returns 16 Meter Disposal 16 General Operating Infor...

Page 3: ...1720 01 that is supplied with the kit Make no substitutions Test Tubes with Caps 0290 6 Replacement Chamber 3 0038 USB Cable 1720 01 USB Wall Adapter 1721 Car Charger 5 0132 TEST METHODS SPECIFICATIO...

Page 4: ...the concentration given Alkalinity CaCO3 5000 mg L Aluminum Al 3 0 1 mg L Iron Fe 3 10 mg L Sulfate SO4 2 200 mg L Color and turbidity must be removed or compensated for in the procedure Temperature s...

Page 5: ...ear colorless Fluoride free water 6 Use the 0 5 mL pipet 0353 to add 0 5 mL of Sodium Arsenite Solution 4128 Cap and mix 7 Use the 1 0 mL pipet 0354 to add 2 measures of Acid Zirconyl SPADNS Reagent 3...

Page 6: ...t blank NOTE The meter will remember the last scanned blank reading It is not necessary to scan a blank each time the test is performed To use the previous blank reading instead of scanning a new one...

Page 7: ...select TestingMenu All Tests 045 Fluoride 12 00 00 001 500 3 Scroll to and select 045 Fluoride from menu 045 Fluoride Scan Blank Scan Sample 12 00 00 001 500 4 This test requires a reagent blank Rins...

Page 8: ...imeter tube 0290 with sample water Fill to the 10 mL line with sample water 9 Use the 0 5 mL pipet 0353 to add 0 5 mL of Sodium Arsenite Solution 4128 Cap and mix 10 Use the 1 0 mL pipet 0354 to add 2...

Page 9: ...he value shown to the concentration of the prepared standard 1 0 in this example NOTE A maximum adjustment of 25 is possible 045 Fluoride 1 0 ppm Edit ENTER Save ENTER Default 12 00 00 001 500 15 Pres...

Page 10: ...ach Set Time Year 2000 12 00 00 001 500 3 Press ENTER to select the final character The time and date will be saved and the meter will return to the Editing Menu Editing Menu Set Clock Logging Factory...

Page 11: ...Editing Menu Set Clock Logging Factory Setup Set Power Save 12 00 00 001 500 FACTORY SETUP The Factory Setup menu is used in manufacturing of the colorimeter This menu is not for use by the operator i...

Page 12: ...iewing The default setting is 10 seconds If Button Control is chosen the backlight button on the key pad will act as an on off switch and the backlight will remain on or off when the meter is being us...

Page 13: ...d the meter will return to the Editing Menu Editing Menu Logging Factory Setup Set Power Save Set Backlight Time 12 00 00 001 500 SELECTING A LANGUAGE There are eight languages available English Spani...

Page 14: ...incorporate a looping feature which allows the user to quickly reach the last choice in the menu from the first choice In a looping menu the last choices in the menu are above the first choice and scr...

Page 15: ...B mini B connector into the meter and the larger end of the USB cable USB type A connector into the wall adapter Plug the wall adapter into an AC outlet Reinsert the rubber USB port plug after chargin...

Page 16: ...the backlight time option to 10 seconds or select Button Control and keep the backlight off BATTERY REPLACEMENT The lithium ion battery used in this unit should last for many years with normal use Whe...

Page 17: ...with an integrated interference filter The interference filter selects a narrow band of light from the corresponding LED for the colorimetric measurements A USB wall adapter USB computer connection o...

Page 18: ...t the top of the menu will lead to the bottom of the menu Header Menu Title Main Window Selection First Choice Second Choice Third Choice Another Footer 12 00 00 001 500 P And Another And So On A ligh...

Page 19: ...prevent dust from entering the tubes Dry tubes should be stored with the caps on to prevent contamination After a tube has been filled and capped it should be held by the cap and the outside surface s...

Page 20: ...mpany to receive compensation for damaged goods GENERAL PRECAUTIONS READTHEINSTRUCTIONMANUALBEFOREATTEMPTINGTOSETUPOROPERATETHE METER Failure to do so could result in personal injury or damage to the...

Page 21: ...RH non condensing USB Port Mini B Power Requirements USB wall adapter USB computer connection or lithium ion rechargeable battery Battery Charge Life Approximately 380 tests with backlight on to 1000...

Page 22: ...no other warranty whether written or oral is expressed or implied TROUBLESHOOTING ERROR MESSAGES Over Range If the message OVERRANGE is displayed when scanning a sample the sample may be over range o...

Page 23: ...B wall computer adapter Shut Down Low Batt Shut Down Battery is too low to operate the unit Charge battery or use USB wall computer adapter Overrange Sample is outside of acceptable range Dilute sampl...

Page 24: ...gton Ave Chestertown Maryland 21620 USA 1 410 778 3100 800 344 3100 www lamotte com LaMotte and WaterLink are registered trademarks of LaMotte Company 2023 LaMotte Company All Rights Reserved 3243 MN...

Reviews: