background image

Models LB480A/LB680A 

USB Powe™      


Product Manual PPA (Pulse Profiling Application) 


Revision:  08/02/11 


25


Markers Toolbar 

Normal Markers 

 
Markers are used to make measurements at a particular point (

Normal Markers

) or measure the difference between 

two points (

Delta Markers

). Markers are only available in the Measurement view. The value of each marker is 

displayed in the 

Results

 pane. The value of the active marker is displayed in the upper left portion of the Measurement 

view unless it is turned off 

– see the 

Meas Notation On/Off 

button


under the

 Display Options 

toolbar. 


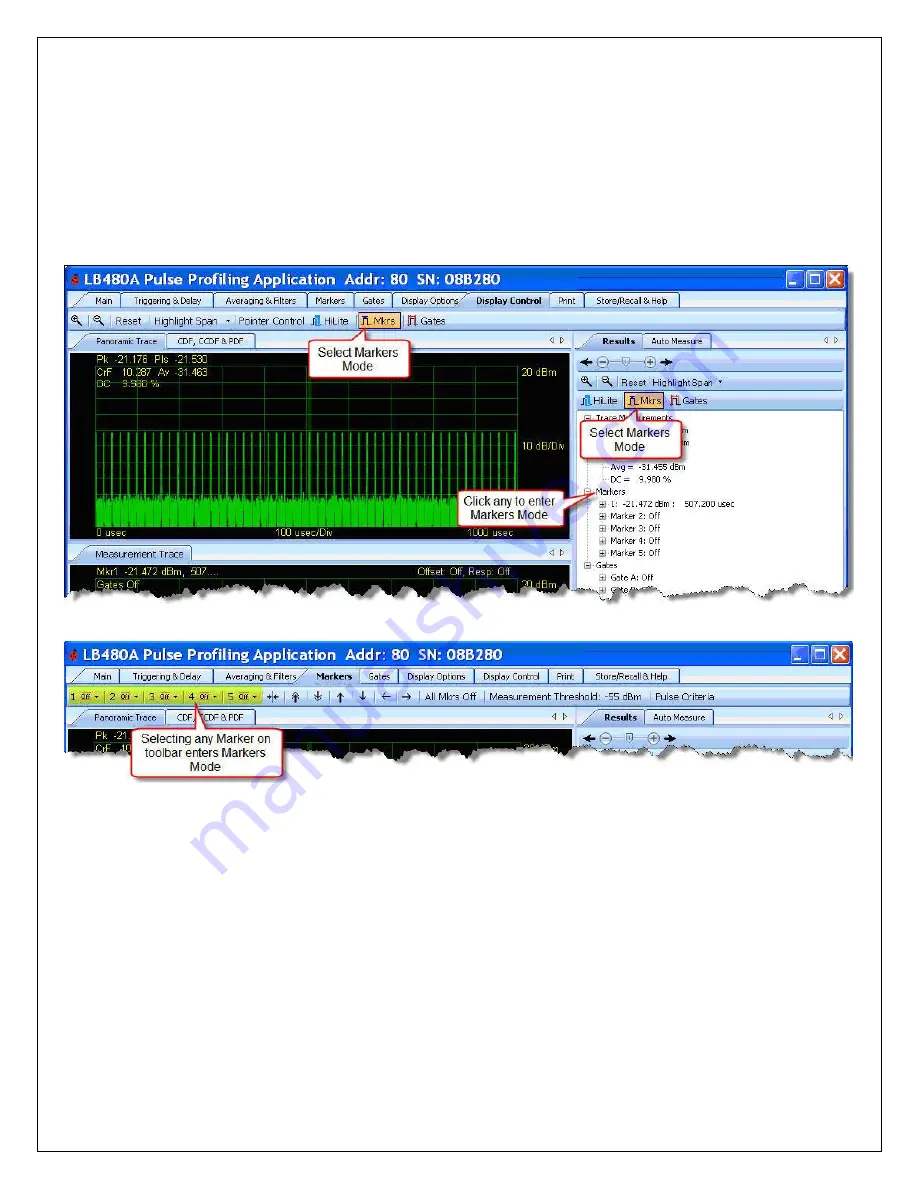
To manipulate (move or place) a particular marker the mouse pointer must be in the 

Markers

 mode. Because pointer 

modes are changed quite often there are a number of ways to change modes as shown above. You can select the 

Markers 

mode in four ways: 

 
1.  In the 

Results

 pane select the 

Markers

 mode icon. 

2.  In the 

Results

 pane click on any marker node. For instance, 

click the node labeled “Marker 1” to set the pointer 

mode to 

Markers

3.  Under the 

Display Control

 toolbar select the 

Markers

 mode icon 

4.  Select the 

Markers

 toolbar and select any numbered marker button. 


Summary of Contents for PowerSensor+ LB480A

Page 1: ...Models LB480A LB680A USB PowerSensor Product Manual PPA Pulse Profiling Application Revision 08 02 11 1 Product Manual for the PULSE PROFILING APPLICATION MODELS LB480A LB680A...

Page 2: ...upport Contact Information 10 Operating System and Computer Requirements 10 Installation Procedure 10 Install the Software 10 Connect the Sensor 10 3 Pulse Profiling Overview 11 Quick Start Guide and...

Page 3: ...igger 41 Internal Manual Level Trigger 43 External TTL Trigger 44 Edge Trigger 45 Continuous Sweep 45 Single Sweep 45 Delay Trigger 45 Trigger Out 45 Averaging Filters Toolbar 46 Auto Reset 46 Manual...

Page 4: ...hazard that could partially damage the product Do not continue until you fully understand the meaning A NOTE provides additional pertinent information related to the operation of the product CONFORMIT...

Page 5: ...modulation measurements A programmatic interface is also available for the product The LB480A power sensor allows for the complete characterization of RF and microwave signals from 100 MHz to 8 GHz w...

Page 6: ...m How to identify the type of USB port The PowerSensor requires your computer to have USB 2 0 for correct operation You can identify what port you have using the following method or similar depending...

Page 7: ...h and Development and Manufacturing o Maintenance Repair Installation and Service o Communications o Radar Wireless Satellite and Radio Links Accessories The product is shipped with the following item...

Page 8: ...External Trigger included with the product 004 Add 100 kHz 200 kHz 300 kHz 500 kHz 1 MHz 2 MHz 3 MHz 5 MHz 10 MHz 0W2 Wideband Video Out 50 ohms not available with 001 CW3 Three year extended warrant...

Page 9: ...replacement of the connector voids calibration and should only be done where calibration is not required Service There are no serviceable parts on the PowerSensor Recommended service is return to fac...

Page 10: ...upport is available for various test development environments including MS Visual Basic 6 0 MS Visual Basic NET MS C NET NI LabVIEW NI LabWindows and Agilent VEE Recommended PC configuration Pentium D...

Page 11: ...se floor The LB480A is specified from 100 MHz to 8 GHz with a noise floor 60 dBm for frequencies 6 GHz The LB680A is specified from 50 MHz to 20 GHz 18 6 GHz with Type N connectors and has a noise flo...

Page 12: ...ment Trace You can highlight a portion of the Panorama by clicking and dragging the cursor directly on the Panorama View This highlighted time segment will then appear in the Measurement View This all...

Page 13: ...click and drag the cursor from one of the dockable window tabs Then select a position top bottom center right left on the popup to place that display or pane on the panel We will demonstrate moving th...

Page 14: ...nual PPA Pulse Profiling Application Revision 08 02 11 14 You will see the following two screens with the Auto Measure pane first on top Now click the Panoramic Trace tab to put it on top and to see o...

Page 15: ...Models LB480A LB680A USB PowerSensor Product Manual PPA Pulse Profiling Application Revision 08 02 11 15...

Page 16: ...popup like we just demonstrated You will see the screen below with the Measurement Trace expanded even more with no stimulus applied to the sensor NOTE You can also drag a docking tab onto the deskto...

Page 17: ...rement Trace will move to the position indicated with Auto Hide active as shown below This means the display is not pinned to the panel and you must point to the Measurement Trace tab to view it Toggl...

Page 18: ...low shows an arbitrary input to the sensor The mouse pointer is in Highlight mode and a section of the span on the Panoramic Trace has been highlighted This highlighted time seqment appears as the bot...

Page 19: ...mic Trace in more detail you need only select or highlight the portion of the trace in which you are interested Refer to the screen shot below for the following discussion After selecting Highlight mo...

Page 20: ...l be centered on the current area of interest b If a portion of the trace is not selected then the percentage will be centered around the middle of the current panorama trace 4 To select a precise por...

Page 21: ...tic measurement using our example input The automatic measurement feature is very convenient and gives a complete characterization of the pulse with a click of a button based on the selected sweep tim...

Page 22: ...n toolbar shown below allows setting of the measurement Frequency Sweep Time Reference Level and Resolution Offset and frequency Response Again the measurement frequency should correspond to the incom...

Page 23: ...tation However LadyBug provides a delayed measurement capability This enables you to see small portions of data in greater detail long after a trigger has been acquired Sweep Time Time Between Samples...

Page 24: ...s the unit to the following factory default state Frequency 1 GHz Sweep Time 1 msec Reference Level Resolution 20 dBm 10 db Div Offset 0 dB disabled Response 0 dB disabled Trigger Source Internal Auto...

Page 25: ...urement view unless it is turned off see the Meas Notation On Off button under the Display Options toolbar To manipulate move or place a particular marker the mouse pointer must be in the Markers mode...

Page 26: ...t the marker position precisely in time by selecting Set Position from the marker drop down and entering a specific value as shown below Only one marker can be active at a time although all five marke...

Page 27: ...ab on the toolbar and select Normal Marker from the Markers 1 drop down as shown You can also right click on the marker tree in the Results pane to access this drop down for each individual marker Mar...

Page 28: ...active at a time Simply click on the marker to activate and read its value You can also read the measured value in the Results pane While the Delta Marker is convenient for measuring the time between...

Page 29: ...rrows for a description of each action EXAMPLE We have moved the dockable Measurement Trace pane for better viewing in the next screen shot to demonstrate the Center trace on marker function Notice th...

Page 30: ...You will lose marker positioning if you click this button Measurement Threshold The marker search tool works in conjuction with the Measurement Threshold function shown below The Measurement Threshold...

Page 31: ...threshold if threshold is enabled The pulse criteria is relative to the noise floor if threshold is disabled For example if the threshold is 55dBm default and the pulse criteria is 6 dB then the resul...

Page 32: ...make proper pulse measurements We can calculate the peak droop pulse power and pulse width These pulse measurements often represent a starting point for other measurements such as PRFand PRT The Pulse...

Page 33: ...ace the gates for the various measurement types Notice that if several pulses are within a gate pulse width pulse power PRT PRF and duty cycle for example the measurements will consider only the first...

Page 34: ...mining PRF PRT starts much like the pulse width measurement by searching for a rising edge except that the gates for a PRF and PRT measurement must include at least one complete uninterrupted cycle Th...

Page 35: ...gate then takes the average of 5 of the samples immediately preceding the right gate The difference between the two is droop in dB Overshoot Reports the difference between the highest point between a...

Page 36: ...Models LB480A LB680A USB PowerSensor Product Manual PPA Pulse Profiling Application Revision 08 02 11 36...

Page 37: ...surements and pick Pulse Width Alternately you can right click on the gate in the Results pane and make the measurement selection The gate pair will appear at center graticule in the Measurement view...

Page 38: ...active at a time The drop down menu on each gate shows the selection of measurements that can be made or right click on the gate in the Results pane A dashed line will appear if the gate cannot take a...

Page 39: ...gates and gates within markers You can compare these manual measurements with an automatic measurement Be sure that there are at least two pulse cylces in the Measurement view Now select the Auto Mea...

Page 40: ...nts Right click on the gate to see the measurement list or click the down arrow on the toolbar NOTE You can always highlight the span if you drag the cursor over the Panorama view or select a highligh...

Page 41: ...evel will be adjusted accordingly Therefore while the Internal Auto Level is more convenient and quite reliable it also can be somewhat less responsive The Internal Auto Level trigger source is not re...

Page 42: ...s returns a trace and triggers off the incoming signal However if a signal is not present it will return a noise trace Shown below is an example of a complex waveform being measured using internal tri...

Page 43: ...was not found If the trigger is set too low then the system will trigger on noise and you will get a noise trace All trigger modes can use positive or negative Edge triggering as well as Cont continu...

Page 44: ...g low level signals All trigger modes can use positive or negative Edge triggering as well as Cont continuous or Sngl single sweep The trigger Delay function up to 10 msec must be enabled disabled fro...

Page 45: ...ger Allows the user to delay the beginning of the trace from the trigger for up to 10 msec This feature allows the user to acquire high resolution traces long after the trigger has occurred Trigger Ou...

Page 46: ...abled It takes 0 3 1 0 msec to collect one buffer of data The number of averages or buffers is selected from the drop down shown below There is provision for automatic or manual averaging reset Auto R...

Page 47: ...lity to get satisfactory measurements External triggering has the advantage of triggering on demand and is not level dependent There are trade offs involved when using averaging Increasing the number...

Page 48: ...werSensor Product Manual PPA Pulse Profiling Application Revision 08 02 11 48 NOTE The Filter and Poles selections are only active with LB480A Option 004 Otherwise the selections will be inactive and...

Page 49: ...the reduction in the high frequency component of the signal More Poles then decrease roll off but have the affect of increasing both the rise and fall times of the displayed signal as time relates inv...

Page 50: ...Gate Color Size Display Font Results Font Display Colors Themes Grid On Off Meas Notation On Off Exit Select the display preferences from this toolbar as shown below color size opacity theme etc You c...

Page 51: ...y Print Black White The Print toolbar allows you to print either the Panorama Display Measure Display or the statistical displays separately as shown below The printout will include all the marker and...

Page 52: ...e Register Recall Register Store as Name Recall as Name Help About The Store Recall Help toolbar allows you to store and recall up to 10 measurement states as shown below Additionally you can store re...

Page 53: ...above the average power level The power level is expressed in dB relative to the average power The percentage of time the signal spends at or above each line defines the probability for that particul...

Page 54: ...anwhile you can check for any interim updates by downloading the product manual from the website The latest software and documentation are available for download from the company website see the Conta...

Reviews: