background image

LaCie Dupli Disc DVD125 USB 2.0

User Manual

page 

Your LaCie Dupli Disc DVD125

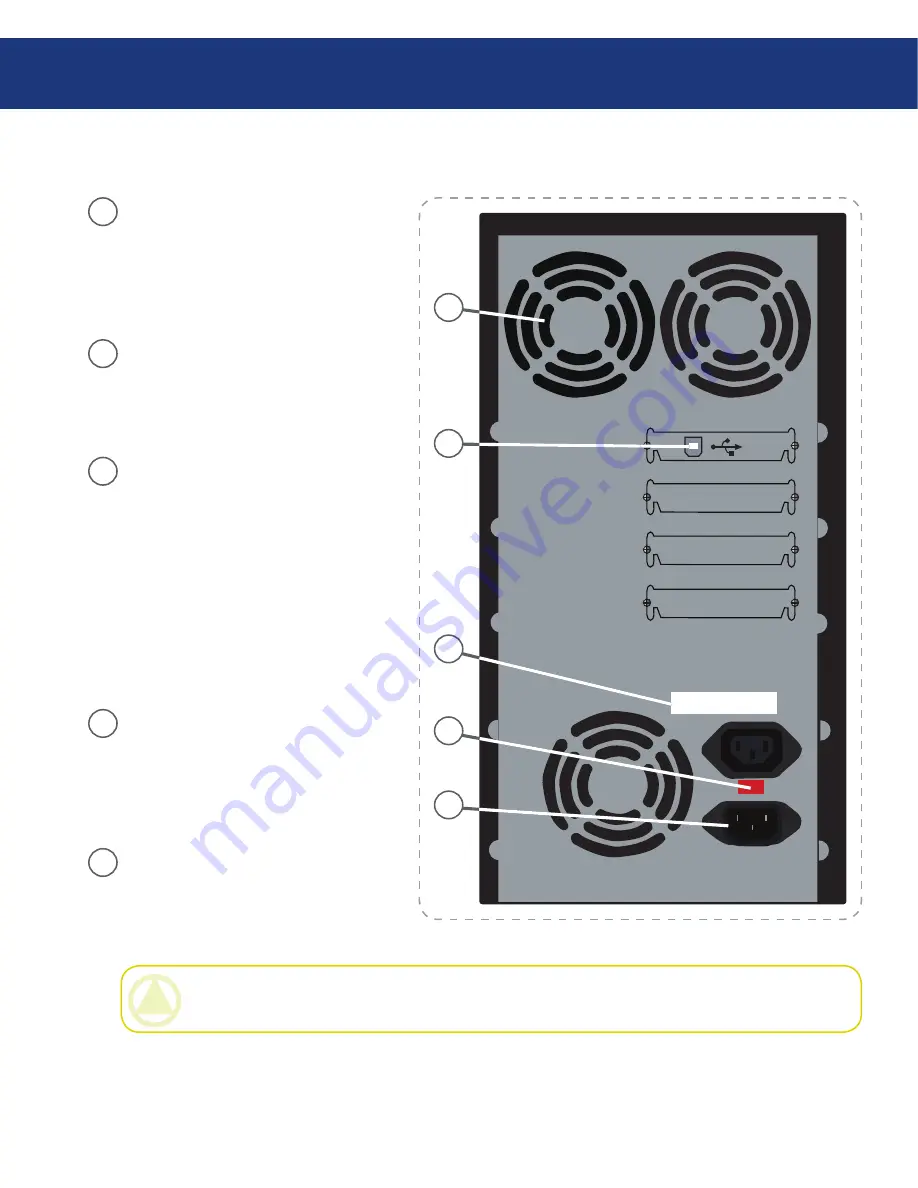
Fans  -

  Helps  keep  your  LaCie 

Dupli  Disc  DVD125  cool  during 

operation. Do not block and ensure 

there is sufficient space to allow for 

proper operation.

Hi-Speed  USB  2.0  interface  cable 

port -

 This is where you plug in your 

USB  cable  for  optional  computer 

connectivity.

Serial  Number  Sticker  -

  This  is  the 

Serial Number of your device. Write 

down the serial number and keep it 

in a safe place, because you will need 

to provide the number in the event 

you  have  to  call  LaCie  Technical 

Support for any reason in regard to 

the  drive’s  performance.  The  serial 

number would also come in handy if 

your device is lost or stolen.

Voltage  Setting  -

  Set  the  voltage 

setting  of  your  duplicator.  Please 

make  sure  that  the  voltage  setting 

doesn’t differ from that of your main 

power source.

Power  Supply  Connector  - 

This  is 

where you plug in the power supply 

cable  supplied  with  your  LaCie 

Dupli Disc DVD125.

2.4.3. Rear View

S/N: xxxxxxxxxxxx

1

2

3

4

1

2

3

4

5

5

CAUTION:

 Check voltage matches your country’s standard voltage   before  using for the first time.  Default 

voltage is 230 V.

Summary of Contents for 108655 - Dupli Disc DVD125

Page 1: ...View Control Panel 12 2 4 3 Rear View 13 3 Setting Up Your LaCie Dupli Disc DVD125 14 3 1 Powering On Your LaCie Dupli Disc DVD125 14 3 2 Connecting Via USB 15 3 2 1 How to activate USB connectivity...

Page 2: ...11 20 11 20 Quick Compare 33 4 11 21 11 21 Audio Burn Speed 33 4 12 12 USB Mode 33 4 13 13 Advanced Setup 34 4 13 1 13 1 UnderRun Protect 35 4 13 2 13 2 Overburn 35 4 13 3 13 3 Read Error Skip 35 4 1...

Page 3: ...Buttons 39 5 5 High Disc Failure Rates 40 5 6 Emergency Ejection Of Discs 40 5 7 Display Screen Messages 41 5 7 1 Specific Messages during Audio Editing 42 5 7 2 Specific Messages during Firmware Upda...

Page 4: ...for a Class B digital device pur suant to Part 15 of the FCC Rules These limits are designed to provide reasonable protection against harmful interference in a residential installa tion This equipmen...

Page 5: ...ng please contact your local city office your household waste disposal service or the shop where you purchased the product Only qualified persons are autho rized to carry out maintenance on this devic...

Page 6: ...and stability of your duplicator Do not place heavy objects on top of the duplicator or use excessive force on it Never use excessive force on your duplicator If you detect a problem consult the Trou...

Page 7: ...computer to duplicate DVDs or CDs Its various functions allow you to make copies of a master disc at once for quick easy duplica tion To ensure fail proof duplication the LaCie Du pli Disc DVD125 pro...

Page 8: ...caution it is recommended that the discs be tested after they have been written to refer to page 20 Please ensure that a backup copy of any important data is made on a separate storage unit in order t...

Page 9: ...u cannot copy professional DVD Video movies with the LaCie Dupli Disc DVD125 All professional DVD Video movies are protected by copyright laws 2 2 Supported CD Formats Your LaCie Dupli Disc DVD125 can...

Page 10: ...aCie Dupli Disc DVD125 2 3 Supported Logical Formats Your LaCie Dupli Disc DVD125 can duplicate the following logical formats ISO 9660 UDF Fixed Packet mode UDF Variable Packet mode CAUTION The LaCie...

Page 11: ...2 4 1 Front View LaCie Dupli Disc DVD125 Ver 1 61s ent esc ReWritable ReWritable ReWritable ReWritable ReWritable ReWritable Control Panel Source Master drive default and USB DVD RW when connected via...

Page 12: ...Up Arrow Push this button to scroll up through the functions and menus ENT Button Push this button to start a selected function ESC Button Push this button to cancel a se lected function Down Arrow P...

Page 13: ...ecause you will need to provide the number in the event you have to call LaCie Technical Support for any reason in regard to the drive s performance The serial number would also come in handy if your...

Page 14: ...Disc DVD125 using the On Off switch located on the front of the device 1 2 3 4 DVD Duplicator 2033s ver 1 61s OS booting Once the LaCie Dupli Disc DVD125 is turned on the following messages will appe...

Page 15: ...0 port on the back of the duplicator Scroll to menu 12 USB Mode and press ENT 1 2 3 2 1 How to activate USB connectivity on your duplicator 12 USB Mode 3 Switch back to Stand alone mode You need to re...

Page 16: ...and then push the On Off switch on the front of the device CAUTION Do not turn off the LaCie Dupli Disc DVD125 during duplication Doing so will cancel the duplication render the DVD R RW or CD R RW m...

Page 17: ...as the following figures show Menu 13 can by accessed by pressing the ESC button for 3 seconds Copy Controller 1 Copy 2 Test 3 Test Copy 4 Verify 5 Compare 6 Prescan 7 Disc Info 8 Select Source 9 Ima...

Page 18: ...Fly 11 12 Burn Mode 11 13 Display Time 11 14 Button Sound 11 15 Device Info 11 16 System Info 11 17 Quick Erase 11 18 Full Erase 11 19 Auto Close Tray 11 20 Quick Compare 11 21AudioBurnSpeed 13 7 Upda...

Page 19: ...source DVD or CD disc into the DVD ROM drive Place one DVD blank media or a blank CD if the source media is a CD into the DVD RW drive s You can use from 1 to 5 DVD RW drive s depend ing on the numbe...

Page 20: ...a on it the Dupli Disc DVD125 will erase the Table of Content TOC and overwrite the data previously recorded prior to the simulation When the test is completed the screen will dis play the following i...

Page 21: ...e master disc into the DVD RW drive Press the ENT button select this function 4 4 4 Verify 4 Verify The screen will display the following information during the Verify process Verify DVD 0 xxxx xx MB...

Page 22: ...dentical If the comparison fails as below the screen will in dicate the failure Press the ENT button twice and the screen will show the following information Src 02 DVD RW TOC not match The Prescan fu...

Page 23: ...e default source drive is the top one named 00 IDE0 as this is also the one that can be seen when connected via USB Press ENT you will get a screen similar to this 4 8 8 Select Source SRC DVD Dual 00...

Page 24: ...add is displayed press the ENT but ton A will appear beside the selected track as shown in the following screen Select Track 1 10 03 25 CAUTION Pressing the ENT button after the track is selected will...

Page 25: ...t Disc No Press the ENT button to close the compilation pro cess and the system will ask you if you want to close all of the sessions as shown below see menu 10 4 if you would like to close session la...

Page 26: ...on is completed and the 1 Copy menu is displayed press the Down Arrow on the control panel ten times to scroll to the 11 Setup menu option 11 Setup There are 21 separate options under the 11 Setup men...

Page 27: ...ows to scroll to the following screen 11 02 Setup CD Burn Speed CD Burn Speed 48x Press the Ent button to choose this option and change the CD burn speed of the DVD RW drive The default setting is Aut...

Page 28: ...copy or test blank DVD discs when they are placed in the DVD RW drive From the above menu press the ESC button and use the Down Arrow to scroll to the following screen 11 05 Setup Auto Start Drive Pre...

Page 29: ...se the Down Arrow to scroll to the follow ing screen 11 08 Setup Auto Compare Press the ENT button to choose this option The default setting is Off Press the Down Arrow to select On 4 11 7 11 7 Auto V...

Page 30: ...is Eject Good Only Press the Down Arrow to select Eject All Disc or Do Not Eject This option is not available on this model This function allows you to set the type of recording method for CDs There...

Page 31: ...om the above menu press the ESC button and use the Down Arrow to scroll to the follow ing screen 11 15 Setup Device Info Press the ENT button to choose this option 4 11 15 11 15 Device Info 00 IDE1 Ma...

Page 32: ...takes more time than a Quick Erase From the above menu press the ESC but ton and use the Down Arrow to scroll to the following screen 11 18 Setup Full Erase Press the ENT button to choose this option...

Page 33: ...sures a better sound quality 4 11 21 11 21 Audio Burn Speed In this function you have the opportunity to choose between the USB LH mode LH link host which links the top drive to your computer enabling...

Page 34: ...ss the Down Arrow button to scroll the different options and menus Press the ENT button to select the function 4 13 13 Advanced Setup There are 18 submenu options under the 13 Advanced Setup menu 13 A...

Page 35: ...fault setting is Off CAUTION LaCie warns you that enabling this function may irreversibly damage your duplicator LaCie strongly recommends you NOT to enable this function This function allows you to i...

Page 36: ...firmware CDs us ing an unknown CD or an inappropriate firmware CD may damage your Dupli Disc DVD125 Also never switch off the duplicator while updating the firmware as this may damage the system This...

Page 37: ...g ESC If you enter the menu and change your mind when you see the question mark simply switch off the du plicator using the ON OFF button Press ESC until you hear the beep about 3 seconds You will see...

Page 38: ...of the Duplicator s drive and press ESC for three seconds to access menu 13 Press the Up Arrow to access sub menu 13 18 The system will ask whether you would like to up date all the drives or only one...

Page 39: ...a read fails an error message will appear on the Display screen Check the media see 4 Verify and 6 Prescan and try another source disc to see if the problem persists If the LaCie Dupli Disc DVD125 do...

Page 40: ...er of the drives using the tray open buttons when no duplication operation is being performed an emergency eject operation will open the media tray Switch off the LaCie Dupli Disc DVD125 drive and unp...

Page 41: ...discs cannot be in the same channel Preparing The system is preparing to record Check Target Please Wait The system is checking the target device Audio Disc Can t compare The system cannot compare th...

Page 42: ...gt overflow del last trk The disc capacity is not enough to store the selected tracks Do you want to delete the last track Ins empty disc Continue Do you want to insert a blank disc and continue copyi...

Page 43: ...w lacie com caen contact English LaCie Denmark Contact us at http www lacie com dk contact LaCie Finland Contact us at http www lacie com fi contact LaCie France Contact us at http www lacie com fr co...

Page 44: ...cement part such as a pickup tray etc The tamper seal on the device casing is broken LaCie will not under any circumstances be liable for direct special or consequential damages such as but not limite...

Reviews: