background image


6.  Application Example 


67 

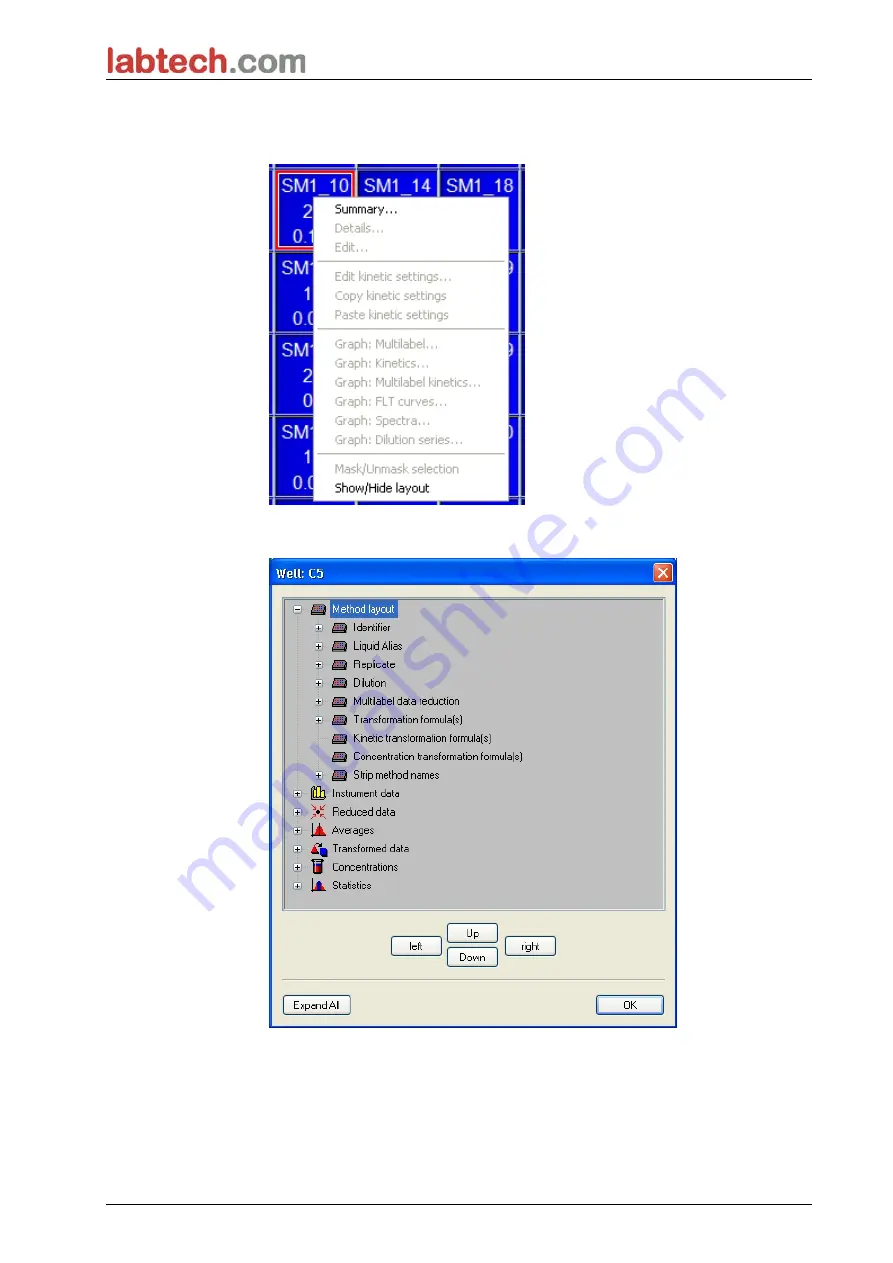
Click in the well with the right mouse key and the context-sensitive menu 
appears: 


Selecting 

Summary

 the following window is displayed providing detailed 

information of the definition and the settings of the chosen well: 


Click 

Next

 in the plate layout window and the

 Save as

 dialog box appears, where 

you can enter a file name and remarks. Click the small 

Save

 button on the left of 

the window to save the file; you can continue working on the method or 
workspace. Click the 

Finish

 button on the right side at the bottom of the screen to 

save the file and to close the wizard. The program goes back to the wizard list.  

Summary of Contents for LT-4500

Page 1: ...Instructions for Use for Absorbance Reader Document Name LT 4500 IFU Document Revision No 1 0...

Page 2: ...ight Information The contents of this document are the property of labtech com and are not to be copied reproduced or transferred to another person or persons without prior written permission Copyrigh...

Page 3: ...IF THE INSTRUCTIONS ARE NOT FOLLOWED WARNING INDICATES THE POSSIBLE PRESENCE OF BIOLOGICALLY HAZARDOUS MATERIAL PROPER LABORATORY SAFETY PRECAUTIONS MUST BE OBSERVED WARNING THIS SYMBOL INDICATES THE...

Page 4: ......

Page 5: ...ing ON the Instrument 16 3 6 Software 17 3 6 1 Introduction 17 3 6 2 Installation Procedure 17 3 6 3 Installation Qualification 18 3 6 4 Start Working with LT com 19 3 7 LT com Measurement Parameter E...

Page 6: ...ation Example 49 6 1 Introduction 49 6 2 Step by Step Example Quantitative ELISA 49 6 2 1 Test Kit Description 49 6 2 2 Create a Method 51 6 2 3 Organize Printed Report 61 6 2 4 Run the Method 65 6 2...

Page 7: ...Disposal of the Instrument 79 8 Troubleshooting 81 8 1 Introduction 81 8 1 1 Table of Error Messages and Troubleshooting 81 8 1 2 Definition of Overflow 82 8 1 3 Power Failure 82 9 Abbreviations Trad...

Page 8: ......

Page 9: ...oratory safety procedures CAUTION IF THE INSTRUCTIONS GIVEN IN THIS PUBLICATION ARE NOT CORRECTLY FOLLOWED THE INSTRUMENT MAY BECOME DAMAGED OR PROCEDURES MAY NOT BE CORRECTLY PERFORMED AND THE SAFETY...

Page 10: ...MENT IT IS THE OPERATOR S RESPONSIBILITY TO ENSURE THAT A COMPATIBLE ELECTROMAGNETIC ENVIRONMENT FOR THE INSTRUMENT IS MAINTAINED SO THAT THE INSTRUMENT PERFORMS AS INTENDED DO NOT OPERATE THE INSTRUM...

Page 11: ...ty will no longer be valid and the instrument will lose regulatory conformity Note The operating authority must use only CE labeled test kits for clinical diagnostic applications The operating authori...

Page 12: ...and experiences If the product is used as intended the person is able to recognize and avoid dangers The administrator has extensive skills and is able to instruct the end user or the routine user in...

Page 13: ...1 Visually inspect the packaging for damage before it is opened Report any damage immediately 2 Select a location to place the instrument The location should be flat vibration free away from direct s...

Page 14: ...ot available in your country please contact your local supplier Connect the instrument only to an electrical supply system with protective earth CAUTION DO NOT USE THE INSTRUMENT IN AN INCORRECT VOLTA...

Page 15: ...solution 1024 x 600 1280 x 1024 USB ports 1 USB 2 0 or higher 2 USB 2 0 or higher 3 4 2 Software Requirements The following requirements have to be met for using LT com Operating System Microsoft Wind...

Page 16: ...e 1 Connect the instrument to the external computer with the USB cable 2 Ensure that the main power switch on the left side of the instrument is in the OFF position 3 Insert the power cable into the m...

Page 17: ...s including validation and quality control must also be established 3 6 2 Installation Procedure To install the software insert the USB stick to the USB port and proceed as follows 1 LT com installati...

Page 18: ...ents Labtech LT com 3 6 3 Installation Qualification Check successful installation of LT com with the automatic installation qualification program Start TecanIQ exe from the Windows Start menu Start P...

Page 19: ...er launching LT com the Wizard List appears Each wizard can be started either by double clicking or by selecting it and clicking the Next button Start Measurement Wizard The Start Measurement wizard i...

Page 20: ...dit a Sample ID list wizard is used to create new and to edit existing sample ID lists Create Edit a Method Wizard The Create Edit a method wizard is used to define or edit methods Note For detailed i...

Page 21: ...cation workflow is then visible to the user in the workflow pane Each process step program element can be copied and pasted using the Windows standard shortcuts Ctrl C Ctrl V or context sensitive mous...

Page 22: ...e Actions Shaking Move Plate Kinetic Kinetic Cycle Kinetic Condition Miscellaneous Comment User Request Wait Timer Incubation Lab Ware Plate The Plate program element is used to select a plate format...

Page 23: ...ragging a frame over the wells to be selected Measurements Absorbance The Absorbance program element is used to perform absorbance measurements Enter or select the respective parameters Two drop down...

Page 24: ...osing the respective shaking mode See chapter 4 1 1 for available shaking modes Clicking the link Wait a couple of seconds inserts a new program element See page 26 for details Move Plate Select the p...

Page 25: ...he time interval hh mm ss or ms Kinetic Condition Use the Kinetic Condition program element to define which actions should be executed at a certain cycle If 2 is entered for Execute command at cycle w...

Page 26: ...rm a certain action then the entered text should inform the operator to perform these actions A dialog box shows the message and the measurement process stops until OK is clicked Wait Timer Use the Wa...

Page 27: ...flow pane settings and parameters for this element can be entered or edited Single program elements inside the Workflow pane can be collapsed to display the most important information or expanded to a...

Page 28: ...button and select Release or Indent Other elements from the Control bar can be inserted into the hierarchy of a workflow as follows The first Range element is inserted directly after the Plate element...

Page 29: ...ents 3 8 1 Defining Endpoint Measurements The following example describes an Absorbance Endpoint Measurement in all wells of a 96 well microplate 1 Select a 96 well microplate from the Plate definitio...

Page 30: ...orbance labels shall be measured 1 Select a 96 well microplate from the Plate definition drop down list 2 By default all wells of the 96 well microplate are chosen for measurement Click to expand the...

Page 31: ...oplate from the Plate definition drop down list 2 Insert a Kinetic Cycle program element between the part of plate and the absorbance element 3 Cycles Number of cycles 50 4 Kinetic interval interval b...

Page 32: ...or the second indented program element The following is an example of how to define a Multilabel kinetic with two Absorbance labels The example shows that the two Absorbance program elements depend on...

Page 33: ...d Absorbance program element and click the right mouse button Select Release Strip from the context sensitive menu The Workflow pane appears as shown in the following screenshot In this workflow an Ab...

Page 34: ...test kit package for information regarding the validation procedure Use the recommended absorbance filters for the LT 4500 Microplates The instrument can be used with those types of microplates which...

Page 35: ...500 is able to shake the microplate before it is measured The microplate can also be shaken between each of the kinetic measurement cycles Use LT com to set the shaking mode CAUTION WHEN SHAKING MICRO...

Page 36: ...the instrument The status LED gives information of the status of the instrument Green blinking instrument is not connected to LT com Green instrument is connected and ready for measurement Red measur...

Page 37: ...o the bottom of the instrument Example Name Plate Contents of the name plate e g model name and article number may vary depending on the specific model For an overview of the various instruments for w...

Page 38: ...For accessorily available filters please contact your local supplier The filters of the standard filter wheel are mounted as listed below Filter position Filter wavelength 1 405 nm 2 450 nm 3 620 nm 4...

Page 39: ...ver voltage category II Basic instrument without AC adapter 24 V DC Over voltage category I Consumption LT 4500 Standby mode approx 12 VA Operational mode max 30 VA Outside dimensions Width 34 7 cm 13...

Page 40: ...0 OD 0 5 0 005 OD 1 0 0 005 OD Linearity 450 492 nm 0 000 2 000 OD 2 000 3 000 OD 1 1 5 Wavelength selection Standard filter Narrow bandwidth interference filters Up to 8 filters can be mounted in a f...

Page 41: ...BS 3 2004 ANSI SBS 4 2004 CAUTION ONLY USE MICROPLATES WITHOUT LIDS AND DO NOT USE MICROPLATES HIGHER THAN 15 2 MM Handling the Microplate Insert or remove the microplate only when the plate transport...

Page 42: ...ASTM Barcode Scanner Test It is recommended to check the functionality of the handheld barcode scanner in regular terms Therefore a software tool is available online Please contact your local supplie...

Page 43: ...damaged barcode labels must not be used The adhesive labels must be flat and not peeling off at the edges We recommend ensuring the quality of the barcode labels by means of local SOPs PARAMETERS CHAR...

Page 44: ......

Page 45: ...calibration procedure is performed to ensure that the instrument is working correctly and to calibrate the optical system 5 3 Operational Qualification OQ The following tests can be performed to ensu...

Page 46: ...late with a freshly prepared Orange G solution use different dilutions of the solution in each well so that a range of optical densities is obtained Make sure that the wells contain at least 200 l The...

Page 47: ...ch about 3 OD it is recommended to use 125 mg l 1 Orange G Sigma Cat No O7252 For other wavelengths different solutions must be used 200 l of each dilution are then pipetted into the microplate a mini...

Page 48: ......

Page 49: ...ow to create a method in LT com is provided in this chapter By following the instructions you will learn how to define evaluations from a test kit description in LT com Note These example files are av...

Page 50: ...gression line that goes through these points is the standard curve Interpretation of the test results IgM 18 UA ml Negative 18 UA ml IgM 22 UA ml Intermediate IgM 22 UA ml Positive The calculated IgM...

Page 51: ...dialog box select Create edit a method and click OK Click Continue on the Welcome page of the Create edit a method wizard and the Select a file dialog box appears Select New Measurement Parameters Cli...

Page 52: ...on Example 52 On the Wavelength strip select 492 nm as Measurement wavelength and 620 nm as Reference wavelength Continue Wizard by clicking Choose measurement parameters and the Plate layout window i...

Page 53: ...cted automatically Starting at well B1 click and drag the mouse to C1 The wells B1 to C1 are then marked with a red border Click Fill selection and the wells are labeled with the selected identifier t...

Page 54: ...and click Fill selection Note Select the wells as follows Starting at well D1 click and drag the mouse over the required wells to H1 Then hold down the control Ctrl key and drag the mouse over the req...

Page 55: ...formed data in the control bar In the Formula box automatically appears x BL1 for this blank reduction where x refers to the current input data value in a well and BL1 is the mean value of the blank w...

Page 56: ...ml Calibrator 6 160 UA ml Make sure ST is selected in the Select Identifier list In the Identifier list a list of the standards from the Exp Group 1 appears In the corresponding Concentration box of S...

Page 57: ...standard curve The following is in the test kit description After the blank correction the optical densities OD 492 OD 620 are plotted versus the concentration The regression line that goes through th...

Page 58: ...6 Application Example 58 On the Axis tab define the labeling and the scaling of the axis as shown below On the Graph tab define the graph title curves font and graph display...

Page 59: ...e appropriate cutoffs In the Input data box select Mean conc UA ml The Cutoffs table represents a scale indicating the high and the low end for the Limits and Labels In Limits type 22 as the first hig...

Page 60: ...t results is guaranteed In this example the following requirement must be fulfilled The calculated IgM concentration of both negative controls must be under 8 UA ml In the Input box select Single conc...

Page 61: ...ed using drag and drop In the Print as box choose between printing the data as a matrix or as a list with a special orientation In this example a report containing the measurement parameters plate lay...

Page 62: ...a setup part of the report definition procedure is complete the Printed Report dialog box looks like this On the Header and Footer tabs define the layout of the header and the footer of the report see...

Page 63: ...the Layout or Sample ID List Automated Data Handling In the control bar select Automated data handling from the Data handling item Select export to ASCII file and view results after measurements In LT...

Page 64: ...rks text field Comments entered here will be saved and displayed with the filename Audit trail comment text field Comments entered here will be stored in the audit trail Organize Favorites button The...

Page 65: ...user if desired Click Start to start the measurement A workspace will be created automatically which contains all previously entered information and will collect all measurement values While the measu...

Page 66: ...ick Next on the Welcome page of the Evaluate Results wizard and the Select a file dialog box appears Select the workspace Quantitative ELISA example_LT 4500 mth from the file list and click Make your...

Page 67: ...ttings of the chosen well Click Next in the plate layout window and the Save as dialog box appears where you can enter a file name and remarks Click the small Save button on the left of the window to...

Page 68: ...ST1_4 40 ST1_4 Standard 4 first experimental group ST1_5 80 ST1_5 Standard 5 first experimental group ST1_6 160 ST1_6 Standard 6 first experimental group 3 Define Standard Curve Definitions in LT com...

Page 69: ...ct the instrument Maintain the instrument Insert or replace filters in the filter wheel Disposal instructions WARNING BEFORE DOING ANY CLEANING OR MAINTENANCE REMOVE THE MICROPLATE WARNING PRIOR TO CL...

Page 70: ...OTENTIALLY INFECTIOUS IT SHOULD BE DISINFECTED ACCORDING TO THE RELEVANT NATIONAL LAWS AND REGULATIONS All parts of the instrument that came into contact with biological samples patient samples positi...

Page 71: ...ect the outer surfaces and the plate transport of the instrument WARNING THE DISINFECTION PROCEDURE SHOULD BE PERFORMED IN A WELL VENTILATED ROOM BY AUTHORIZED TRAINED PERSONNEL WEARING DISPOSABLE GLO...

Page 72: ...contact time according to the manufacturer s Instructions for Use wipe the plate transport using a soft paper towel moistened with a mild detergent or distilled water to remove all traces of the disin...

Page 73: ...he outside of the box so that it is clearly visible 7 3 3 Safety Certificate To ensure the safety and health of personnel our customers are kindly asked to complete a Safety Certificate which was deli...

Page 74: ...placement and Installation The LT 4500 must be connected to LT com in order to do a software guided filter insertion or replacement If the connection is lost during the procedure due to accidental int...

Page 75: ...ck Define filter slides 4 Click Filter switching to start the procedure 5 Remove any microplate from the plate transport 6 Tilt the instrument carefully backwards until it lies on the back side with t...

Page 76: ...of the stop ring Turn the tool and remove the stop ring by pulling it out of the filter slot 12 Turn the filter wheel over so that the filter slides out of the slot Do not use the filter assembly too...

Page 77: ...op ring is aligned with the end of the filter assembly tool and remove the tool 17 Place the filter wheel back into the filter wheel slot and push it deeper until it is secured magnetically 18 Reattac...

Page 78: ...is ready for measurements Note Be careful not to mix up the filter positions and filter wavelengths as this will lead to wrong measurement data 7 6 Disposal 7 6 1 Introduction Follow laboratory proce...

Page 79: ...tions concerning the disposal of the device please contact your local supplier Pollution degree 2 IEC EN 61010 1 Method of disposal Contaminated waste ATTENTION DIRECTIVE 2002 96 EC ON WASTE ELECTRICA...

Page 80: ...stics Cable Metals Iron Nonferrous Metal NFM The instrument is compliant with the RoHS directive 2002 95 EC on the restriction of the use of certain hazardous substances in electrical and electronic e...

Page 81: ...initialized Hardware problem Electronic defect belt broken or MTP transport mechanically blocked MTP lost steps abs steploss max_steploss MTP lost steps during measurement Steploss number of lost step...

Page 82: ...ilter Init Error Filter transport could not be initialized Hardware problem Electronic defect filter wheel transport mechanically blocked 8 1 2 Definition of Overflow If the result of the absorbance m...

Page 83: ...mation Interchange ASTM American Society for Testing and Material C Degrees Celsius CE Conformit Europ enne CFR Code of Federal Regulations cm Centimeter DC Direct Current EC European Community ELISA...

Page 84: ...and electronic equipment 9 2 Trademarks The following product names and any registered and unregistered trademarks mentioned in this document are used for identification purposes only and remain the e...

Page 85: ...ymbols appear on the instrument Manufactured by Date of manufacture Conformit Europ enne Read the Instructions for Use before operating the instrument In vitro diagnostic medical device Order number S...

Page 86: ......

Page 87: ...Location 34 Specifications 39 K Kinetic Condition 25 Kinetic Control Bar 25 Kinetic Cycle 25 Kinetic Measurements 31 L Lab Ware Control Bar 22 LIS Option 42 Barcode Scanner Test 42 Barcodes 43 Handhe...

Page 88: ...List 19 Specifications 39 Switching ON the Instrument 16 Symbols 85 System Requirements 15 T Troubleshooting 81 U Unpacking Unpacking and Inspection 13 Unpacking Procedure 13 User Profile 12 User Requ...

Reviews: