


3
General
Cleanliness
Cleanliness is part of safety.
Ensure the equipment continues to work properly by
removing any stacked garbage around the Maximizer
(if installed) or around the separators. Clean all truck
lights, warning lights and safety stickers, so you and the
surrounding pedestrians and vehicles can be safe
around the truck at all times.
Keep the contact surface between the body and the
chassis clean. Labrie Enviroquip Group recommends
to clean the chassis after every unloading.
Make sure that the side step and other steps (if
installed) are clean and free of any slippery material.
The next sections will describe how to clean the
following parts:
body (including partitions)
loading bucket
chassis
If the Maximizer system is installed on your T
OP
S
ELECT
™ unit, refer to “Maximizer Maintenance” on
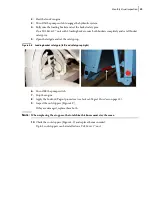
Keep the right- and left-hand side cab
floor dry and clean to prevent risk of
slipping or having an accident.
Use a stepladder to work on higher parts
of the vehicle. Remember that the roof is
not meant to be walked on. Be very
cautious if you have to work on the roof
area.
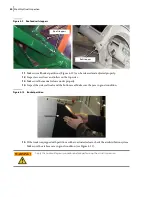
Always use a safety harness when
working or walking on the roof of the
vehicle.
WARNING!
DANGER!
DANGER!
Summary of Contents for Top Select
Page 1: ...TOP SELECT TM MAINTENANCE MANUAL...
Page 2: ......
Page 3: ...TOP SELECT MAINTENANCE MANUAL...
Page 8: ...vi Table of Contents...
Page 34: ...26 Safety...
Page 40: ...32 General Cleanliness...
Page 72: ...64 Loading Container Maintenance...
Page 104: ...96 Preventive Maintenance...
Page 121: ...Lubrication 113 Figure 11 2 Body hinges Grease Fittings on Body Figure 11 3 Tailgate and hooks...
Page 122: ...114 Lubrication Figure 11 4 Partition Figure 11 5 Optional Maximizer Location of lube zerks...
Page 123: ...Lubrication 115 Figure 11 6 Roof hinges and loading cylinders...
Page 124: ...116 Lubrication Figure 11 7 Lube chart...
Page 132: ...124 Troubleshooting...
Page 134: ...126 Hydraulic and Pneumatic Circuit Diagrams Hydraulic Schematics Single Side Bucket...
Page 135: ...Hydraulic and Pneumatic Circuit Diagrams 127 Single Side Bucket w Maximizer...
Page 136: ...128 Hydraulic and Pneumatic Circuit Diagrams Dual Side Bucket...
Page 137: ...Hydraulic and Pneumatic Circuit Diagrams 129 Dual Side Bucket w Maximizer...
Page 139: ...Hydraulic and Pneumatic Circuit Diagrams 131 Air System Schematics TS 1000 w Options...
Page 140: ...132 Hydraulic and Pneumatic Circuit Diagrams TS 2000 w Options...