background image

2


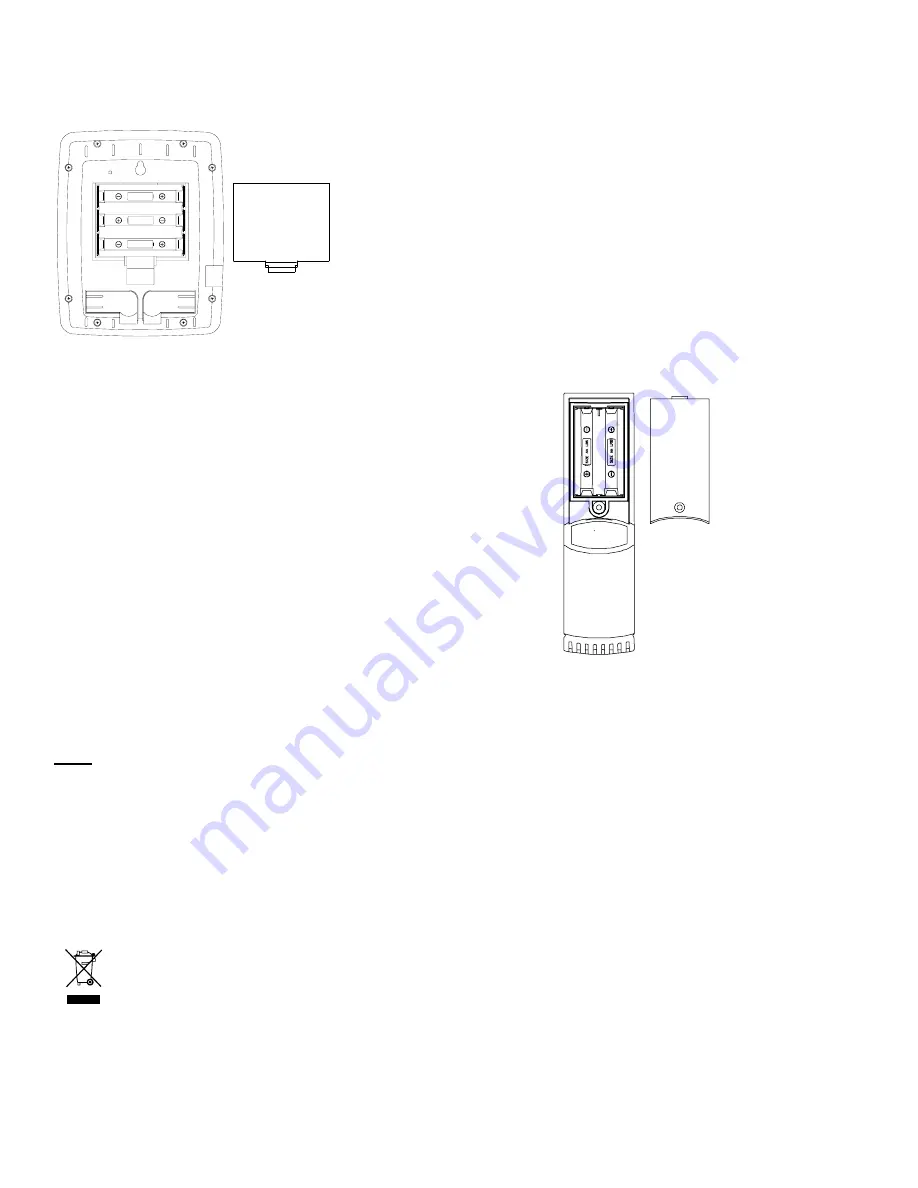
HOW TO INSTALL AND REPLACE BATTERIES IN THE WEATHER STATION 

 
The indoor weather station uses 3 x AA, 1.5V batteries. To install and replace the batteries, please follow the steps below: 

 
1.  Insert finger or other solid object in the space at the bottom center of the 

battery compartment and lift up to remove the cover. 

2.  Insert batteries observing the correct polarity (see marking). 
3.  Replace battery compartment cover. 


HOW TO INSTALL AND REPLACE BATTERIES IN THE REMOTE TEMPERATURE/HUMIDITY SENSOR 


The remote temperature/humidity sensor uses 2 x 
AAA 1.5V batteries. To install and replace the 
batteries, please follow the steps below: 
 
1.  Remove the battery cover  
2.  Insert the batteries, observing the correct polarity 

(see battery compartment marking) 

3.  Replace the battery cover on the unit 


BATTERY CHANGE: 
 

User shall replace batteries of the indoor weather station when the battery low indicator is displayed at the LCD. If user 
does not replace the batteries, working error may result. 

 
Note:


After changing the batteries in the indoor weather station there is no need for user to reset the indoor weather station. 
In fact, the indoor weather station can remember all remote temperature/humidity sensor information and sequence 
as per the pervious set-up. However, user may be required to reset the desired LCD contrast, alarm on/off condition


and the clock (by re-entering the date and time manually or simply wait for the WWVB time signal).  


The “average” value display for particular channel will only be calculated from the data after battery change. 


User needs to carry out the re-learning of the particular remote temperature/humidity sensor after replacing batteries 
in the remote temperature/humidity sensor. See “

LEARNING/ REMOVING A SENSOR (CHANNEL)” 

for the 

procedures of relearning a remote temperature/humidity sensor. 


It is recommended to replace the batteries in all units on an annual basis to ensure optimum accuracy of these units. 


Please participate in the preservation of the environment. Return used batteries to an authorized depot. 


SIZE AA LR6

SIZE AA LR6

SIZE AA LR6

Battery cover 

Battery 
compartment 

Summary of Contents for WS-8610U

Page 1: ...time of reception Indoor and outdoor humidity display as RH with MIN MAX records Data logging function can store up to 3000 sets of temperature humidity data Connectable to PC Com port data can be tra...

Page 2: ...es working error may result Note After changing the batteries in the indoor weather station there is no need for user to reset the indoor weather station In fact the indoor weather station can remembe...

Page 3: ...After the batteries have been installed the indoor weather station will search for the signal for a duration of 5 minutes If there is no temperature or humidity reading in the OUTDOOR LCD after 5 minu...

Page 4: ...justment increase or decrease in different manual settings and alarm setting Mode key MODE In normal display mode press to toggle between the following view mode a Maximum record of a selected channel...

Page 5: ...de for the following a LCD contrast setting b Time zone setting c Daylight saving time on off setting d Radio controlled time reception on off setting e 12 24 hour format setting f Time setting Hour a...

Page 6: ...he mode or Alarm AL key to go back to the normal display mode TIME ZONE SETTING The time zone default of the weather station is 0 To set a different time zone 1 Press and hold the SET key until the di...

Page 7: ...splay mode TIME RECEPTION ON OFF SETTING In areas where reception of the WWVB time signal is not possible the WWVB time reception function can be turned OFF The clock will then work as a normal Quartz...

Page 8: ...ld the SET key until the digits Lcd starts flashing 2 Press and release the SET key five times to enter the hour setting The hour digit in the time LCD will be flashing 3 Use the Plus and Minus key to...

Page 9: ...will be flashing 5 Use the Plus and Minus key to set the month 6 Press the SET key one more time to confirm the month and advance to the day setting The day digit will be flashing 7 Use the Plus and...

Page 10: ...to 3 setting them either in re learnt or removed state Note Once a channel is removed the indoor weather station will be disconnected from the channel and the data transmitted by this channel cannot...

Page 11: ...ELS INDOOR AND OUTDOOR CHANNELS 1 Press the Plus or Minus key to toggle between the temperature and humidity readings of the indoor channel and the remote temperature humidity sensor channel s The cha...

Page 12: ...the data which have been saved in the system memory will be displayed The avg icon will be flashing If the remote temperature humidity sensor channel is not set to be saved in the system memory no av...

Page 13: ...t at 85 F and 65 F respectively Then the alarm will sound once the temperature is higher than 85 F or lower than 65 F To set the high humidity alarm 1 In normal display press the Plus or Minus key to...

Page 14: ...e Alarm key to enter the high temperature alarm setting To set the high temperature alarm 1 In normal display press the Plus or Minus key to select a temperature humidity sensor the temperature humidi...

Page 15: ...nd 65 F low while only activating high temp alarm and deactivating low temp alarm In this case the alarm will not trigger when temperature is lower than 65 F yet will trigger when temp is higher than...

Page 16: ...ond The maximum and minimum temperature humidity data and the time of record will be reset to the current value CLEARING THE MAX MIN TEMPERATURE AND HUMIDITY DATA OF ALL REMOTE TEMPERATURE HUMIDITY SE...

Page 17: ...minutes followed by the full segment display You are then required to remove and re insert the batteries to complete the restart of the unit After batteries are re inserted the station will automatica...

Page 18: ...ck the following items 1 The distance of the indoor weather station or remote temperature humidity sensors should be at least 6 feet 2 meters away from any interfering sources such as computer monitor...

Page 19: ...t over the desired location 3 Through the screw holes of the bracket mark the mounting surface with a pencil 4 Screw mounting bracket onto the mounting surface Ensure that the screws are flush with th...

Page 20: ...s to the units Return it to their original point of purchase for repair by a qualified engineer Opening and tampering with the units may invalidate their guarantee Do not expose the units to extreme a...

Page 21: ...n your owner s manual 5 damage resulting from the performance of repairs or alterations by someone other than an authorized La Crosse Technology Ltd authorized service center 6 units used for other th...

Reviews: