12
13
OPERATION
Lighting and combustion
If, during the first lighting, the stove should emanate smells due to the evaporation of substances
used in the manufacturing, it is sufficient to ventilate the room for a few hours.
Use small and medium-size logs and put them in the fireplace so that the air can penetrate between
them. Place at the base of the stack some lighters (we recommend tablet derived from natural wax).
With the air regulation registers you can regulate the passage of primary and secundary air, necessary
for combustion. While lighting the stove registers shall be totally opened.
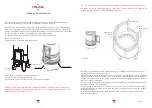
This registers are placed in the base of the stove, like in the following drawings:
The use will be as follows:
To light the stove: air registers completely opened
For a medium combustion: air registers half opened
For slow combustion: air registers opened 1/3
These positions can be changed in relation to the chimney flue draft.
ADVICE: do not close the registers completely because by doing so the combustion
would be deprived of the necessary air, giving rise to a choked combustion and to the
growing of soot on the door glass.
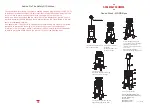
N.B. It is also necessary to clean the fireplace area immediately behind the door from
the ashes in order to keep the primary air inlet open. The ash found in this area can be
pushed towards the back of the fireplace or removed.
By using dry and seasoned wood for lighting the stove, it is possible to obtain a high flame and to
immediately activate the draft in the chimney.
When the brazier is formed on the fireplace floor, it is possible to insert larger logs (always crossed for
proper oxygenation). When the charge is burned, it will remain a substantial bed of hot embers that
will allow the charge of the fireplace, without having to perform another lighting; in this way, you will
obtain a continuous combustion.
The combustion control through the glass door will avoid repeated openings of the fireplace and the
consequent lowering of its temperature.
For a good yield, it is necessary to always have a good quantity of wood inside the fireplace; without
overfilling it and without pressing its ceiling and its walls (it is always advisable to leave some space
to let the air circulate).
In this way, the air will circulate freely while keeping a “lively” fire and the refractory bricks will not
suffer unecessary trauma.
Secondary air
Primary air
Fireplace door
Area for
primary air inlet
Fig. N.13
Remove the
ashes
Secondary air
Primary air
3-8 of 3-14
Summary of Contents for Stack
Page 2: ......
Page 10: ...1 7 of 1 41 ...
Page 15: ...1 12 of 1 41 ...
Page 16: ...1 13 of 1 41 ...
Page 17: ...1 14 of 1 41 ...
Page 18: ...di R Perino e S Neri S n c 1 15 of 1 41 ...
Page 19: ...di R Perino e S Neri S n c 1 16 of 1 41 ...
Page 20: ...di R Perino e S Neri S n c 1 17 of 1 41 ...
Page 21: ...di R Perino e S Neri S n c 1 18 of 1 41 ...
Page 22: ...di R Perino e S Neri S n c 1 19 of 1 41 ...
Page 23: ...di R Perino e S Neri S n c 1 20 of 1 41 ...
Page 24: ...di R Perino e S Neri S n c All holes Ø 6mm 1 21 of 1 41 ...
Page 25: ...1 22 of 1 41 ...
Page 26: ...1 23 of 1 41 ...
Page 27: ...1 24 of 1 41 ...
Page 28: ...1 25 of 1 41 ...
Page 29: ...1 26 of 1 41 ...
Page 30: ...1 27 of 1 41 ...
Page 31: ...1 28 of 1 41 ...
Page 32: ...1 29 of 1 41 ...
Page 33: ...1 30 of 1 41 ...
Page 34: ...1 31 of 1 41 ...
Page 35: ...1 32 of 1 41 ...
Page 36: ...1 33 of 1 41 ...
Page 37: ...1 34 of 1 41 ...
Page 48: ...2 4 of 2 57 ...
Page 49: ...2 5 of 2 57 ...
Page 50: ...2 6 of 2 57 ...
Page 51: ...2 7 of 2 57 ...
Page 52: ...2 8 of 2 57 ...
Page 53: ...2 9 of 2 57 ...
Page 54: ...2 10 of 2 57 ...
Page 55: ...2 11 of 2 57 ...
Page 56: ...2 12 of 2 57 ...
Page 57: ...2 13 of 2 57 ...
Page 58: ...2 14 of 2 57 ...
Page 59: ...2 15 of 2 57 ...
Page 60: ...2 16 of 2 57 ...
Page 61: ...2 17 of 2 57 ...
Page 62: ...2 18 of 2 57 ...
Page 63: ...2 19 of 2 57 ...
Page 64: ...2 20 of 2 57 ...
Page 65: ...2 21 of 2 57 ...
Page 66: ...2 22 of 2 57 ...
Page 68: ...2 24 of 2 57 ...
Page 69: ...2 25 of 2 57 ...
Page 70: ...2 26 of 2 57 ...
Page 71: ...2 27 of 2 57 ...
Page 72: ...2 28 of 2 57 ...
Page 73: ...2 29 of 2 57 ...
Page 74: ...2 30 of 2 57 ...
Page 75: ...2 31 of 2 57 ...
Page 76: ...2 32 of 2 57 ...
Page 77: ...2 33 of 2 57 ...
Page 78: ...2 34 of 2 57 ...
Page 79: ...2 35 of 2 57 ...
Page 80: ...2 36 of 2 57 ...
Page 81: ...2 37 of 2 57 ...
Page 82: ...2 38 of 2 57 ...
Page 83: ...2 39 of 2 57 ...
Page 84: ...2 40 of 2 57 ...
Page 85: ...2 41 of 2 57 ...
Page 86: ...2 42 of 2 57 ...
Page 87: ...2 43 of 2 57 ...
Page 88: ...2 44 of 2 57 ...
Page 89: ...2 45 of 2 57 ...
Page 90: ...2 46 of 2 57 ...
Page 91: ...2 47 of 2 57 ...
Page 103: ...INSTRUCTION MANUAL FOR INSTALLATION USE AND MAINTENANCE TYPE RNO 200 MODEL 3 2 of 3 14 ...
Page 121: ...4 6 of 4 40 ...
Page 122: ...4 7 of 4 40 ...
Page 123: ...4 8 of 4 40 ...
Page 128: ...4 13 of 4 40 ...
Page 129: ...4 14 of 4 40 ...
Page 130: ...4 15 of 4 40 ...
Page 133: ...4 18 of 4 40 ...
Page 134: ...4 19 of 4 40 ...
Page 138: ...4 23 of 4 40 ...
Page 139: ...4 24 of 4 40 ...
Page 140: ...4 25 of 4 40 ...
Page 145: ...4 30 of 4 40 ...
Page 146: ...4 31 of 4 40 ...
Page 147: ...4 32 of 4 40 ...
Page 152: ...4 37 of 4 40 ...
Page 153: ...4 38 of 4 40 ...
Page 154: ...4 39 of 4 40 ...


