background image

PS-1 (Printing System (1) PostScript option)  5-5

Chapter 5 Scanner Operation

4.

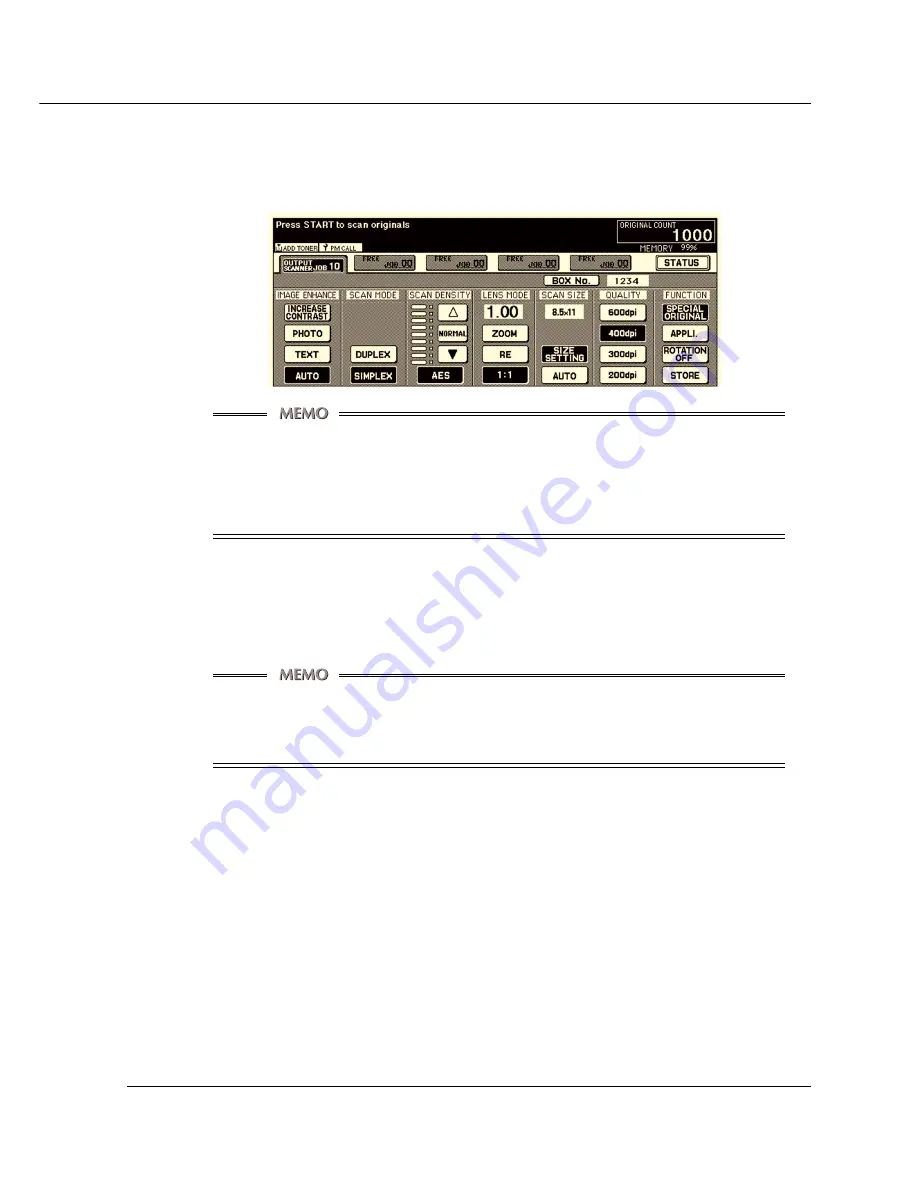
Enter a 4-digit box number, and press the [OK] key. The display is switched to a
scanner setting basic screen.

Be sure to jot down this number. You need it when reading scanned data from the computer.

When using the printing system as a scanner, we recommend assigning a box
number (1-9998) to each user and informing them of their numbers via e-mail
beforehand.

The box number assists in protecting the individual user’s data.

5.

Set Text / Photo Enhance, Resolution, and Application, as required.

6.

Press the [Start] button and the original is scanned depending on the current
settings.

If, before the scanned data is sent to the print controller, you press the [Start]
button again to let the next scanning session start, then both scanned data are
sent together to the print controller.

To Scan Documents in Store Mode

The scanned data of multiple originals is sent to the print controller after canceling store
mode.

1.

Complete steps 1 through 5 under the heading “Scanning Procedure in Real
Mode”.

2.

Press the [STORE] key in the scanning setting basic screen.

3.

Press the [Start] button so the original document you’ve set on the platen glass
or RADF is scanned depending on the current scanning settings.

At this point of the process, no data is sent to the print controller.

4.

Press the [STORE] key, and press the [Start] button to send the scanned data to
the print controller.

Summary of Contents for Vi7360

Page 1: ...PS 1 Printing System 1 PostScript Option INSTRUCTION HANDBOOK ...

Page 2: ... Mita PS 1Workgroup Document System will give you many years of trouble free service To ensure high quality copying performance and to prevent premature wear and failure of precision parts and components periodic cleaning and routine adjustments should be scheduled We recommend that you contact your service center to discuss the benefits and advantages of Kyocera Mita s Customer Service Maintenanc...

Page 3: ...will not attempt to alter disassemble decrypt reverse engineer or decompile the Software 7 Title to and ownership of the Software and Documentation and any reproductions thereof shall remain with Adobe and Kyocera Mita 8 Trademarks shall be used in accordance with accepted trademark practice including identification of the trademark owner s name Trademarks can only be used to identify printed outp...

Page 4: ...ost Interface 1 5 Engine Interface 1 5 Data Flow 1 6 How to Use Memory 1 7 Printer Driver 1 8 Page Description Language 1 8 Chapter 2 Setup 2 1 Contents of This Chapter 2 2 Installation of the Printer Driver 2 3 Before Installation 2 3 Installation to Windows 2 3 Installation to Macintosh 2 7 Chapter 3 Printer Driver 3 1 Contents of This Chapter 3 2 Working Environment 3 3 Compliant OS 3 3 Print f...

Page 5: ...tting Menu 4 15 Functions of the Printer Setting 4 16 Test Print 4 16 Controller Set 4 16 Set Default 4 18 PCL Setup 4 19 Chapter 5 Scanner Operation 5 1 Brief Description 5 2 To Install the Scanner Driver 5 3 Scanning from the Copier 5 4 To Scan Documents in Real Mode 5 4 To Scan Documents in Store Mode 5 5 Scanner Setting Basic Screen 5 6 Functions 5 8 Reading in Scanned Data on computer 5 11 To...

Page 6: ...radiate radio frequency energy If it is not installed and used in accordance with the instructions manual interference with radio communications may result This equip ment has been tested and found to comply with the limits for a Class A computing device pursuant to Subpart B Part 15 of FCC rules which are designed to provide reasonable protection against interference from such equipment when it i...

Page 7: ...nguage and includes the 136 built in Adobe PostScript 3 fonts For a complete list see Appendix C Font List A part or all of this User s Guide shall not be used or copied without permission Kyocera Mita shall have no liability for any influences caused by using the Vi7360 Printing System 1 PS 1 system and this Handbook Information written in this Instruction Handbook is subject to change without no...

Page 8: ...About this Handbook This Handbook describes the printing operations of the Vi7360 Printer Copier when it is connected to the Printing System 1 PS 1 Print Controller An optional Network Interface Card NC 5 is required to use the Vi7360 Printer Copier as printer connected to a network To learn more about printer operations on the network refer to the Vi7360 Instruction Handbook and the NC 5 Instruct...

Page 9: ...to the Printer Vi7360 by way of a network parallel port Chapter 3 Printer Driver Chapter 3 describes how to print from applications and various functions of the printer driver installed in the computers Chapter 4 Control Panel Setup Chapter 4 describes the layout of the Control Panel of the Printer Vi7360 and explains how to operate and set functions on the Control Panel Chapter 5 Scanner Operatio...

Page 10: ... NT 4 0 Microsoft Windows NT 4 0 and NT Service Pack 3 32MB RAM or more Using Windows 2000 Microsoft Windows 2000 32MB RAM or more Macintosh The following are required to print from the Macintosh to the Print Controller Computers on which Mac OS 7 1 or more can run CD ROM drive necessary to install the printer driver Parallel Port The following are required to print to the Print Controller by way ...

Page 11: ...his Handbook has the following meaning Precautions and limits at the time of operating hardware or software are written Hints advice confirming items etc at the time of operating hardware or software are written Notation of sub folders Sub folders are written in a logical string as for example route level folder sub folder 1 sub folder 2 For example instructions for selecting the Kov7360uxxx exe f...

Page 12: ...w Contents of This Chapter 1 2 Overview of the Print Controller 1 3 Printing System 1 PS 1 and Print Engine 1 3 Hardware Configuration 1 5 Host Interface 1 5 Engine Interface 1 5 Data Flow 1 6 How to Use Memory 1 7 Printer Driver 1 8 Page Description Language 1 8 ...

Page 13: ...pt option Chapter 1 Overview Contents of This Chapter This chapter describes the outline of the Printing System 1 PS 1 Print Controller which is attached to the Vi7360 engine For copier functions refer to the Vi7360 Instruction Handbook ...

Page 14: ...pt 3 When the command for printing is executed from applications on Windows 95 98 Me NT 4 0 2000 or Macintosh print data is sent to the Printing System 1 PS 1 by way of a parallel cable IEEE 1284 or a network The PostScript interpreter inside the Print Controller rasterizes the print data to image data which is sent to the Vi7360 Print Engine via the video interface card installed in the Print Eng...

Page 15: ...inting System 1 PS 1 The E RDH system temporarily stores in memory the print data you select from available op tions The E RDH memory is 64 MB standard and can be extended to 512 MB When using the E RDH in the one sided mode printing will be performed simulta neously while the print controller rasterizes the pages in the print job and sends them to the E RDH memory While pages are being printed fr...

Page 16: ...et option 100BaseTX and 10BaseT The optional NC 5 card is used to connect to the Ethernet The NC 5 is the internal network interface card which supports multiple protocols on the Ethernet This card includes a CPU and flash memory with an upgradable program The NC 5 supports the following network protocols IPX SPX NetWare Peer to Peer TCP IP LPD LPR Peer to Peer Refer to the corresponding operating...

Page 17: ...r Hard Disk PDL Processing Rasterization Interpreter Page memory IEEE 1394 Communication Board IEEE 1394 VIC Video Interface Card PCI bus E RDH memory PCI bus Printer Driver Spooler Print Commands Browser HTML Ethernet Network I F TCP IP IPX SPX AppleTalk Nework Interface Card Option Parallel I F IEEE 1284 Print Engine Print PDL command Rasterized image data Printer status ...

Page 18: ...addition the E RDH memory of the Vi7360 can be expanded to 512 MB maximum The more memory in the Printing System 1 the more pages can be rasterized while waiting for the previous job to print Memory Overflow Depending on the functions selected in the printer driver occasional memory over flow may occur if the volume of the print job is large In this case the print job is cancelled e g Booklet Fold...

Page 19: ...T 4 0 and NT Service Pack 3 Windows 2000 Mac OS 7 1 or more Refer to Chapter 2 Setup p 2 1 for how to set up the printer Refer to Chapter 3 Printer Driver p 3 1 for detailed functions of the printer driver Page Description Language PDL page description language controls the transfer of information from the computer to the Print Controller PostScript 3 comes as PDL with the Printing System 1 PS 1 B...

Page 20: ... Printing System 1 PostScript option 2 1 Chapter 2 Setup Contents of This Chapter 2 2 Installation of the Printer Driver 2 3 Before Installation 2 3 Installation to Windows 2 3 Installation to Macintosh 2 7 ...

Page 21: ... 1 PS 1 system connect the Vi7360 Printing System 1 PS 1 system to computers by way of the parallel port and install the printer driver on the computers This chapter describes how to install the printer driver Refer to Chapter 3 Printer Driver p 3 1 for how to print from applications and func tions of the printer driver ...

Page 22: ...uired to install the printer driver 1 Turn on the computer and start Windows Exit from all active Windows applications if running Using Windows NT 4 0 2000 Log on as an Administrator or a user entitled to install printer drivers such as Power User etc 2 Set the User Software CD on the CD ROM drive 3 Double click the My Computer icon on the desktop to open the My Com puter window Then double click ...

Page 23: ...nter The Local Port Selection window will appear by clicking the Next button When selecting Network Printer When personal computers or workstations are connected to the network and you want to print via the network connect to the optional Network Inter face Card NC 5 and select Network Printer For a Network Printer type the network path or queue name and click the Next button If you don t know its...

Page 24: ... installation Digital Signature Not Found window will appear Click the Yes button to continue the installation 15 Select whether you configure the printer or not then click the Next button Select Yes to setup the printer otherwise select No When you check the Yes the Kyocera Mita Vi7360 PS Properties window will appear You can setup the printer using the printer properties as needed When you selec...

Page 25: ... the ReadMe file or clicking the Finish button without checking Yes I want to view the ReadMe file the setup will finish to return the desktop window then Printing System 1 PS 1 printer will be available The printer driver of the Printing System 1 PS 1 becomes available without restarting your computer ...

Page 26: ... and OS to another Using PowerMacintosh Confirm your OS version Mac OS 8 5 or more Double click the AdobePS Installer icon in the PS3 English OS8_5 or more Driver folder of the User Software CD Mac OS 7 1 or more to 8 4 Double click the AdobePS Installer icon in the PS3 English OS7_1 or more Driver folder of the User Software CD Using other Macintosh Regardless of your OS version perform the above...

Page 27: ...k the AdobePS 4 Click the printer name corresponding with the Printing System 1 PS 1 printer in the list of Select a PostScript Printer Refer to the Network Interface Card Status Page for relevant printer name 5 Click the Create button when you first use the Printing System 1 PS 1 printer Select the PPD file copied to your HDD from the User Software CD ROM The dialog will appear 6 Click the button...

Page 28: ...nts TrueType fonts except Windows standard fonts included in the User Software CD ROM to your system will enable WYSIWYG printing with the built in fonts and may also increase printing performance To install Screenfonts Refer to the ReadmeE txt file in the Screenfonts folder of the User Software CD ROM ...

Page 29: ... Contents of This Chapter 3 2 Working Environment 3 3 Compliant OS 3 3 Print from Applications Windows 3 3 Execution of Printing 3 3 Print Settings 3 3 Print from Applications Macintosh 3 11 Execution of Printing 3 11 Print Settings 3 11 Printer Driver Function List 3 13 ...

Page 30: ...er Contents of This Chapter This chapter describes how to print from applications to the Vi7360 Printing System 1 PS 1 system and how to use the functions of the printer driver installed in computers Refer to Chapter 2 Setup p 2 1 for installation of the printer driver ...

Page 31: ...lication and click Print 2 Check that Printing System 1 PS 1 printer s name is shown on Printer Name and click OK When Printing System 1 PS 1 printer is not shown select it from the list box Setting the Print dialog box Refer to the user s manual of each application Uncheck the Collate Printing check box from each application Print Settings Perform various settings at the time of printing on the p...

Page 32: ...lowing methods The contents of appearance depends on the opening methods Method 1 Click the Properties shown from the menu by right clicking the Printing System 1 PS 1 printer icon in the Printers window displayed by clicking Start Settings Printers To open the Printers window from My Computer You can open the Printers window by double clicking the Printers folder in the My Computer Window opened ...

Page 33: ...the Print dialog shown by clicking the File Print on each application then click the Properties button With the exception of the General tab Sharing tab Fonts tab shown in Method 1 you can specify the setup items displayed in Method 2 As shown in Method 2 some part of the functions from the Paper tab Device Op tions tab PostScript tab cannot be set up ...

Page 34: ...operties Each window will be opened by the following ways Method 1 Click the Properties shown from the menu by right clicking the Printing System 1 PS 1 printer icon in the Printers window displayed by clicking Start Settings Printers To open the Printers window from My Computer You can open the Printers window by double clicking the Printers folder in the My Computer Window opened by double click...

Page 35: ... from the Printer Name of the Print dialog shown by clicking the File Print on each application then click the Properties button Kyocera Mita Vi7360 PS Document Properties The setup items on the window by Method 2 are as same as those by Method 3 But these items are different from those on the window by Method 1 From Windows NT 4 0 you can specify the various settings using both the Kyocera Mita V...

Page 36: ...dialog Each window will be opened by the following ways Method 1 Click the Properties shown from the menu by right clicking the Printing System 1 PS 1 printer icon in the Printers window displayed by clicking Start Settings Printers Kyocera Mita Vi7360 PS Properties To open the Printers window from My Computer You can open the Printers window by double clicking the Control Panel Printers folder in...

Page 37: ...indow in Method 2 can be also shown by clicking the Printing Preferences button on the General tab on the window in Method 1 Also Kyocera Mita Vi7360 PS Printing Defaults can be displayed by clicking the Printing Defaults button in the Advanced tab on the window in Method 1 Kyocera Mita Vi7360 PS Printing Defaults AdobePS Kyocera Mita Vi7360 PS Advanced Options can be displayed by clicking the Adv...

Page 38: ...ilar to those of the Layout tab and the Paper Quality tab in Method 3 and the settings in the AdobePS Kyocera Mita Vi7360 PS Advanced Options window may be viewed by clicking the Advanced button in these two windows These setting items are different from those displayed in the window in Method 1 From Windows 2000 you can specify the various settings using the Kyocera Mita Vi7360 PS Printing Prefer...

Page 39: ... name is displayed in the Printer name box then clic OK button If the Printing System 1 PS 1 printer name is not displayed select the printer Setting the Print dialog box Refer to the user s manual of each application Print Settings Each application used is displayed in the print dialog box The following are the popular print dialog boxes Setting Items Printer Specific Options 1 Printer Specific O...

Page 40: ...3 12 PS 1 Printing System 1 PostScript option Chpater 3 Printer Driver PostScript Settings Refer to Printer Driver Function List p 3 13 for the printer driver functions ...

Page 41: ...PS Default Document Properties Kyocera Mita Vi7360 PS Document Properties or Kyocera Mita Vi7360 PS Properties of Windows NT 4 0 Refer to page 3 7 for instructions on how to display the window Properties 2000 Kyocera Mita Vi7360 PS Printing Preferences or Kyocera Mita Vi7360 PS Printing Defaults of Windows 2000 Refer to page 3 9 for instructions on how to display the window Properties 2000 Advance...

Page 42: ...NT Properties NT Advanced tab Printer Features 2000 Properties 2000 Advanced Options Printer Features Fold Stitch O 95 98 Me O NT 4 0 O 2000 O Macintosh Set Value None Fold Only Fold Trim Fold Stitch Fold Stitch Trim Description Makes folded stitched trimmed set according to the selected method Operation 95 98 Me Properties Properties 95 98 Me Device Options tab NT Properties NT Advanced tab Print...

Page 43: ...O NT 4 0 O 2000 O Macintosh Set Value None Printed Blank Description Inserts a sheet to the top of each set of copies as a front cover by the selected method Operation 95 98 Me Properties Properties 95 98 Me Device Options tab NT Properties NT Advanced tab Printer Features 2000 Properties 2000 Advanced Options Printer Features Front Cover Tray O 95 98 Me O NT 4 0 O 2000 O Macintosh Set Value None ...

Page 44: ...Statement Letter Legal Tabloid A3 A4 A5 A6 B4 B5 B6 F4 8K 16K Statement W Letter W Tabloid W A3W A4W A5W B4W B5W Description Selects a paper size Operation 95 98 Me Properties Properties 95 98 Me Paper tab NT Properties NT Page Setup tab Advanced tab Paper Size 2000 Properties 2000 Advanced Options Paper Output Orientation O 95 98 Me O NT 4 0 O 2000 O Macintosh Set Value Portrait Landscape Rotated...

Page 45: ...n 95 98 Me Properties Properties 95 98 Me Paper tab NT Properties NT Advanced tab Media 2000 Properties 2000 Paper Quality tab Margins O 95 98 Me NT 4 0 2000 Macintosh Set Value Units Inches Millimeters Top Bottom Left Right Description Prints with the margins set using the specified unit Operation 95 98 Me Properties Properties 95 98 Me Paper tab Margins button Copies 95 98 Me O NT 4 0 O 2000 O M...

Page 46: ... 95 98 Me Graphics tab NT Properties NT Advanced tab Resolution 2000 Properties 2000 Advanced Options Graphic Scaling O 95 98 Me O NT 4 0 O 2000 O Macintosh Set Value 1 1000 Description Prints the document image reduced or enlarged to the specified value Operation 95 98 Me Properties Properties 95 98 Me Graphics tab NT Properties NT Advanced tab Scaling 2000 Properties 2000 Advanced Options Graphi...

Page 47: ...s Device Settings tab 2000 Properties Device Settings tab Sheet Feeder O 95 98 Me O NT 4 0 O 2000 O Macintosh Set Value None CI 1 Description Lets printer recognize the selected sheet feeder Operation 95 98 Me Properties Device Options tab NT Properties Device Settings tab 2000 Properties Device Settings tab Trimmer Unit O 95 98 Me O NT 4 0 O 2000 O Macintosh Set Value None TU 108 Description Lets...

Page 48: ... 95 98 Me Properties Device Options tab NT Properties Device Settings tab 2000 Properties Device Settings tab Memory Configuration O 95 98 Me O NT 4 0 O 2000 O Macintosh Set Value 64 96 128 160 192 224 256 288 320 352 384 416 448 480 512 MB RAM Description Let printer recognize the selected value as available printer memory Operation 95 98 Me Properties Device Options tab NT Properties Device Sett...

Page 49: ...r 4 3 Touch Screen 4 4 Basic Screen 4 6 Job Status Screen 4 7 Printer Mode Basic Screen 4 9 Cancel 4 10 Check 4 10 Interrupt Reserve 4 12 How to Enter Settings on the LCD Touch Screen 4 13 Procedures of the Printer Setting 4 14 Configuration of Printer Setting Menu 4 15 Functions of the Printer Setting 4 16 Test Print 4 16 Controller Set 4 16 Set Default 4 18 PCL Setup 4 19 ...

Page 50: ...n of the printer mode and the setup menu of the Control Panel of the Vi7360 Printer Copier Refer to the operating manual of the copier for other functions and screens of the Control Panel Refer to Chapter 3 Printer Driver p 3 1 to learn how to use the printer driver from applications and how to set up the printer from the printer driver ...

Page 51: ...PAD Enters numeric values 5 PROOF COPY Outputs a single set of copies to confirm whether the current settings are selected properly 6 INTERRUPT Stops printing in progress to allow copying from the platen glass 7 STOP Stops the copying sequence or printing deletes the stored memory 8 TIMER Lights when the timer function is set 9 POWER SAVER ON OFF Activates power saving mode for times when the copi...

Page 52: ...ys for making copy print job selections Selections are highlighted at the touch The screens also work with the conventional control panel keys The Touch Screen of the Control Panel is covered with glass Do not drop heavy items on the glass or put excess weight or pressure on it otherwise the glass may break or become scratched After the power switch is turned on the Campany name displays for appro...

Page 53: ...en the Job Status Screen will be displayed See below Basic Screen Job Status Screen These screens automatically display information regarding machine and copying print ing status Additional help is available any time with the HELP key which can be pressed from any screen except from Job Memory or Key Operator Mode Screens ...

Page 54: ...0 Printing System 1 PS 1 system Notice icon means the followings INITIALIZING The Print Controller is in the initialization mode PRINT The Print Controller is currently printing ERROR The Print Controller generated an error message IDLE The Printing System 1 PS 1 is ready to receive the print data from your computer WAIT The Print Engine is under warm up ...

Page 55: ... assigned to the machine MODE Displays the machine s current mode of operation Two modes are listed below COPIER PRINTER STATUS Displays the current status of the machine for each job Indication Meaning IDLING Ready to use in each mode ERROR Error in each mode PRINTING Output in each mode RESERVE Ready to reserve NO PAPER No paper in copy print mode STOP Stop in each mode JAM Jam in each mode INTE...

Page 56: ...t of the job 0 to 9999 The number exceeding 9999 will be displayed as 9999 MINUTE s TO GO Displays the time in minutes required for completing the job Exceeding 999 minutes 999 Shorter than 1 minute 1 Other The following message will be displayed on the bar when the reserved job does not exist RESERVED JOB DOES NOT EXIST ...

Page 57: ...he LCD is changed to the Copy Mode Basic Screen and the normal copy settings becomes available Test Print Display the Test Print Setup Screen You can print the test print by selecting the item Controller Set Display the Controller Set Screen You can perform various settings related to the Print Controller Set Default Display the Set Default Screen You can select default values of various settings ...

Page 58: ...ll appear 2 Touch the EXIT to confirm the cancelation Touch the CONTINUE to continue printing without canceling the job Check You can check the current job settings and see how the printed job will look before printing out multiple sets How to check the job Wait Mode Wait 1 Select Wait Mode Wait in the printer property on your computer Select Wait Mode from the upper list of Printer features in De...

Page 59: ...XIT on the Image Shift Screen 5 Touch the PROOF PRINT to print one copied set for proofreading if neces sary 6 Touch the Exit and then press Start to resume the rest of the print job How to check the job Wait Mode Wait with Proof 1 Select Wait Mode Wait with Proof in the printer property on your computer Select Wait Mode from the upper list of Printer features in Device Options tab of the printer ...

Page 60: ... key again to enable the engine to resume the Interrupted print job If the INTERRUPT key is pressed while receiving the job data Interrupt mode will become available after the receiving is complete If the INTERRUPT key is pressed while printing is in progress Interrupt mode will become available after the current set of print job is completed Even without pressing the INTERRUPT key again interrupt...

Page 61: ...an select or change settings from the LCD by using the Printer Mode Item Selection Various settings are performed by touching an icon of the item you would like to select on the LCD Currently selected items are displayed with reverse color Appearance of Selected Items The icon selected by touching changes into the reverse color ...

Page 62: ...Printer Mode Basic Screen 2 Touch the Controller Set key The Printer Mode Basic Screen is switched to the Controller Set Screen 3 Touch the Banner Page key The setting screen of the selected item is displayed 4 Touch the On icon The icon color is changed to the reverse color 5 Touch the OK icon Touch the or key to select other sub menu or items which you will change Touch the Cancel Key to return ...

Page 63: ...Print Banner Page Spool Job Timeout Copier Timeout Sub Menu Item On Off On Off 1 bit Off Long Edge Short Edge Portrait Landscape 5 10 15 20 30 60 120 180 240 300 15 30 60 120 Set Default Default Paper Resolution Print Quality Duplex Orientation 8 5x11 8 5x11R 8 5x14R 11x17R A3R B4R A4R A4 B5 B5R 400x400 600x600 PCL Setup Courier Style CR LF Mapping Input Tray Dark Light CR LF CR Auto Tray Tray1 Tr...

Page 64: ...f the Config Data are as follows Version information Current settings Resolution Print Quality Copy mode timeout Default Paper Size Language Installed Paper Tray1 Tray2 Tray3 Tray4 Bypass Tray Device status Total RAM installed Hard disk free space Miscellaneous PS pages printed Controller Set To enable the settings it is necessary to turn OFF ON the Vi7360 Select Controller Set on the Printer Mode...

Page 65: ...t the Job Timeout value to 10 seconds 15 set the Job Timeout value to 15 seconds 20 set the Job Timeout value to 20 seconds 30 set the Job Timeout value to 30 seconds Default 60 set the Job Timeout value to 60 seconds 120 set the Job Timeout value to 120 seconds 180 set the Job Timeout value to 180 seconds 240 set the Job Timeout value to 240 seconds 300 set the Job Timeout value to 300 seconds Co...

Page 66: ...n Items of the Default Resolution Set Screen are as follows Engine Default set the Resolution to Engine Default 400x400 set the Resolution to 400 dpi Default 600x600 set the Resolution to 600 dpi Print Quality Touch Print Quality to set the default Print Quality Only 1 bit is available Duplex Touch Duplex to set the default Duplex Items of the Default Duplex Set Screen are as follows Off set the D...

Page 67: ...er Style to set the Courier Style Items of the Courier Style are as follows Dark use old version Courier Style Light use new version Courier Style Default CR LF Mapping Touch CR LF Mapping to set the CR LF Mapping Items of the CR LF Mapping are as follows CR LF replace line ending LF code to CR LF CR does not convert line ending code Default Input Tray Touch Input Tray to set the Input Tray Items ...

Page 68: ...ner Driver 5 3 Scanning from the Copier 5 4 To Scan Documents in Real Mode 5 4 To Scan Documents in Store Mode 5 5 Scanner Setting Basic Screen 5 6 Functions 5 8 Reading in Scanned Data on a Computer 5 11 To Import Scanned Data 5 11 Scanner Driver s Main Screen 5 13 Variable Option 5 16 To Delete Scanned Data 5 17 ...

Page 69: ...an documents you must first specify a 4 digit box number on the control panel This box number is handled like a folder on the controller s hard disk The saved file can be read into TWAIN capable Windows applications through the network for editing storage This process also requires a box number Data scanned into the controller s hard disk can be cleared only from computers on the network Original ...

Page 70: ...rd should be assigned appropriate IP addresses and that the TCP IP network should be enabled For the TCP IP settings of the network interface card see the separate Instruction Handbook for the network interface card To install the scanner driver Kyocera Mita Network Scanner Driver To install the scanner driver perform the following procedure 1 Turn on the computer and start Windows Exit from all a...

Page 71: ...r way you can specify Image Quality Lens Mode Resolution Dual Page Non Image Area Erase and others before getting the original read in To Scan Documents in Real Mode The scanned data is sent to the print controller every time one sheet is scanned in this mode 1 Set the original document to be scanned that is to be read on the RADF or platen glass of the copier 2 Press the MODE button on the operat...

Page 72: ... depending on the current settings If before the scanned data is sent to the print controller you press the Start button again to let the next scanning session start then both scanned data are sent together to the print controller To Scan Documents in Store Mode The scanned data of multiple originals is sent to the print controller after canceling store mode 1 Complete steps 1 through 5 under the ...

Page 73: ...ult copy mode AUTO mode For the default setting of the copy mode Key Operation mode refer to the copier manual AUTO Distinguish between text and photo automatically and set up the appropriate image quality INCREASE CONTRAST Darken lightly printed images e g pencil without changing background exposure PHOTO Reproduce a halftone photo image TEXT In this mode text is improved in comparison to using t...

Page 74: ...sing the Platen mode You can select AUTO or SIZE SETTING AUTO Same as the default copy mode SIZE SETTING Allows you to select a scanning frame size Example When an 11 x 17 original is loaded and you select 8 5 x 11 then the scanning takes on the 8 5 x 11 frame Options 11 x 17 8 5 x 14 8 5 x 11 R 8 5 x 11 A3 A4R A4 A5 B4 B5R B5 B6R All image area Default is AUTO QUALITY Use this feature to select t...

Page 75: ...ng setting basic screen displays the special original screen which looks like this Special Original Screen Pressing the APPLI key in the scanning setting basic screen displays an application selection screen which looks like this Application Selection Screen After selecting an advanced feature pressing the OK key brings you back to the main window Or you can press the Cancel key to abandon your se...

Page 76: ... book copy direction selection Non Image Area Erase and AUTO Layout are selected automatically each mode may be canceled This feature cannot be used in combination with Mixed Original Application Non image Area Erase Allows you to enable disable the Non image Area Erase This feature cannot be used in combination with Mixed Original Z Folded original SDF Reverse Image or All image Area If lights ar...

Page 77: ... All image Area Application AUTO Layout Allows you to enable disable AUTO Layout setting This feature cannot be used in combination with Mixed Original Z Folded original SDF Sheet Cover Insertion Image Insert Repeat Image Shift or Overlay Application All image Area In this mode the document is scanned completely to the edges This feature cannot be used in combination with Non image Area Erase Re v...

Page 78: ... Application that conforms to TWAIN Adobe PhotoShop LE 2 Select File Acquire and select Select TWAIN_32_Source 3 Select Kyocera Mita Network Scanner Driver in the Select Source dialog box The displayed Screen varies according to the application in use 4 Click Select button 5 Select File Acquire TWAIN_32_Source 6 In the Scanner Box No Set up dialog box enter the server name IP address of the scanne...

Page 79: ... list shown in the main window then click Reading to allow the selected file to be read in By default the file is cleared from the controller s hard disk immediately after the file is fully read in If you want you can override this default setting so that the file is held in the hard disk To learn how to do this see Setting the Kyocera Mita Network Scanner Driver 9 You can open the read in documen...

Page 80: ... desired name can be entered Document Shows scanned data file numbers Numbers are automatically assigned in sequence Date Time Shows the date and time each scanned data file was generated Page Shows the total number of pages of each scanned data file Size Shows the horizontal and vertical pixel numbers of the first page of each scanned data file Resolution Shows horizontal resolution dpi of the fi...

Page 81: ...y is used to select a page or pages when reading in a scanned data file By default All is selected With applications that cannot handle files containing multiple pages Specify page is set to 1 If you select Specify page selected pages are limited depending on the total number of pages scanned by the copier Reading key This reads in a selected scanned data file from the scanner Delete key This dele...

Page 82: ... 1 PostScript option 5 15 Chapter 5 Scanner Operation Option key This is used to change various settings of the scanner driver Close key This key is used to close the scanner driver Help key This key is used to access Help ...

Page 83: ...low Use reverse display of Scanned document Reverse the image of the scanned document Delete after taking in Scanner document Delete a scanned document file that is temporarily held in the scanner Temp folder set up for scanner This allows you to select a directory into which temporarily stored data can be read into your application before saving it to the PC s hard disk Click Folder Change then s...

Page 84: ...ct TWAIN_32_Source 3 In the Select Source dialog box select Kyocera Mita Network Scanner Driver 4 Select File Acquire then select TWAIN_32_Source 5 Click Scanner Selection 6 Click and select a available scanner from the displayed scan job list 7 Click Connection The Kyocera Mita Network Scanner Driver main window will appear 8 From the file list shown in the main window select a file you want to d...

Page 85: ...PS 1 Printing System 1 PostScript option Appendix A 1 Appendix A Troubleshooting Basic Troubleshooting Appendix A 2 General Problems on the PS Appendix A 3 ...

Page 86: ...find information concerning the current trouble 3 If possible print the Test Print from the LCD of the copier to check that the settings are appropriate 4 Check the current status of the Print Controller Check the current status shown on the LCD of the Control Panel Touch the STATUS key on the Basic Screen to check the job status When your job is being processed or waiting for being printed Window...

Page 87: ... get a printout from a specific file It is possible that the print setting for the file is wrong that graphics contained in the file are damaged or that bad elements are contained in the file Find a print setting that does not cause any PostScript Error message to appear and try to get a printout If this fails save the file as a new file or under a different name A PostScript Error message display...

Page 88: ...PS 1 Printing System 1 PostScript option Appendix B 1 Appendix B Product Specifications Product Specifications Appendix B 2 ...

Page 89: ...s can be processed at the maximum Next job reservation Next copy job reservation is available while printing the current job Special Printing Duplex Negative image Mirror image Layout N up Scaling Job Offset Booklet 2 in 1 2 in 1 Repeat Fold and Stitch Wait Mode Image Shift Front Back Cover Watermarks Trim Stapling Punch etc Orientation Portrait Landscape Resolution 400x400dpi 600x600dpi Gradation...

Page 90: ...dix B Product Specifications in common Printer driver for Macintosh OS 7 1 or more Printer driver for Macintosh OS 8 5 or more Compliant Host Computer A Windows based computer Macintosh Notice Specifications are subject to change for improvements without notice ...

Page 91: ...PS 1 Printing System 1 PostScript option Appendix C 1 Appendix C Font List Internal Font List Appendix C 2 ...

Page 92: ...Appendix C 2 PS 1 Printing System 1 PostScript option Appendix C Font LIst Internal Font List ...

Page 93: ...PS 1 Printing System 1 PostScript option Appendix C 3 Appendix C Font List ...

Page 94: ...Appendix C 4 PS 1 Printing System 1 PostScript option Appendix C Font LIst ...

Page 95: ...3 Blank 3 15 Booklet 3 14 Bottom 3 17 Built in Fonts v Bypass Tray 4 19 C Canadian Department of Communications Regulations iv Cancel 4 10 Centronics 1 5 CHECK 4 3 Check 4 10 Chooser 2 7 CI Tray 3 15 CI 1 3 19 Collate 3 14 Combination 3 14 Compliant OS 3 3 Conceptual Connection 1 4 Config Data 4 16 Configuration of Printer Setting Menu 4 15 CONTENTS ii Control Panel Layout 4 3 Control Panel Setup ...

Page 96: ... LCD Touch Screen 4 13 How to interrupt 4 12 How to Use Memory 1 7 How to use Reserve function 4 12 I IDLE 4 6 IDLING 4 7 IEEE 1284 1 3 1 5 IEEE 1394 1 3 1 5 Image Shift 3 15 INITIALIZING 4 6 Input Tray 4 19 Installable options 3 19 Installation of the Printer Driver 2 3 Installation to Macintosh 2 7 Installation to Windows 2 3 Internal Font List Appendix C 2 INTERRUPT 4 3 4 7 Interrupt Reserve 4 ...

Page 97: ... 10 Parallel 1 5 Parallel Port viii Patent Notice v PCL Setup 4 9 4 19 PDL 1 8 Peer to Peer 1 5 Plain Paper 3 17 Portrait 3 16 4 18 PostScript3 v 1 8 PostScript Settings 3 12 PostScript tab 3 5 POWER SAVER ON OFF 4 3 PowerMacintosh 2 7 PRINT 4 6 Print as a mirror image 3 19 Print as a negative image 3 18 Print from Applications Macintosh 3 11 Print from Applications Windows 3 3 Print page border 3...

Page 98: ... 7 ST 4000 3 20 ST 4001 3 20 Sub Tray 3 16 System Requirements viii T Tabbed Sheet 3 17 TCP IP 1 5 Test Print 4 9 4 16 The Control Panel of the Vi7360 Printer Copier 4 3 Thick Paper 3 17 Thin Paper 3 17 TIMER 4 3 Top 3 17 TOTAL PAGE s 4 7 Touch Screen 4 4 Trimmer Unit 3 19 Troubleshooting Appendix A 1 TU 108 3 19 U Units 3 17 User defined type 3 17 User Software CD vi 2 3 2 7 Using Windows 2000 vi...

Reviews: