Kyocera Mita Ecosys FS-3800 Operation Manual Download Page 288

Printing through Application Software

3-23

Private Printing

You need to enter a password at retrieving the job, confidentiality is 

assured even if you share the printer with others. Print jobs will be deleted 

when they are printed or when the printer is turned off.
To print, proceed as follows.
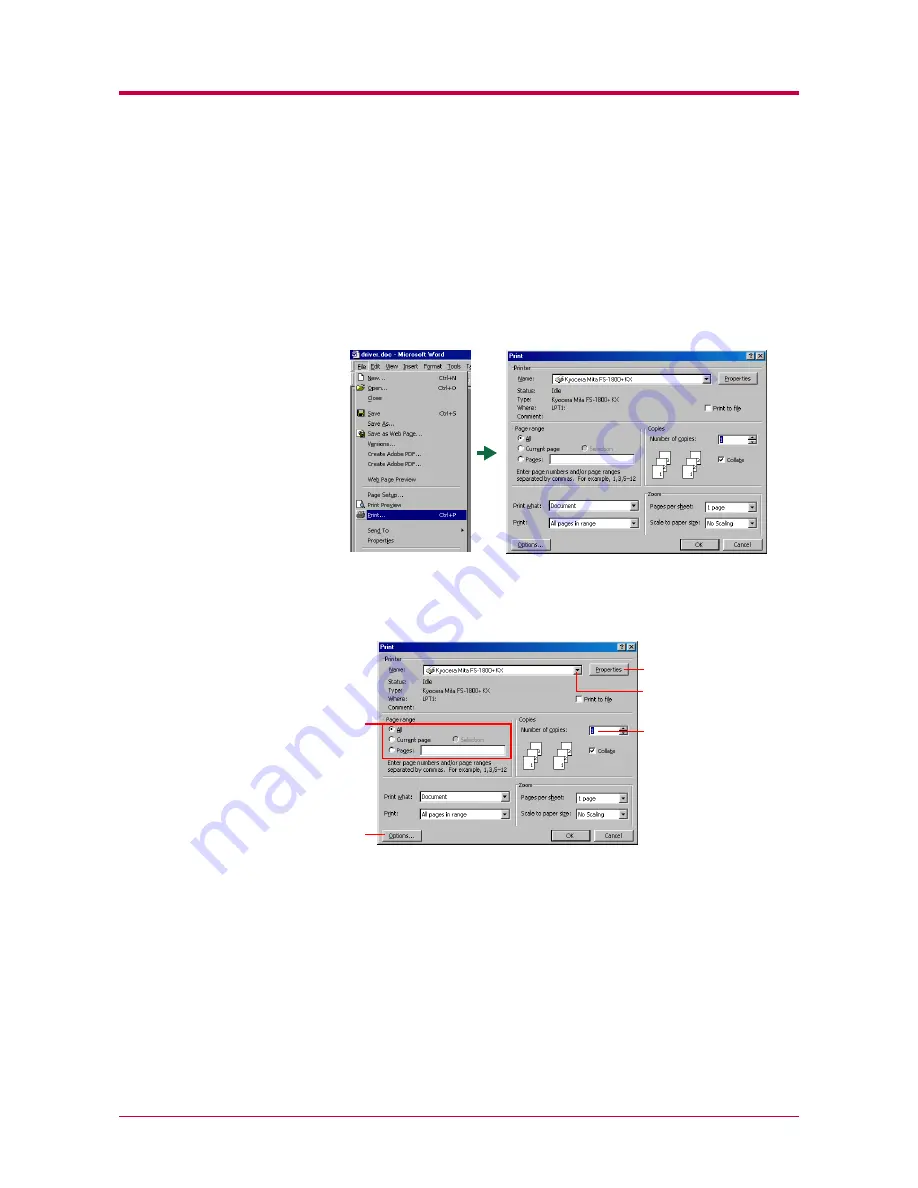
1

Browse through Windows 

File

 > 

Print

. The 

Print

 dialog box will 

displayed.

2

Click on the 

Name

 drop down list, all the printers installed under 

Windows are listed. Click the name of the printer you want to use.

3

Select the range of the pages you want to print in the document, 

All


or 

Current page only

 in 

Page range

. To print part of the document, 

enter page numbers separated by commas.

4

Specify the number of pages you want to print in the 

Number of 

copies

 combo box in 

Copies

.

3

2

4

5

6

Summary of Contents for Ecosys FS-3800

Page 1: ...FS 1800 Page Printer Operation Guide Table of Contents ...

Page 2: ...IBE is a registered trademark of Kyocera Corporation KPDL and KIR Kyocera Image Refinement are trademarks of Kyo cera Corporation Diablo 630 is a product of Xerox Corporation IBM Proprinter X24E is a product of International Business Machines Corporation Epson LQ 850 is a product of Seiko Epson Corporation Hewlett Packard PCL and PJL are registered trademarks of Hewlett Packard Company Centronics ...

Page 3: ...LIED WARRANTIES OF MERCHANTABILITY AND FITNESS FOR A PARTICULAR PUR POSE Some jurisdictions do not allow the exclusion of implied warranties so the above exclusion may not apply to you 3 Limitation of Remedies IBM s entire liability under this license is the following 1 For any claim including fundamental breach in any form related in any way to this license IBM s liability will be for actual dama...

Page 4: ...assemble decrypt reverse engineer or decompile the Software 7 Agfa Japan warrants that for ninety 90 days after delivery the Software will perform in accordance with Agfa Japan published specifications and the diskette will be free from defects in material and workmanship Agfa Japan does not warrant that the Software is free from all bugs errors and omissions THE PARTIES AGREE THAT ALL OTHER WARRA...

Page 5: ...n System 1 12 Printing the Menu Map 1 12 Printing Status Page 1 14 e MPS Printing 1 18 e MPS Configuration 1 32 Changing the Interface Parameters 1 40 Changing the Emulation 1 50 Setting the Default Font 1 54 Using Page Set Menus 1 61 Setting the Print Quality 1 70 Operating a CompactFlash Memory Card 1 76 Operating the Microdrive Hard Disk 1 85 Setting the RAM Disk 1 86 Paper Handling 1 88 Verify...

Page 6: ...uality Problems 3 3 3 3 Indicators and Messages 3 6 3 3 1 Indicators 3 6 3 3 2 Maintenance Messages 3 7 3 3 3 Error Messages 3 10 3 4 Correcting a Paper Jam 3 12 3 4 1 Jam at the Paper Cassette or Inside the Printer 3 14 3 4 2 Paper Jam at the Option Duplexer 3 16 3 4 3 Paper Jam at the Option Sorter 3 18 3 4 4 Jam at the MP Tray 3 20 Chapter 4 Paper Selection 4 1 4 1 General Guidelines 4 2 4 1 1 ...

Page 7: ...le Connection C 9 C 4 1 Preparing an RS 232C Cable C 9 C 4 2 Connecting the RS 232C Cable C 9 C 4 3 Setting the RS 232C Parameters C 10 Appendix D Option Units D 1 D 1 Available Options D 2 D 2 Installing Option Units D 3 D 2 1 PF 60 Paper Feeder D 3 D 2 2 DU 60 Duplexer D 6 D 2 3 SO 60 Sorter D 9 D 2 4 EF 60 Envelope Feeder D 15 D 2 5 PT 4 PT 60 Face up Output Tray D 19 D 2 6 Network Interface Ca...

Page 8: ...mely desirable features It was designed to make a contribution to a cleaner environment as well as to represent the latest generation of page printer technology This section explains the following topics Features For More Information Guide to the Operation Guide ...

Page 9: ... Kyocera Image Refinement KIR technology high quality printing can be achieved even at 300 dpi and 600 dpi Large paper capacity Approximately 500 sheets can be loaded into the paper cassette and about 100 sheets can be loaded into the MP tray Wide variety of print media As well as standard paper the printer will print on transparency labels and other types of special purpose media Sleep Mode Conse...

Page 10: ... download the messages in other languages Please contact your Kyocera Mita dealer Microdrive hard disk unit slot for various functions such as job retention VMB and more By saving print jobs onto the Microdrive they can be printed out at the operator panel when desired The electronic sort function can be used for much faster printing CompactFlash card slot for option fonts macros forms etc Data in...

Page 11: ...dures from printer setup to printing a test page Operation Guide this guide Guides you through topics concerning the operations and maintenance of the printer Printer Driver Guide Describes how to install and set the printer driver This manual is contained in the CD ROM supplied with the printer PRESCRIBE Programming Manual Describes how to use the PRESCRIBE commands and their parameters in detail...

Page 12: ... such as paper jams Chapter 4 Paper Selection This chapter explains the types of paper that can be used with the printer Appendix A Fonts This appendix explains about fonts and lists the printer s internal fonts Appendix B Expansion Memory This appendix explains how to expand the printer s memory Appendix C Host Computer Interface This appendix explains the pin assignment and specifications for th...

Page 13: ...1 1 Chapter 1 Using the Operator Panel 1 This chapter explains the following topics Understanding the Operator Panel Using the Operator Panel ...

Page 14: ...the other interface begins printing the job Message Meaning Self test The printer is self testing after power up Please wait The printer is warming up and is not ready When the printer is switched on for the first time after the toner container is installed Adding toner also appears Ready The printer is ready to print Processing The printer is receiving data generating graphics reading a CompactFl...

Page 15: ...tray feeding Message Display Paper Size Message Display Paper Size A4 ISO A4 21 29 7 cm DL ISO DL 11 22 cm A5 ISO A5 14 8 21 cm C5 ISO C5 16 2 22 9 cm A6 ISO A6 10 5 14 8 cm b5 ISO B5 17 6 25 cm B5 JIS B5 18 2 25 6 cm EX Executive 7 1 4 11 2 inches B6 JIS B6 12 8 18 2 cm 6 Commercial 6 3 4 3 5 8 6 1 2 inches LT Letter 8 1 2 11 inches 9 Commercial 9 3 7 8 8 7 8 inches LG Legal 8 1 2 14 inches HA Ja...

Page 16: ...ine Data can be received but will not be printed Also indicates when printing is automatically stopped due to occurrence of an error Flashing Indicates data transfer is taking place Lit Indicates either that data is being processed or that data is being written to the memory card Flashing Indicates when the printer needs maintenance attention or the printer is warming up Please wait Lit Indicates ...

Page 17: ...in the message display and printing stops after the current page is printed Resets numeric values or cancels a setting procedure Used to stop the sounding of the alarm buzzer an error occurs When pressed during mode selection terminates the setting and the printer returns to the Ready condition Used to select the emulation font character code set to read an CompactFlash card and more Used to acces...

Page 18: ...the printer driver which take priority over operator panel settings 1 2 1 Menu Selection System The following is the hierarchy diagram of the menu selection system of the printer The vertical transition is made with the and keys and horizontal transition is made with the and keys To change or finalize configuration on an item use the ENTER key Note Ready PAR A4 PLAIN These items will not appear un...

Page 19: ...tWare Off NetWare On TCP IP Off Ether Talk Off OPT StatusPage Off NetWare Frame Auto DHCP OFF IP Address Subnet Mask Gateway Parity None Baud Rate 9600 Emulation Line Printer Print KPDL errs On Print KPDL errs On Emulation PCL 6 Print KPDL errs Off Emulation KPDL Emulation KPDL AUTO Print KPDL errs Off Emulation DIABLO 630 Emulation EPSON LQ 850 Code Set LQ US Emulation IBM Proprinter Code Set DIA...

Page 20: ... On Orientation Landscape Courier Regular Font Option Font Internal I000 Courier Dark Letter Gothic Dark Letter Gothic Regular Size 012 00 point s Pitch 10 00 cpi List of Fonts Page Set Copies 001 Orientation Portrait Page Protect Auto LF Action LF only CR Action Ignore CR CR Action CR and LF CR Action CR only Wide A4 On Wide A4 Off ...

Page 21: ...ode Off RAM Disk Size Read Data Write Data Delete Data List of Partition Read Fonts Read Data Write Data Delete Data Format List of Partition Resolution 600 dpi Resolution 300 dpi Print Quality KIR mode Off KIR Mode On Ecoprint Mode On Ecoprint Mode Off Resolution Fine 1200 mode Resolution Fast 1200 mode Print Density 03 Read Data Opt ROM List of Partitions Memory Card ...

Page 22: ...or Business EF Type Envelope BulkFeeder Size BulkFeeder Type Plain Cassette Size Unit inch Unit mm X Dimension Y Dimension Cassette Type Plain Duplex Mode None Override A4 LT On Override A4 LT Off Type Adjust Custom 1 Paper weight Heavy Thick Paper weight Normal Duplex Path Enable Reset Type Adjust Feed Select Cassette Opt StackerMode Sorter Life Counters Total Print New Toner Installed Stack Sele...

Page 23: ... Time Out 030sec Sleep Timer 015 min Print HEX DUMP Printer Reset Resource prot Permanent Resource Prot Off Buzzer Off Buzzer On Service Print Status Page Auto Continue Mode Off Auto Continue Mode On Auto Continue Timer 000sec Sleep Mode Off Sleep Mode On Toner ID Developer Drum MSG Language English ...

Page 24: ... a full list of menu selection system Note that menus indicated on the list may vary depending on which option units are installed on the printer 1 Press the MENU key 2 Press the or key repeatedly until Print Menu Map appears 3 Press the ENTER key A question mark appears If you want to abandon the printing of the menu map press the CANCEL key 4 Press the ENTER key again The printer prints a menu m...

Page 25: ...Using the Operator Panel 1 13 MENU MAP FS 1800 Page Printer Sample MENU MAP ...

Page 26: ...ge 1 Press the MENU key 2 Press the or key repeatedly until Print Status Page appears 3 Press the ENTER key A question mark appears If you want to abandon the printing of a status page press the CANCEL key 4 Press the ENTER key again The printer prints a status page For a full description of the status page see the following pages Print Status Page MENU Print Status Page ENTER Print Status Page EN...

Page 27: ...ing pages Items and values on the status page may vary depending on the printer s firmware version KIR Test pattern ON Memory Installed Options Network Status Emulation Toner Gauge 0 100 Interfaces Hardware Information Page Information Error Log STATUS PAGE FS 1800 Page Printer Firmware Version Released 1 4 3 5 7 2 6 8 9 10 11 Note ...

Page 28: ...Status This shows the IP address Subnet Mask address and Default Gateway address for the network interface card installed in the printer 7 Emulation This shows all available emulations of the printer The printer is shipped from the factory with PCL 6 emulation selected as the default 8 Error Log This shows the last three instances of the following four types of errors listing them in the order of ...

Page 29: ...is information shows the default font and the default emulation for all interfaces installed in the printer 11 KIR Test Pattern KIR is the Kyocera Mita s original smoothing function This test pattern shows the effect of the KIR Kyocera Image Refinement system ...

Page 30: ... data Printing is performed faster with less computer spooling time and less network traffic Furthermore printed data that is stored on the Microdrive can be called up using job retention functions such as Quick Copy etc allowing you to quickly print additional copies of a document from the printer at any time without needing to re spool the document or start up the computer system Job Retention J...

Page 31: ...printing at the operator panel In this way you can reduce the waste of paper Private Print Confidential print jobs can be printed out when you are at the printer This mode saves print jobs in the printer without printing until you instruct the printer to do so at the operator panel Printing using this mode requires the 4 digit PIN number you set using the printer driver Stored Job This mode allows...

Page 32: ...ect a type of code job at the printer driver The following two types of code jobs are available Permanent Code Job Temporary Code Job For details refer to the Printer Driver Guide You can print out frequently needed print jobs such as fax cover pages checklists and order forms using the option barcode reader If you store a print job and print it out with a barcode ID attached you can print that jo...

Page 33: ...he e MPS Configuration menu When the number of jobs reaches the limit the oldest job will be overwritten by the new one When the printer is turned off all the stored jobs will be deleted Printing Additional Copies by Quick Copy When printing make the Quick Copy settings using the printer driver For how to make the settings refer to the Printer Driver Guide 1 Press the MENU key 2 Press the or key r...

Page 34: ... 8 Press the or key to display the desired job title If you want to cancel the selection press the CANCEL key 9 Press the ENTER key The number of copies to be printed can be set To increase the copycount press the key to decrease the copy count press the key as many times as desired If you want to abandon the selection press the CANCEL key 10 Press the ENTER key The printer prints the specified nu...

Page 35: ...h the title of the job to be deleted displayed press the ENTER key The cursor below the copy count starts to blink 3 Press the key repeatedly until Delete appears for the number of copies 4 Press the ENTER key The message display displays Processing and the print job is deleted ENTER job title copy 001 job title Delete ENTER ...

Page 36: ... the waste of paper can be reduced Make the Proof and Hold settings using the printer driver and print The printer prints one copy and at the same time saves the print job to the Microdrive Use the operator panel to print the remaining copies You can also change the number of copies when resuming printing using the operator panel Printing Remaining Copies of a Proof and Hold Use the same procedure...

Page 37: ...u need to enter the user ID from the printer operator panel to actually print a private or stored job When the printer is turned off all the print jobs will be deleted but the stored jobs remain Printing a Private Job or Stored Job 1 Press the MENU key 2 Press the or key repeatedly until e MPS appears 3 Press the key 4 Press the or key repeatedly until Private Stored appears The name entered for U...

Page 38: ...ay appears Enter the four digit user ID entered in the printer driver and press the ENTER key To enter the ID press the or key to move the cursor to the number to be changed and then enter the correct number by pressing the or key 10 The number of copies to be printed can be set To increase the copy count press the key to decrease the copy count press the key as many times as desired If you want t...

Page 39: ...tle of the job to be printed displayed press the ENTER key If a user ID has been registered using the printer driver enter the ID and press the ENTER key 3 Press the key repeatedly until Delete appears for the number of copies 4 Press the ENTER key Processing appears and the print job is deleted ENTER job title Copies 001 job title Delete ENTER ...

Page 40: ...int the job you desire by reading its barcode ID with the option barcode reader 1 Press the MENU key 2 Press the or key repeatedly until e MPS appears 3 Press the key 4 Press the or key repeatedly until List of Code JOB appears 5 Press the ENTER key A question mark appears If you want to abandon printing procedure press the CANCEL key 6 Press the ENTER key again Processing appears The printer prin...

Page 41: ...ay however the total memory size for the mailboxes is limited to the size of the remaining memory space on the Microdrive Once printed the jobs stored in the mail box will be deleted and not stored any more If there are more than one job stored in the mail box the all jobs are deleted together when the last one is printed Printing to a VMB Select a virtual mail box to post the job from the printer...

Page 42: ...appears The VMB number will appear in the location marked by s below while the VMB name will appear in the location marked by s 5 Press the ENTER key A blinking question mark appears before the VMB name 6 Press the ENTER key The printer prints the job stored in the virtual mail box Once printed the job in the virtual mail box is automatically deleted MENU e MPS Print VMB Data Tray ENTER Print VMB ...

Page 43: ...y 2 Press the or key repeatedly until e MPS appears 3 Press the key 4 Press the or key repeatedly until List of VMB appears 5 Press the ENTER key A question mark appears If you want to abandon printing procedure press the CANCEL key 6 Press the ENTER key again The printer prints a list of VMB data MENU e MPS List of VMB ENTER List of VMB ENTER ...

Page 44: ...rary Code Jobs Maximum Area in Microdrive to hold Permanent Code Jobs Maximum Area in Microdrive to hold Virtual Mail Boxes VMB Number of Changing the Maximum Quick Copy Jobs 1 Press the MENU key 2 Press the or key repeatedly until e MPS appears 3 Press the key 4 Press the or key repeatedly until e MPS Configuration appears 5 Press the key 6 Press the or key repeatedly until Quick Copy appears Opt...

Page 45: ...e where the cursor is blinking It can be set between 0 and 50 You can use the and keys to move the cursor right and left If you want to abandon the setting procedure press the CANCEL key 9 Display the desired maximum number of jobs and press the ENTER key 10 Press the MENU key The message display returns to Ready ENTER Quick Copy 32 ENTER MENU ...

Page 46: ...ly until e MPS appears 3 Press the key 4 Press the or key repeatedly until e MPS Configuration appears 5 Press the key 6 Press the or key repeatedly until Temp Code JOB Size appears The default setting is 50 MB 7 Press the ENTER key A blinking cursor appears MENU e MPS e MPS Configuration Temp Code JOB Size 50MB ENTER Temp Code JOB Size 50MB ...

Page 47: ...don the setting procedure press the CANCEL key The area specified here is the maximum storage area that can be used by Temporary Code Jobs Note that the total amount of storage areas specified must not exceed the total size of the Microdrive Otherwise in the particular storage area you may only be able to accommodate print jobs of a smaller amount of print jobs than specified 9 Display the desired...

Page 48: ...edly until e MPS appears 3 Press the key 4 Press the or key repeatedly until e MPS Configuration appears 5 Press the key 6 Press the or key repeatedly until Perm Code JOB Size appears The default setting is 50 MB 7 Press the ENTER key A blinking cursor appears MENU e MPS e MPS Configuration Perm Code JOB Size 50MB ENTER Perm Code JOB Size 50MB ...

Page 49: ...ndon the setting procedure press the CANCEL key The area specified here is the maximum storage area that can be used by Permanent Code Jobs Note that the total amount of storage areas specified must not exceed the total size of the Microdrive Otherwise in the particular storage area you may only be able to accommodate print jobs of a smaller amount of print jobs than specified 9 Display the desire...

Page 50: ...NU key 2 Press the or key repeatedly until e MPS appears 3 Press the key 4 Press the or key repeatedly until e MPS Configuration appears 5 Press the key 6 Press the or key repeatedly until VMB Size appears 7 Press the ENTER key A blinking cursor appears MENU e MPS e MPS Configuration VMB Size MB ENTER VMB Size MB ...

Page 51: ...don the setting procedure press the CANCEL key The area specified here is the maximum storage area that can be used by Virtual Mail Boxes Note that the total amount of storage areas specified must not exceed the total size of the Microdrive Otherwise in the particular storage area you may only be able to accommodate print jobs of a smaller amount of print jobs than specified 9 Display the desired ...

Page 52: ...e mode of this printer supports a bi directional high speed mode Normally this interface is used under the default setting AUTO For details see Appendix C After setting the interface be sure to reset the printer or turn the power off at least once The new setting will be enabled thereafter 1 Press the MENU key 2 Press the or key repeatedly until Interface appears One of the interface names shown b...

Page 53: ...mode menu 6 Press the ENTER key A blinking question mark appears 7 Press the or key to display the desired mode The display changes as shown below Press the ENTER key AUTO default Normal High Speed Nibble high 8 Press the MENU key The message display returns to Ready ENTER Parallel I F AUTO MENU ...

Page 54: ... interface names shown below appears indicating the current interface Parallel default Serial Option when a network interface card is installed 3 Press the ENTER key A blinking question mark appears If you want to abandon the interface selection procedure press the CANCEL key The interface remains unchanged 4 Press the or key repeatedly until Serial appears 5 Press the ENTER key again MENU ENTER I...

Page 55: ...e changed in a similar manner Baud Rate 9600 Data Bits 8 Stop Bits 1 Parity None Definable baud rates 1200 2400 4800 9600 default 19200 38400 57600 115200 Definable data bits 7 8 default Definable stop bits 1 default 2 Definable parity None default Odd Even Ignore Protocol DTR pos XON Definable protocol DTR pos XON default DTP positive DTR negative XON XOFF ETX ACK Barcode Mode Off If set to On wh...

Page 56: ...rom 1200 2400 4800 9600 default 19200 38400 57600 and 115200 Some computers may not be compatible with a baud rate of 115200 bps If you set the baud rate to 115200 and communication problems occur lower the baud rate 9 Display the desired baud rate and press the ENTER key 10 Press the MENU key The message display returns to Ready Note ENTER MENU ...

Page 57: ...as explained in this section You can also have a status page for the network interface card printed out each time the printer is turned on 1 Press the MENU key 2 Press the or key repeatedly until Interface appears One of the interface names shown below appears indicating the current interface Parallel default Serial Option 3 Press the ENTER key A blinking question mark appears 4 Press the or key r...

Page 58: ...TCP IP protocol to connect the printer in the network You can select Netware or EtherTalk in a similar manner If TCP IP is currently Off is displayed select On using the or key Press the ENTER key again NetWare On TCP IP On EtherTalk Off Opt StatusPage On This is the network interface card status page print menu See page 1 48 ENTER TCP IP On TCP IP On TCP IP On ...

Page 59: ...P select On or Off using the or key For IP Address Subnet Mask and Gateway addresses press or key to change the number 000 to 255 where the cursor is blinking You can use the and key to move the cursor right and left To obtain these addresses consult your network administrator 11 Press the ENTER key 12 Press the MENU key The message display returns to Ready DHCP Off IP Address 000 000 000 000 Subn...

Page 60: ...r the network interface status page will be printed when the printer status page is printed Printing out a network interface card status page may not be possible with some network interface cards For details see the manual for the network interface card 1 Press the MENU key 2 Press the or key repeatedly until Interface appears 3 Press the ENTER key A blinking question mark appears If you want to a...

Page 61: ...tting is On If it is set to Off change it as follows Press the ENTER key A blinking question mark appears 8 Select On using the or key 9 Press the ENTER key again 10 Press the MENU key The message display returns to Ready Opt StatusPage On ENTER Opt StatusPage Off Opt StatusPage On ENTER Opt StatusPage On MENU NETWORK STATUS PAGE FS 1800 Page Printer ...

Page 62: ...O 630 EPSON LQ 850 3 Press the ENTER key A blinking question mark appears 4 Press the or key repeatedly until the desired emulation mode appears If you want to abandon the selection press the CANCEL key 5 Press the ENTER key The key allows access to sub item Code set 6 Press the MENU key The message display returns to Ready After changing the emulation you have the option to change the character c...

Page 63: ...he default setting is PCL 6 1 Press the MENU key 2 Press the or key repeatedly until Emulation appears 3 Press the ENTER key A blinking question mark appears 4 Press the or key repeatedly until the message display indicated KPDL AUTO appears If you want to abandon the setting procedure press the CANCEL key 5 Press the ENTER key 6 Press the key When Print KPDL Errs is displayed press the or key The...

Page 64: ...NU key The message display returns to Ready Auto Printing of KPDL Error The printer can be set to print error data during KPDL emulation If this is set to On error data will be printed if only trouble occurs during printing The factory default setting is Off 1 Press the MENU key 2 Press the or key repeatedly until Emulation appears 3 Press the ENTER key A blinking question mark appears ENTER Alt E...

Page 65: ...If Alt Emulation is displayed when the KPDL AUTO emulation is selected press the or key to change it 7 Press the ENTER key A blinking question mark appears 8 Select On using the or key If you want to abandon the setting procedure press the CANCEL key 9 Press the ENTER key 10 Press the MENU key The message display returns to Ready Emulation KPDL ENTER Print KPDL Errs Off ENTER Print KPDL Errs Off P...

Page 66: ...check that Internal is displayed and press the key The message display changes to that shown below If Internal is not displayed press the or key to display it To select an option font press the ENTER key while Font is displayed Press or key repeatedly until the message display indicates Option and press the ENTER key Pressing the key after that displays the font selection shown above This operatio...

Page 67: ...eatedly until the desired font number appears For font numbers of the internal fonts see List of Fonts on page A 2 If you want to abandon the selection press the CANCEL key 6 When the desired font is displayed press the ENTER key 7 Press the MENU key The message display returns to Ready ENTER I000 ENTER MENU ...

Page 68: ...dly until Font appears 3 Check that Internal is displayed and press the key 4 Press the or key repeatedly until Courier appears 5 Press the ENTER key A blinking question mark appears 6 Select Regular or Dark using the or key If you want to abandon the setting procedure press the CANCEL key 7 Press the ENTER key 8 Press the MENU key and the message display returns to Ready Courier MENU Font Interna...

Page 69: ...epeatedly until Size appears 5 Press the ENTER key A blinking cursor _ appears 6 Press the or key to increase or decrease the value of the figure where the cursor is blinking The font size can be set between 4 and 999 75 points in 0 25 point increments You can use the or key to move the cursor right and left If you want to abandon the setting procedure press the CANCEL key 7 When the desired size ...

Page 70: ... the ENTER key A blinking cursor _ appears 6 Press the or key to increase or decrease the value of the figure where the cursor is blinking The character pitch can be set between 0 44 and 99 99 characters per inch in 0 01 character per inch increments You can use the or keys to move the cursor right and left If you want to abandon the setting procedure press the CANCEL key 7 When the desired size i...

Page 71: ... displayed and press the key To print a list of option fonts display Option and press the key 4 Press the or key repeatedly until List of Fonts appears 5 Press the ENTER key A question mark appears If you want to abandon printing procedure press the CANCEL key 6 Press the ENTER key again Processing appears then Ready The printer prints a list of fonts with a short sample and font ID number for eac...

Page 72: ...st of Fonts Internal Scalable and Bitmapped Fonts List Font Name Scalable Bitmap Password Selection FSET Font ID PRESCRIBE Internal Scalable and Bitmapped Fonts List Font Name Scalable Bitmap Password Selection FSET Font ID PRESCRIBE ...

Page 73: ...o be printed of each page for the current interface The number of copies can be set between 1 and 999 The number of copies can be set whenever the message display indicates Ready 1 Press the MENU key 2 Press the or key repeatedly until Page set appears 3 Press the key 4 Press the or key repeatedly until Copies appears 5 Press the ENTER key A blinking cursor _ appears Page Set Copies MENU Page Set ...

Page 74: ...re the cursor is blinking It can be set between 1 and 999 You can use the and keys to move the right and left If you want to abandon the setting procedure press the CANCEL key 7 When the desired size is displayed press the ENTER key 8 Press the MENU key The message display returns to Ready ENTER MENU ...

Page 75: ... set whenever the message display indicates Ready 1 Press the MENU key 2 Press the or key repeatedly until Page Set appears 3 Press the key 4 Press the or key repeatedly until Orientation appears 5 Press the ENTER key A blinking question mark appears Orientation Portrait A A Landscape Paper feed direction MENU Page Set Orientation Portrait ENTER Orientation Portrait ...

Page 76: ...or Panel 1 64 6 Select Portrait or Landscape using the or key If you want to abandon the setting procedure press the CANCEL key 7 Press the ENTER key 8 Press the MENU key The message display returns to Ready ENTER MENU ...

Page 77: ...insufficient printer memory Be sure to return this setting to Auto in order to maintain high printer memory efficiency This can be done as follows 1 Press the MENU key 2 Press the or key repeatedly until Page set appears 3 Press the key 4 Press the or key repeatedly until Page Protect appears 5 Press the ENTER key A blinking question mark appears Page Protect MENU Page set Page Protect On ENTER Pa...

Page 78: ... 66 6 Press the or key repeatedly until Auto appears If you want to abandon the setting procedure press the CANCEL key 7 Press the ENTER key 8 Press the MENU key The message display returns to Ready Page Protect Auto ENTER MENU ...

Page 79: ...the ENTER key A blinking question mark appears 6 Press the or key repeatedly until desired linefeed action appears LF only A linefeed is performed default CR and LF A linefeed and carriage return are performed Ignore LF The linefeed is ignored If you want to abandon the setting procedure press the CANCEL key 7 When the desired action is displayed press the ENTER key 8 Press the MENU key The messag...

Page 80: ...TER key A blinking question mark appears 6 Press the or key repeatedly until desired carriage return action appears CR only A carriage return is performed Default CR and LF A carriage return and linefeed are performed Ignore CR The carriage return code is ignored If you want to abandon the setting procedure press the CANCEL key 7 When the desired action is displayed press the ENTER key 8 Press the...

Page 81: ...6 emulation 1 Press the MENU key 2 Press the or key repeatedly until Page set appears 3 Press the key 4 Press the or key repeatedly until Wide A4 appears 5 Press the ENTER key A blinking question mark appears 6 Select On or Off using the or key If you want to abandon the setting procedure press the CANCEL key 7 Press the ENTER key 8 Press the MENU key The message display returns to Ready Wide A4 M...

Page 82: ...ngine Set the print density to 3 when setting the KIR mode For details on print density see page 1 75 You can look at the check line the last line on a status page to make the optimum KIR mode setting Print Quality KIR Mode With KIR Off With KIR On default Q Note KIR Test pattern ON Memory Installed Options Network Status Emulation Toner Gauge 0 100 Interfaces Hardware Information Page Information...

Page 83: ... or key repeatedly until KIR Mode appears 5 Press the ENTER key A blinking question mark appears 6 Select On or Off using the or key If you want to abandon the setting procedure press the CANCEL key 7 Press the ENTER key 8 Press the MENU key The message display returns to Ready MENU Print Quality KIR Mode On ENTER KIR Mode On ENTER MENU ...

Page 84: ...ing is Off The Ecoprint mode setting is On when the printing image becomes lighter yet very readable The Ecoprint setting has no effect on the print speed 1 Press the MENU key 2 Press the or key repeatedly until Print Quality appears 3 Press the key 4 Press the or key repeatedly until Ecoprint Mode appears Ecoprint Mode Ecoprint setting is Off default Ecoprint setting is On Note MENU Print Quality...

Page 85: ...y A blinking question mark appears 6 Select On or Off using the or key If you want to abandon the setting procedure press the CANCEL key 7 Press the ENTER key 8 Press the MENU key The message display returns to Ready ENTER Ecoprint Mode Off ENTER MENU ...

Page 86: ... print a job 1 Press the MENU key 2 Press the or key repeatedly until Print Quality appears 3 Press the key 4 Press the or key repeatedly until Resolution appears 5 Press the ENTER key A blinking question mark appears 6 Select Fast 1200 mode Fine 1200 mode 300 dpi or 600 dpi using the or key If you want to abandon the setting procedure press the CANCEL key 7 Press the ENTER key 8 Press the MENU ke...

Page 87: ...ress the key 4 Press the or key repeatedly until Print Density appears 5 Press the ENTER key A blinking question mark appears 6 Select the print density from five steps from 01 light to 05 dark using the or key If you want to abandon the setting procedure press the CANCEL key 7 Press the ENTER key 8 Press the MENU key The message display returns to Ready Print Density MENU Print Quality Print Dens...

Page 88: ...ata Formatting a CompactFlash card Print a list of data names Reading Fonts If a CompactFlash card is already inserted into the slot when the printer is turned on the fonts are automatically read into the printer To re read fonts into the printer from a CompactFlash card proceed as follows 1 Press the MENU key 2 Press the or key repeatedly until Memory Card appears 3 Press the key 4 Press the or k...

Page 89: ...MENU key The message display returns to Ready Reading Data Data stored on a CompactFlash card can be read To read data on a CompactFlash card proceed as follows 1 Press the MENU key 2 Press the or key repeatedly until Memory Card appears 3 Press the key 4 Press the or key repeatedly until Read Data appears The data name also appears 5 Press the ENTER key A blinking question mark appears before the...

Page 90: ...d later in this section to print a list of data names for confirmation To write data to a CompactFlash card proceed as follows First check that the CompactFlash card is properly formatted Otherwise the Write Data message to be explained below will not be shown on the message display If the card inserted in the CompactFlash card slot is not formatted the Format option will automatically appear on t...

Page 91: ...a destination name also referred to as a partition name which the printer automatically assigns one after another as follows DataS001 first data DataS002 second data DataS003 third data In the example above if the file TEST TXT is the first data to be written onto the memory card the destination name will be DataS001 As the printer receives data the message display changes to Processing then when ...

Page 92: ...ils see section 3 3 3 Error Messages on page 3 10 If this happens press the GO key The message display returns to Ready 9 Repeat above steps until you have transferred all data files that you want to write to the CompactFlash card Each time you finish writing data a CompactFlash card write information page is printed from the printer showing the information explained in step 4 above but pertaining...

Page 93: ...e data name also appears 5 Press the ENTER key A blinking question mark appears before the data name 6 Press the or key to display the desired data name If you want to abandon the deleting of data press the CANCEL key 7 Press the ENTER key Processing appears and the data is deleted from the CompactFlash card MENU Memory Card Delete Data data name ENTER Delete Data data name ENTER ...

Page 94: ...d To format a CompactFlash card proceed as follows 1 Press the MENU key 2 Press the or key repeatedly until Memory Card appears 3 Press the key 4 Press the or key repeatedly until Format appears 5 Press the ENTER key A question mark appears 6 Press the ENTER key Processing appears and formatting of the CompactFlash card starts If you want to abandon formatting press the CANCEL key Note MENU Memory...

Page 95: ...rd format information is printed the message display returns to Ready Printing a List of Data Names The printer prints a list of all data names referred to as partitions stored in a memory card for reference Printing a list is also available for a font card To print a list of data names for the CompactFlash card proceed as follows 1 Press the MENU key 2 Press the or key repeatedly until Memory Car...

Page 96: ...red in the CompactFlash card in bytes Free Space The size of the capacity remaining in the CompactFlash card for storing further data including the amount of memory that the printer uses for its system Partition Name The name of the written data as assigned automatically by the printer Partition Size The size of the written data in bytes Partition Type The type of the written data i e whether it i...

Page 97: ...d The printer s menu selection system allows you to perform the following operations on the Microdrive For details see 3 4 e MPS in Printer Driver Guide Reading data Writing data Deleting data Printing of list of partitions The procedures are the same as that for the Memory Card menu See Operating a CompactFlash Memory Card on page 1 76 Hard Disk ...

Page 98: ...is 12 MB you can set 3 MB RAM disk using the manner explained below If you attempt to set a memory size beyond this restriction the printer automatically round it down so that the size is always 9 MB less than the total printer memory Once the RAM disk size is set the printer must be reset To activate RAM disk in the printer s memory first you must use the printer s menu selection system The print...

Page 99: ...using the or key It is not possible to make a setting that exceeds total printer memory The default value for the RAM disk is the total printer memory minus 9 MB This parameter may be set anywhere from 01 to 99 depending on the available printer memory If you want to abandon the setting press the CANCEL key 6 When the desired RAM disk size is displayed press the ENTER key 7 Press the MENU key and ...

Page 100: ...mber of paper you use should be considerably smaller than 100 sheets to avoid possible paper jam First Mode Automatic Manual Feeding The printer automatically feeds any paper placed on the MP tray even if another paper source is selected After all paper in the MP tray is printed paper will be fed from the paper source originally selected This is the factory default setting Cassette Mode The casset...

Page 101: ...blinking question mark appears 6 Select First or Cassette using the or key If you want to abandon the setting procedure press the CANCEL key 7 Press the ENTER key 8 Press the MENU key The message display returns to Ready ENTER MP Tray Mode First ENTER MENU ...

Page 102: ...cation printer driver The factory default setting is A4 or Letter This menu does not appears when the option envelope feeder is installed on the printer For more details about the paper sizes that can be fed from the MP tray see Chapter 4 1 Press the MENU key 2 Press the or key repeatedly until Paper Handling appears 3 Press the key 4 Press the or key repeatedly until MP Tray Size appears 5 Press ...

Page 103: ...isplay changes as shown below A4 Executive Letter Legal Custom Hagaki OufukuHagaki Monarch Business Comm 9 Comm 6 3 4 DL C5 A6 B6 A5 B5 ISO B5 If you want to abandon the selection press the CANCEL key 7 Press the ENTER key 8 Press the MENU key The message display returns to Ready ENTER MENU ...

Page 104: ...s when the option envelope feeder is installed on the printer For more details about the paper types that can be fed from the MP tray see Chapter 4 1 Press the MENU key 2 Press the or key repeatedly until Paper Handling appears 3 Press the key 4 Press the or key repeatedly until MP Tray Type appears 5 Press the ENTER key A blinking question mark appears MP Tray Type MENU Paper Handling MP Tray Typ...

Page 105: ... Plain Transparency Preprinted Labels Bond Recycled Vellum Rough Letterhead Color Prepunched Envelope Cardstock Custom 1 to 8 If you want to abandon the selection press the CANCEL key 7 When the desired MP tray type is displayed press the ENTER key 8 Press the MENU key and the message display returns to Ready ENTER MENU ...

Page 106: ...election from the application printer driver The factory default setting is DL This menu appears when the option envelope feeder is installed on the printer For more details about the envelope sizes that can be fed from the envelope feeder see Chapter 4 1 Press the MENU key 2 Press the or key repeatedly until Paper Handling appears 3 Press the key 4 Press the or key repeatedly until EF Size appear...

Page 107: ...display changes as shown below DL default C5 A6 B6 A5 Hagaki OufukuHagaki Monarch Business Comm 9 Comm 6 3 4 If you want to abandon the selection press the CANCEL key 7 When the desired envelope size displayed press the ENTER key 8 Press the MENU key The message display returns to Ready ENTER MENU ...

Page 108: ...from the application printer driver The factory default setting is Envelope This menu appears when the option envelope feeder is installed on the printer For more details about the envelope types that can be fed from the envelope feeder see Chapter 4 1 Press the MENU key 2 Press the or key repeatedly until Paper Handling appears 3 Press the key 4 Press the or key repeatedly until EF Type appears 5...

Page 109: ...own below Envelope default Cardstock Custom 1 to 8 Plain Preprinted Labels Bond Recycled Rough Letterhead Color Prepunched If you want to abandon the selection press the CANCEL key 7 When the desired envelope type is displayed press the ENTER key 8 Press the MENU key and the message display returns to Ready ENTER MENU ...

Page 110: ... the paper cassette is set to CUSTOM Properly set the paper into the paper cassette For details about the adjustment of the paper guides and paper stopper inside the paper cassette see the Installation Guide supplied with the printer 1 Pull out the paper cassette from the printer and turn the paper size dial to CUSTOM 2 Adjust the paper guides and paper stopper inside the paper cassette to the siz...

Page 111: ...epeatedly until Unit appears The unit of measurement can be selected between millimeters and inches The current unit of measurement is displayed the default setting is mm 9 Press the ENTER key A blinking question mark appears 10 Select mm or inch using the or key If you want to abandon the selection press the CANCEL key 11 Press the ENTER key 12 When the unit of measurement is set press the key X ...

Page 112: ...dth is set press the key Y Dimension appears the paper length setting Set the desired length in the same way as the width The length can be set between 210 and 356 mm 8 27 to 14 02 inches 17 Display the paper length press the ENTER key 18 Press the MENU key The message display returns to Ready To print using the custom size set above define the same custom size on the printer driver For details se...

Page 113: ...om the application printer driver The factory default setting is Plain For more details about the paper types that can be fed from the paper cassette see Chapter 4 1 Press the MENU key 2 Press the or key repeatedly until Paper Handling appears 3 Press the key 4 Press the or key repeatedly until Cassette Type appears 5 Press the ENTER key A blinking question mark appears Cassette Type MENU Paper Ha...

Page 114: ...ay changes as shown below Plain Preprinted Bond Recycled Rough Letterhead Color Prepunched Custom 1 to 8 If you want to abandon the selection press the CANCEL key 7 When the desired cassette type is displayed press the ENTER key 8 Press the MENU key The message display returns to Ready ENTER MENU ...

Page 115: ...er cassette and MP tray of the printer If option paper feeders are installed they can also be selected 1 Press the MENU key 2 Press the or key repeatedly until Paper Handling appears 3 Press the key 4 Press the or key repeatedly until Feed Select appears 5 Press the ENTER key A blinking question mark appears Feed Select MENU Paper Handling Feed Select Cassette ENTER Feed Select Cassette ...

Page 116: ...te 1 Printer s standard paper cassette when option paper feeders are installed Cassette 2 Paper cassette of the top option paper feeder Cassette 3 Paper cassette of the second option paper feeder Cassette 4 Paper cassette of the third option paper feeder 7 When the desired paper source displayed press the ENTER key 8 Press the MENU key The message display returns to Ready ENTER MENU ...

Page 117: ...g their long edge and short edge binding in which they are joined together along their short edge In selecting a binding type you must also consider the orientation of the printed page You can use long edge or short edge binding with either landscape or portrait printing Depending on the binding type and print orientation the duplexer provides four types of binding setups These are 1 portrait long...

Page 118: ...d duplex mode displayed press the ENTER key 8 Press the MENU key The message display returns to Ready Duplex Printing from the MP tray In first mode be sure to set the MP tray to the same paper size and paper type as set for the current paper cassette If the paper size or type differs a paper jam may result Also note that it is not possible to select the MP tray as the current paper cassette and p...

Page 119: ... 5 Press the ENTER key A blinking question mark appears 6 Press the or key to display the desired destination The output tray changes as shown below Face down tray Printer s face down output tray Default Face up tray Printer s face up output tray Option face up tray required Option stacker Displayed when option output device is installed such as SO 60 7 When the desired paper source displayed pres...

Page 120: ... when you need several independent copies of a document The collator mode sorts the output pages by page When multiple copies of a file are printed all copies of a single page are delivered together to a single tray The mail box mode simply stacks the printed pages into the sorter tray you desire without sorting the pages 1 Press the MENU key 2 Press the or key repeatedly until Paper Handling appe...

Page 121: ...ars 6 Press the or key to display the desired sorter mode The display changes as shown below Sorter default Collater Mail box 7 When the desired sorter mode displayed press the ENTER key 8 Press the MENU key The message display returns to Ready ENTER Opt StackerMode Sorter ENTER MENU ...

Page 122: ...When this is set to On printing is performed even if the actual paper size differs from the paper size formatting the jobs 1 Press the MENU key 2 Press the or key repeatedly until Paper Handling appears 3 Press the key 4 Press the or key repeatedly until Override A4 LT appears 5 Press the ENTER key A blinking question mark appears 6 Select On or Off using the or key 7 Press the ENTER key 8 Press t...

Page 123: ...an be set see Setting the Paper Weight on page 1 113 and Setting the Duplex Path on page 1 114 after selecting the paper type to be customized as follows For how to reset the customized settings see Resetting the Type Adjust on page 1 115 1 Press the MENU key 2 Press the or key repeatedly until Paper Handling appears 3 Press the key 4 Press the or key repeatedly until Type Adjust appears 5 Press t...

Page 124: ...nges as shown below Custom 1 to 8 Plain Transparency Preprinted Labels Bond Recycled Vellum Rough Letterhead Color Prepunched Envelope Cardstock 7 When the paper type to be customized is displayed press the ENTER key 8 Press the key and proceed to Setting the Paper Weight on the following page ENTER ...

Page 125: ...e display changes as shown below For details of the default setting for each paper type see section 4 3 Paper Type on page 4 11 Normal Heavy Thick Light Thin If you want to abandon the setting procedure press the CANCEL key 5 When the desired paper thickness displayed press the ENTER key 6 Press the MENU key The message display returns to Ready If the paper type is set to Custom and the option dup...

Page 126: ...aper type see Customizing Paper Type on page 1 111 and press the key 2 Press the or key repeatedly until Duplex path appears 3 Press the ENTER key A blinking question mark appears 4 Select Enable or Disable using the or key For details of the default setting for each paper type see section 4 3 Paper Type on page 4 11 If you want to abandon the setting procedure press the CANCEL key 5 Press the ENT...

Page 127: ...eatedly until Paper handling appears 3 Press the key 4 Press the or key repeatedly until Reset Type Adjust appears 5 Press the ENTER key A question mark appears 6 Press the ENTER key All the customized paper weight and duplex path settings will be reset to the default The message display returns to Ready Reset Type Adjust MENU Paper Handling Reset Type Adjust ENTER Reset Type Adjust ENTER ...

Page 128: ...eduling it will be necessary to reset the toner counter using this menu each time a new toner container is installed Verifying the Total Printed Pages This procedure only displays the total number of printed pages The number cannot be changed 1 Press the MENU key 2 Press the or key repeatedly until Life Counters appears 3 Press the key 4 Press the or key repeatedly until Total Print appears 5 Pres...

Page 129: ... of the toner kit TK 60 TK 60E was changed the toner ID must also be changed See Setting the Toner ID on page 1 136 Also refer to the User s Manual supplied with the toner kit when replacing the toner container 1 Press the MENU key 2 Press the or key repeatedly until Life Counters appears 3 Press the key 4 Press the or key repeatedly until New Toner Installed appears 5 Press the ENTER key A questi...

Page 130: ...menu press the key while Others is displayed The following submenus can be displayed by pressing the key and then the or key Message Language Selecting Automatic Form Feed Timeout Setting Sleep Timer Setting Received Data Dumping Printer Resetting Resource Setting Alarm Buzzer Setting Auto Continue Setting Service Menu for service personnel Others ...

Page 131: ...re given below 1 Press the MENU key 2 Press the or key repeatedly until Others appears 3 Press the key 4 Press the or key repeatedly until MSG Language appears The default message language is English 5 To change the language press the ENTER key A blinking question mark appears MSG Language MENU Others MSG Language English ENTER MSG Language English ...

Page 132: ...following order The key cycles in the reverse order If you want to abandon the setting procedure press the CANCEL key 7 Press the ENTER key 8 Press the MENU key The message display returns to Ready MSG Language English Langue Francais Anzeigesprache Deutsch Lingua Italiano Berichttaal Nederlands ENTER MENU ...

Page 133: ... appears The default setting is 30 seconds 5 Press the ENTER key A blinking cursor appears 6 Press the or key to increase or decrease the value of the figure where the cursor is blinking and set the desired time The time can be set between 0 and 495 seconds in 5 second increments You can use the and keys to move the cursor right and left If you want to abandon the setting procedure press the CANCE...

Page 134: ...repeatedly until Sleep Timer appears The default setting is 015 min 5 Press the ENTER key A blinking cursor _ appears 6 Press the or key to increase or decrease the value of the figure where the cursor is blinking and set the desired time The timer can be set between 5 and 240 min in 5 minute increments You can use the and keys to move the cursor right and left If you want to abandon the setting p...

Page 135: ...cedure given below 1 Press the MENU key 2 Press the or key repeatedly until Others appears 3 Press the key 4 Press the or key repeatedly until Sleep Timer appears 5 Press the key and display Sleep Mode 6 Press the ENTER key A blinking question mark appears MENU Others Sleep Timer 015 min Sleep Mode On ENTER Sleep Mode On ...

Page 136: ...tor Panel 1 124 7 Select Off using the or key If you want to abandon the setting procedure press the CANCEL key 8 Press the ENTER key 9 Press the MENU key The message display returns to Ready Sleep Mode Off ENTER MENU ...

Page 137: ...ecimal code for the purposes of debugging programs and files 1 Press the MENU key 2 Press the or key repeatedly until Others appears 3 Press the key 4 Press the or key repeatedly until Print HEX DUMP appears 5 Press the ENTER key A question mark appears Print HEX DUMP MENU Others Print HEX DUMP ENTER Print HEX DUMP ...

Page 138: ...g will be displayed during receiving the data Once the dumped data you require has been output it is possible to cancel the printing of any further dumped data by taking the printer offline by pressing the GO key and then pressing the CANCEL key 8 Once all data has been received the message Waiting will appear Press the GO key to finish printing ENTER Processing Waiting GO GO ...

Page 139: ...MENU key 2 Press the or key repeatedly until Others appears 3 Press the key 4 Press the or key repeatedly until Printer Reset appears 5 Press the ENTER key A question mark appears If you want to abandon the printer resetting procedure press the CANCEL key 6 Press the ENTER key again Self test appears while the printer is resetting itself then Please wait followed by Ready Printer Reset MENU Others...

Page 140: ...e protection requires extra memory to store the downloaded fonts and macros The total size of the printer memory recommended for using the resource protection option is affected by several factors See Appendix B 1 Press the MENU key 2 Press the or key repeatedly until Others appears 3 Press the key 4 Press the or key repeatedly until Resouce Prot appears 5 Press the ENTER key A blinking question m...

Page 141: ...ress the or key to display the desired mode The display changes as shown below Off default Permanent Perm Temp 7 When the desired mode is displayed press the ENTER key 8 Press the MENU key The message display returns to Ready ENTER MENU ...

Page 142: ...ser The audio alarm is set to On when leaving the factory If the alarm is set to Off it is made not to sound 1 Press the MENU key 2 Press the or key repeatedly until Others appears 3 Press the key 4 Press the or key repeatedly until Buzzer appears 5 Press the ENTER key A blinking question mark appears 6 Select On or Off using the or key 7 Press the ENTER key 8 Press the MENU key The message displa...

Page 143: ...network printer and one person causes one of the above errors after the set period of time elapses the data sent from the next person is printed 1 Press the MENU key 2 Press the or key repeatedly until Others appears 3 Press the key 4 Press the or key repeatedly until Auto Continue appears 5 Press the ENTER key A blinking question mark appears 6 Select On or Off using the or key 7 Press the ENTER ...

Page 144: ... for Auto Continue 1 Press the MENU key 2 Press the or key repeatedly until Others appears 3 Press the key 4 Press the or key repeatedly until Auto Continue Mode appears 5 Press the key and display Auto Continue Timer 6 Press the ENTER key A blinking cursor appears MENU Others Auto Continue Mode On ENTER Auto Continue Timer 000Sec ...

Page 145: ...een 000 and 495 seconds in 5 second increments If set to 000 printing will be continued immediately without allowing any time interval You can use the and keys to move the cursor right and left If you want to abandon the setting procedure press the CANCEL key 8 Display the desired time and press the ENTER key 9 Press the MENU key The message display returns to Ready ENTER MENU ...

Page 146: ...nter settings information that is more detailed than the standard status page and is therefore for mostly service purposes However since there is a great deal of information available on the service status page that may be helpful to you the procedure for printing it out is given below 1 Press the MENU key 2 Press the or key repeatedly until Others appears 3 Press the key 4 Press the or key repeat...

Page 147: ...1 135 7 Press the ENTER key A question mark appears 8 Press the ENTER key The message display indicates Processing and printing starts 9 Press the MENU key The message display returns to Ready ENTER Print Status Page ENTER MENU ...

Page 148: ...t is indicated on the status page The default setting is CA TK 60 Also refer to the User s Manual supplied with the toner kit when replacing the toner container 1 Press the MENU key 2 Press the or key repeatedly until Others appears 3 Press the key 4 Press the or key repeatedly until Service appears 5 Press the key 6 Press the or key repeatedly until Toner ID appears Toner ID MENU Others Service T...

Page 149: ...the ENTER key 8 Press the or key and display CA for the TK 60 or BA for the TK 60E in place of The factory default setting is CA TK 60 9 Press the ENTER key 10 Press the MENU key The message display returns to Ready ENTER Toner ID ENTER MENU ...

Page 150: ...chapter explains how to replace the toner container and how to clean parts such as the registration roller and charger wire This chapter explains the following topics Toner Container Replacement Waste Toner Bottle Replacement Cleaning ...

Page 151: ...ed replacing approximately once every 20 000 pages For a new printer with a toner kit installed for the first time the number of copies that can be printed will be approximately 10 000 Toner Kits to be Used Name TK 60 20 000 pages TK 60E 10 000 pages Contents Toner container Waste toner bottle Wiper cloth Grid cleaner 2 plastic bags for disposal of the old toner container and waste toner bottle Us...

Page 152: ...e right and gently lift the old toner container Keep the toner container as level as possible while removing 3 Put the old toner container in the plastic bag supplied with the toner kit and dispose of it The old toner container may be incinerated without the risk of generating harmful gas Top Cover Lock Lever Note Old Toner Container Note ...

Page 153: ...own thoroughly shake the toner container in the direction of the arrows ten times or more This ensures that the toner is evenly distributed inside 6 Carefully remove the protective seal orange colored 7 Install the toner container into the printer New Toner Container 10 times or more Protective Seal ...

Page 154: ... cover It is necessary to clean the inside of the printer after replacing the toner container If the toner container is replaced when Replace toner Clean printer is displayed Clean printer Press GO will appear after replacement After cleaning the inside of the printer see section 2 3 Cleaning on page 2 9 the message will disappear when the GO key is pressed and the printer will be ready for printi...

Page 155: ...ed with the new one from the new toner kit 1 Open the side cover on the left side of the printer 2 While holding the waste toner bottle press the lock lever and then gently remove the waste toner bottle Remove the waste toner bottle as gently as possible so as not to scatter the toner inside Do not let the opening of the waste toner bottle face downward Note Side Cover Old Waste Toner Bottle Lock ...

Page 156: ...ttle after removing from the printer 4 To avoid toner spilling place the capped waste toner bottle in the plastic bag supplied before proper disposal 5 Open the cap of the new waste toner bottle Cap Old Waste Toner Bottle Plastic Bag Cap New Waste Toner Bottle ...

Page 157: ...parts must be cleaned when replacing the toner container See section 2 3 Cleaning on page 2 9 8 When replacement of the toner container and waste toner bottle is completed set the toner ID see Setting the Toner ID on page 1 136 If you replaced the toner container when Replace toner Clean printer was not displayed reset the remaining toner counter see Resetting the Remaining Toner Counter on page 1...

Page 158: ...ter replacement After cleaning the inside of the printer following the procedure shown below press the GO key the message will disappear and the printer will be ready for printing 2 3 1 Cleaning the Charger Wire The charger wire is a part in the drum unit that needs to be periodically cleaned You can clean the charger wire by pulling the cleaning knob as instructed below 1 Open the side cover on t...

Page 159: ...to the printer and pull out the charger unit as instructed below 1 Take the grid cleaner from protective bag in the new toner kit and remove the cap The grid cleaner pad is supplied with water soaked Perform the following procedure before the pad dries 2 Attach the grid cleaner to the printer with the pad at the top as shown in the figure Protective Bag Cap Grid Cleaner Note Grid Cleaner ...

Page 160: ... 5 times It is easier to pull out the charger unit for the first time if it is raised slightly as shown in the figure This cleans grid part underneath the charger unit 4 Remove the grid cleaner from the printer and dispose of it The grid cleaner is not re usable Charger Unit 1 2 3 ...

Page 161: ...way in and close the side cover 2 3 3 Paper Feed Unit To avoid print quality problems due to paper dust and debris clean the paper feed unit in the following manner 1 While pulling the paper feed unit release lever pull out the paper feed unit Paper Feed Unit Paper Feed Unit Release Lever ...

Page 162: ...r ramp using the wiper cloth included in the toner kit Be careful not to touch the transfer roller the black roller during cleaning as this may adversely affect print quality Paper Ramp Transfer Roller Black See Note below Registration Roller Metal Paper Feed Unit Wiper Cloth Note ...

Page 163: ...explains how to handle printer problems that may occur If a problem cannot be corrected contact your Kyocera Mita dealer This chapter explains the following topics General Guide Print Quality Problems Indicators and Messages Correcting a Paper Jam ...

Page 164: ...ge appears in the message display See 3 3 2 Maintenance Messages on page 3 7 Print quality is not good See 3 2 Print Quality Problems on page 3 3 Paper is jammed See 3 4 Correcting a Paper Jam on page 3 12 Nothing lights on the operator panel even whenpoweristurned on and the fan makes no noise Check that the power cord is properly plugged into the power outlet Turn off the printer s power plug in...

Page 165: ...nd check that the developer unit is inserted correctly and check that the developer s connector is connected properly Check the toner container Open the printer top cover and check that the toner container is correctly installed in the printer See 2 1 Toner Container Replacement on page 2 2 All black printout Check the charger unit Open the printer side cover and check that the charger unit is cor...

Page 166: ...he Print Density on page 1 75 Make sure the paper type setting is correct See 4 3 Paper Type on page 4 11 Clean the charger wire Open the printer side cover Pull the cleaning knob green colored slowly in and out a few times See 2 3 Cleaning on page 2 9 Grey background Check the operator panel If the Toner low TK 60 message is displayed and the ATTENTION indicator is flashing install a new toner ki...

Page 167: ...th See 2 3 Cleaning on page 2 9 Check the transfer roller If the transfer roller is dirty with toner try printing several pages Characters out of position Check the file or program Check whether the problem is being caused by a PRESCRIBE command error If the problem occurs only with a specific file or program the most likely cause is an error in a parameter to a command or command syntax Printed R...

Page 168: ...he printer is off line The printer stores but does not print received data Also indicates when printing is automatically stopped due to occurrence of an error Data indicator Flashing Data transfer is taking place Lit Either data is being processed or data is being written onto the option CompactFlash card or Microdrive Attention indicator Flashing The printer needs maintenance attention or the pri...

Page 169: ... a code beginning with E is displayed The total number of pages printed is also indicated Call service person Fn Controller error n 0 1 2 Call a service person The printer does not operate when a code beginning with F is displayed Check waste toner bottle The waste toner bottle is not installed After installing the waste toner bottle you should be able to print Replace the old waste toner bottle w...

Page 170: ...Handling appears By pressing the key the paper type settings menu appears After setting the correct paper type press the ENTER key and printing starts Missing duplex drawer The duplex drawer is either not installed or incorrectly inserted Insert the duplex drawer securely Opt Stacker unit rear cover open Open the sorter rear cover then close tightly Option interface Error A failure has occurred wi...

Page 171: ...pt Printing job cannot be done in current resolution because there is not enough internal memory Try adding more memory or changing resolution See Appendix B Warning low memory The printer s internal memory is running low due to the number of fonts and macros downloaded Print a status page to see how much user memory is left and try deleting unnecessary fonts and macros See Appendix B Message Corr...

Page 172: ...vailable memory 10 Formatting is not possible because host data is being spooled on the Microdrive Wait until the Microdrive is ready and then format 85 VMB Alias error the alias setting was lost or the VMB tray corresponding to the alias does not exist Set the alias again 97 Code job The number of permanent code job reached the limit value and no more can be saved Either delete some unnecessary j...

Page 173: ...d is insufficient Clean up files 05 Specified file not on CompactFlash card 06 No memory for use by CompactFlash card Expand printer memory Paper path error There is no paper cassette in the feeder or the cassette is not inserted properly After reinserting the paper cassette you should be able to print When two or more option feeders are installed and the lowest one is selected the same message wi...

Page 174: ...e paper jam location are indicated on the message display Details of the messages and paper jam locations are as follows Paper jam message Paper jam location Description Reference page Paper jam Cassette 1 A Paper is jammed at the paper cassette or inside the printer 3 14 Paper jam Cassette 2 to 4 B Paper is jammed at the option paper feeder s cassette 3 14 Paper jam Duplexer C Paper is jammed ins...

Page 175: ...by changing the paper there may be a problem with the printer Call a service person When pulling the paper pull it gently so as not to tear it Torn pieces of paper are difficult to remove and may be easily overlooked deterring the jam recovery Online help messages With the online help message function this printer can display the procedure to correct a paper jam on the message display When a paper...

Page 176: ... paper jam message and HELP START press the key An online help message appears 1 Pull out the paper cassette and remove the jammed paper 2 Push the paper cassette back in While pulling the paper feed unit release lever pull out the paper feed unit Paper jam Cassette 1 HELP START Press key Open cassette 1 and pull out paper feed unit then remove the paper jam Examples of online help messages Paper ...

Page 177: ...d under the registration roller remove it as shown in B 4 Open the rear cover and remove the jammed paper 5 Push the paper cassette and paper feed unit back in and close the rear cover Registration Roller Registration Roller A B Also remove the paper jam from rear cover Rear Cover Close paper feed unit HELP END Press Key ...

Page 178: ...e given below While the display alternates between the paper jam message and HELP START press the key An online help message appears 1 Open the rear cover of the duplexer and remove the jammed paper 2 Pull out the duplex drawer Paper jam Duplexer HELP START Press key Open duplexer rear cover and remove the paper jam Examples of online help messages Rear Cover Pull out duplex drawer Duplex Drawer ...

Page 179: ...Correcting a Paper Jam 3 17 3 Remove the jammed paper 4 Close the rear cover of the duplexer and the duplex drawer and remove the paper jam Close rear cover and duplex drawer HELP END Press Key ...

Page 180: ...P START press the key An online help message appears 1 Open the rear cover of the option sorter 2 Remove the jammed paper If both ends of the paper are inside the sorter turn the paper feed gears in the direction of the arrows The paper can then be removed easily Paper jam Option Stacker HELP START Press key Open option stacker rear cover and Examples of online help messages Rear Cover remove the ...

Page 181: ...Correcting a Paper Jam 3 19 3 Close the rear cover of the option sorter Close rear cover HELP END Press Key ...

Page 182: ...en the paper jam message and HELP START press the key An online help message appears 1 Remove the paper jammed at the MP tray 2 Open and close the top cover the paper jam error will be reset Paper jam MP tray HELP START Press key Check the MP tray and remove the paper jam Examples of online help messages Open and close top cover to release paper jam error HELP END Press Key ...

Page 183: ...4 1 Chapter 4 Paper Selection 4 This chapter explains the following topics General Guidelines Special Paper Paper Type ...

Page 184: ...rades is the ease with which they pass through the printer This is affected by the smoothness size and moisture content of the paper and the way in which the paper is cut The higher the grade of paper you use the less risk there will be of paper jams and other problems and the higher the level of quality your printed output will reflect Differences between paper from different suppliers can also a...

Page 185: ...rinter are as follows Condition of the Paper Avoid using paper that is bent at the edges curled dirty torn embossed or contaminated with lint clay or paper shreds Use of paper in these conditions can lead to illegible printing misfeeding and paper jams and can shorten the life of the printer In particular avoid using paper with a surface coating or other surface treatment The paper should have as ...

Page 186: ... misfeeding jams and premature wear of the printer Uneven paper weight can cause multiple feeds print defects poor toner fusing blurring and other print quality problems The proper weight is 60 to 105 g m2 for the paper cassette and 60 to 200 g m2 for the MP tray Multi purpose tray Size Cassette or multi purpose tray Size Monarch 3 7 8 7 1 2 inches Legal 8 1 2 14 inches Business 4 1 8 9 1 2 inches...

Page 187: ...es expand becoming wavy in appearance When the relative humidity is low and the paper loses moisture the edges shrink and tighten and print contrast may suffer Wavy or tight edges can cause misfeeding and alignment anomalies The moisture content of the paper should be 4 to 6 To ensure the proper moisture content it is important to store the paper in a controlled environment Some tips on moisture c...

Page 188: ...to roll the paper in the opposite direction to counteract the curl Printed sheets will then come out flat Electrostatic properties During the printing process the paper is electrostatically charged to attract the toner The paper must be able to release this charge so that printed sheets do not cling together in the output tray Whiteness The contrast of the printed page depends on the whiteness of ...

Page 189: ...umed if moisture etc given off in printing on special paper causes harm to the machine or operator Before purchasing any type of special paper test a sample on the printer and check that print quality is satisfactory Specifications for each type of special paper are given below 4 2 1 Transparency Overhead Projection Film Transparency must be able to withstand the heat of fusing during the printing...

Page 190: ...ressure sensitive adhesives The carrier sheet also called the linear or backing sheet holds the labels until use Due to the complexity of its composition adhesive backed label paper is particularly likely to give trouble in printing Adhesive label paper must be entirely covered by its top sheet with no spaces between the individual labels Labels with spaces in between are apt to peel off causing s...

Page 191: ... premature printer wear To avoid jamming due to curled envelopes do not leave more than approximately 10 printed envelopes stacked in the paper trays during multiple envelope printing Colored Paper Colored paper should satisfy the same conditions as white bond paper listed in 4 1 2 Paper Specifications on page 4 2 In addition the pigments used in the paper must be able to withstand the heat of fus...

Page 192: ...ycled paper that meets the same specifications as the white bond paper see 4 1 2 Paper Specifications on page 4 2 except whiteness Before purchasing recycled paper test a sample on the printer and check that the print quality is satisfactory Note ...

Page 193: ...ect customized paper types See Customizing Paper Type on page 1 111 The following types of paper can be set O Can be stored Cannot be stored This is a paper type defined and registered by the user Up to eight types of user settings may be defined For details on Customizing Paper Type on page 1 111 Paper source Paper Type MP tray Paper Cassette Paper Weight Duplex path MP tray available only in Cas...

Page 194: ...font is a set of characters of a particular design The design is referred to as a typeface Several characteristics identify a font These include the code set For details on the code sets read the Programming Manual on the supplied CD ROM spacing pitch height style stroke weight and typeface family ...

Page 195: ...int the same font list from the printer by using the printer s operator panel key To print a list of fonts refer to Printing a List of Fonts on page 1 59 Font may be downloaded to the printer s memory from a option Compact Flash card or Microdrive PCL Scalable and Bitmap Fonts Font number Font samples 0 1 2 3 4 5 6 7 8 9 10 11 12 13 14 15 16 17 18 19 20 21 22 23 24 25 26 27 ...

Page 196: ...A 3 Font number Font samples 28 29 30 31 32 33 34 35 36 37 38 39 40 41 42 43 44 45 46 47 48 49 50 51 52 53 54 55 56 57 58 59 60 61 62 63 64 65 66 67 ...

Page 197: ...A 4 Font number Font samples 68 69 70 71 72 73 74 75 76 77 78 79 80 ...

Page 198: ...A 5 KPDL Fonts 1 ...

Page 199: ...A 6 KPDL Fonts 2 ...

Page 200: ...B 1 Appendix B Expansion Memory B This appendix explains how to expand the printer s memory Expanded printer memory enables you to print more complex pages download more fonts and define more macros ...

Page 201: ...inter can be increased to a maximum of 264 MB The expansion memory should be installed only by a Kyocera Mita authorized dealer or Kyocera Mita certified technician Kyocera Mita shall not be liable for damage due to improper installation of the expansion memory The minimum memory requirements for the printer with various options installed are listed in the table below Please refer to this table wh...

Page 202: ...circuit board and DIMM touch a water pipe or other large metal object to discharge yourself of static electricity While doing the work it is recommended that you wear an antistatic wrist strap Touch the main circuit board and DIMM only at the edges Removing the Main Circuit Board from the Printer Be sure to remove the CompactFlash Card memory card first if inserted in the printer s card slot Remov...

Page 203: ...t board all the way out of the printer Before pulling the main circuit board out clear away the area behind the printer Foreign objects accidentally sticking to the back of the main circuit board can cause serious damage to the printer Install the DIMM as described on the following page Screws DIMM Socket Note ...

Page 204: ... Installing DIMMs Insert the DIMM into the socket as shown below 1 Remove the DIMM from its package 2 Open the clips on both ends of the DIMM socket 3 Insert the DIMM into the socket so that the notches on the DIMM align with the corresponding protusions in the socket 4 Close the clips of the DIMM socket to secure the DIMM 5 When you finish installing the DIMM reinsert the main circuit board into ...

Page 205: ...DIMMs in the printer test the printer to see if the installation was successful To test the expansion memory proceed as follows 1 Make sure printer is turned off Plug the power cord into the printer and turn the printer on 2 Press the MENU key on the operator panel 3 Press the or key repeatedly until Print Status Page appears 4 Press the ENTER key twice 5 If the installation was successful the amo...

Page 206: ...t also lists pin assignments signal functions timings connector specifications and voltage levels The RS 232C protocols are also covered Finally it explains how to use the printer in a multi computer environment This appendix explains the following topics Parallel Interface Serial Interface RS 232C Protocol RS 232C Cable Connection ...

Page 207: ...ication is used in compliance with the IEEE1284 standard Ordinarily you should leave this setting unchanged Normal The printer uses the standard communication method prescribed for Centronics interfaces High speed This mode enables faster data transmission between the printer and the host computer Select this mode if printing problems occur when the printer is connected to a workstation C 1 2 Inte...

Page 208: ... 6 8 In Out Data 6 Data 7 9 In Out Data 7 Data 8 10 Out Acknowledge nAck 11 Out Busy Busy 12 Out Paper Empty PError returns paper empty status if FRPO O2 2 13 Out Select Online nSelect returns off line status if FRPO O2 2 14 In Auto feed nAutoFd 15 Not connected 16 0 V DC 17 Chassis GND 18 5 V DC 19 Ground 20 Ground 21 Ground 22 Ground 23 Ground 24 Ground 25 Ground 26 Ground 27 Ground 28 Ground 29...

Page 209: ...ter is busy and low when it is able to accept more data Paper Empty PError Pin 12 This signal goes high when the printer has received a print job and run out of paper Select Online Pin 13 This signal is high when the printer is online and low when the printer is offline It goes low when the GO key is pressed to set the printer offline 5 V DC Pin 18 This line is connected to the printer s 5 V DC li...

Page 210: ... data sent by the printer to the computer It is used mainly in handshaking protocols RXD Receive Data Pin 3 This input carries serial asynchronous data sent by the computer to the printer RTS Request To Send Pin 4 This output is always held high above 3 volts CTS Clear To Send Pin 5 DSR Data Set Ready Pin 6 Unused SG Signal Ground Pin 7 All signals can transmit between the printer and the host com...

Page 211: ...C Interface Voltage Levels The voltage levels of the interface signals conform to EIA RS 232C specifications SPACE is from 3 volts to 15 volts MARK is from 3 volts to 15 volts Voltages between 3 volts and 3 volts are undefined SERIAL Connector The connector marked IOIOI RS 232C on the rear panel is a DB 25S connector Use a DB 25P connector or equivalent for the connector on the cable ...

Page 212: ...rate The factory default setting is 9600 baud Some computers may not be compatible with a baud rate of 115200 bps If you set the baud rate to 115200 and communication problems occur lower the baud rate H2 Data bits 7 or 8 the factory default setting is 8 H3 Stop bits 1 or 2 the factory default setting is 1 H4 Parity The factory default setting is None 0 on the status printout Parameter value Baud ...

Page 213: ...ous stream H8 Received data buffer size This is the size of the input buffer specified in units of 10 Kbytes The factory default setting is 6 meaning 60 Kbytes PRESCRIBE FRPO D0 command The PRESCRIBE FRPO D0 command is provided to allow manipulating XON XOFF when an error has occured on the serial interface The following table summarizes the error status corresponding to different D0 values Parame...

Page 214: ... of the connector Check that the solder connections are secure 4 Desolder wires 2 and 3 then resolder them in crossed configuration Solder wire 2 to pin 3 and wire 3 to pin 2 Cover the solder joints with thermofit tube 5 Cut wires 4 5 6 and 20 6 Solder wires 5 and 6 together and connect them to pin 20 Cover the solder joints with thermofit tube Leave wire 4 unconnected 7 Tape all remaining loose e...

Page 215: ...e same parameters as the printer On many computers this can be done by setting DIP switches before the power is turned on Another method is as follows C 4 3 Setting the RS 232C Parameters Windows 95 98 1 Click on Start button in the Windows 95 98 task bar and align the cursor with Settings then click on Control Panel from among the items displayed 2 The control panel folder opens Double click on S...

Page 216: ... MODE COM1 96 N 8 1 P C MODE LPT1 COM1 2 To test the interface enter the following CTRL P C DIR CTRL P The software settings made using the above procedures are temporary On most computers permanent settings must be made with DIP switches If you want to use a different baud rate or change any of the other RS 232C parameters this can be accomplished from the printer s operator panel See Changing th...

Page 217: ... unit Also refer to the manuals of the respective option units This appendix explains the following option units PF 60 Paper Feeder DU 60 Duplexer SO 60 Sorter EF 60 Envelope Feeder PT 4 PT 60 Face up Output Tray Network Interface Card Microdrive Hard Disk CompactFlash Memory Card ...

Page 218: ...ns Microdrive Hard Disk Unit Enables the electronic sorting and job retention functions To be inserted into the slot designed for it on the main circuit board of the printer See your dealer for purchasing information regarding the Microdrives that are best suited for use with this printer CompactFlash Card This is a microchip card that may contain option fonts macros and forms Insert the card into...

Page 219: ...er paper cassette which can also hold approximately 500 sheets of paper up to approximately 2 000 sheets of paper can be fed continuously The paper cassette of the paper feeder can feed Legal size paper When installing more than one paper feeder first stack the paper feeders together 1 Turn off the printer and disconnect the power cord and printer cable 2 Gently place the printer on top of the pap...

Page 220: ...lling Option Units D 4 4 Push down the bottom plate until it locks 5 Set the paper size dial to the size of paper to be used 6 Adjust the paper guides and paper stopper to the size of paper to be used B5 A4 ...

Page 221: ...s on the paper guides The paper cassette will hold approximately 500 sheets of paper with a 80 g m 21 lb basis weight or with a thickness of 0 11 mm 8 Set the stack of paper so that it is under the clips as shown in the figure 9 Insert the paper cassette back in Note Load Limit Load Limit Clip Clip ...

Page 222: ...ntations portrait and landscape duplex printing is possible in four different methods see Setting Duplex Printing on page 1 105 Duplex printing can be specified from the application printer driver 1 Remove the nine tapes and the pad from the duplexer 2 While pushing the rear cover release lever inward remove the duplexer rear cover 3 Turn off the printer and disconnect the power cord and printer c...

Page 223: ... Gently place the printer on top of the duplexer 5 Connect the printer cable parallel interface cable serial interface cable or network interface cable according to your operation environment 6 Connect the power cord to the printer ...

Page 224: ...Installing Option Units D 8 7 Pass the connected cable and power cord through the opening in the duplexer 8 Install the duplexer rear cover ...

Page 225: ...mode and the mail box mode for details about the modes refer to the Printer Drivers Guide The following installation procedure explains how to install the sorter when the option paper feeder PF 60 and duplexer DU 60 have already been installed 1 Unpack the sorter and place it on its side 2 Remove the tapes from the sorter 3 Unfold the two attachment legs of the sorter 4 Turn off the printer and di...

Page 226: ...ower cord and printer cable 6 Remove the sorter connection cover from the printer Store the removed cover in a safe place 7 Install the sorter by inserting the four hooks on its attachment legs into the notches in the printer Sorter Connection Cover Hook Hook Hook Notch Notch Hook Notch Notch ...

Page 227: ...wn The levers of the attachment legs are in the lock position 9 Connect the sorter cable to the printer When removing the sorter unlock the attachment legs by releasing the levers as shown in the figure one by one and then lift the sorter Sorter Cable ...

Page 228: ...ted to a power outlet and the lower one is to be connected to the printer 11 Secure the connected sorter cable and power cord to an attachment leg on the sorter When disconnecting the sorter cable hold the grip on the connector as shown in the figure and then pull it out Grip To printer Power Cord To power supply ...

Page 229: ...secure the power cord to the duplexer Take care not to loosen the power cord 13 If the duplexer is installed remove the two cut out portions from the upper part of the duplexer rear cover removed in step 5 14 Reinstall the duplexer rear cover Duplexer Rear Cover ...

Page 230: ...g Option Units D 14 15 Install the five sorter trays to the sorter 16 Connect the power cord supplied with the printer to the sorter Do not move or lift the printer with the sorter installed Sorter Tray Warning ...

Page 231: ...e quantities of envelopes at one time Installing the envelope feeder on the printer Turn OFF the power to the printer before installing the envelope feeder 1 Pull the printer s paper feed unit release lever then draw the paper feed unit fully out of the printer 2 Gently tilt the MP tray toward the printer until that it rests on its side as shown in the figure and remove the MP tray from the printe...

Page 232: ...as shown in the figure and lay the envelope feeder down toward you 4 Return the paper feed unit into the printer with the envelope feeder mounted Load envelopes into the envelope feeder 1 Push the bottom tray downward as shown in the figure until you hear a clicking sound to secure it Envelope Feeder Bottom Tray ...

Page 233: ...ge first Then adjust the envelope feeder s paper guides to the width of the envelope Do not set different types of envelopes into the feeder at the same time Do not load envelopes into the envelope feeder higher than the limitation marks on either side of the feeder Do not force paper into the envelope feeder Damage to the mechanism may result Sub tray Paper Guides Note ...

Page 234: ...ns remove the envelopes and move the switch to the up position as shown in the figure This improves seating of the envelopes in the envelope feeder Do not touch envelopes while they are being fed or attempt to pull an envelope back once it starts being fed Damage to the mechanism may result To avoid trouble we recommend that envelopes be deliverd face up using the option face up output tray Refer ...

Page 235: ...per When installing it directly to the printer use PT 4 If an option duplexer has been installed use PT 60 1 Install the paper stopper according to the size of paper to be used same for both PT 4 and PT 60 2 Install the face up output tray on the rear of the printer Legal Size A4 Size Letter Size Paper Stopper When installing directly to the printer If a duplexer has been installed to the printer ...

Page 236: ...ter The network interface card enables the printer to be used in a network 1 Turn off the printer and disconnect the power cord and printer cable 2 Remove the two screws from the option interface slot cover 3 Insert the network interface card and secure it with the screws removed in step 2 Option Interface Slot Cover Screws Network Interface Card Screws ...

Page 237: ...lling Option Units D 21 4 Connect the network cable 5 Set the network address from the printer operator panel for details about the modes see Changing Network Interface Parameters on page 1 45 Network Cable ...

Page 238: ...rive This enables high speed printing of multiple copies using an electric sort function Also you can use the e MPS functions For details see e MPS Printing on page 1 18 For details of available Microdrives see your dealer 1 Turn off the printer and disconnect the power cord and printer cable 2 Remove the two screws from the rear panel 3 Pull the main circuit board all the way out of the printer R...

Page 239: ...g Option Units D 23 4 Install the Microdrive into its slot on the main circuit board 5 Return the main circuit board to the printer by reversing the procedure followed when removing it Microdrive Microdrive Slot ...

Page 240: ...hen printer is turned on The presence of this data in the printer memory can be confirmed on the status printout For details of available CompactFlash cards see your dealer 1 Turn off the printer Do not insert or remove a CompactFlash card while power is on If the CompactFlash card is removed while the printer is on damage could result in the printer s electronics or the CompactFlash card 2 Insert...

Page 241: ...E 1 Appendix E Specifications E ...

Page 242: ...h Drum Amorphous silicon drum Developer Mono component dry developer Main charger Positive scorotron charger Transferring Negative charger roller Separation Curvature separation Drum cleaning Blade cleaner Drum discharging Illumination by eraser LED array Fuser Heat roller and pressure roller Toner saving Ecoprint mode Paper Plain paper See Chapter 4 Paper feed trays Cassette A5 to A4 Letter unive...

Page 243: ...ency fluctuation 2 Power consumption Max 961 W During sleep mode 14 W Operating noise in accordance with ISO 7779 Bystander Position sound pressure level at the front During printing LpA 53 dB A During standby LpA 35 dB A During sleep mode Immeasurably low Dimensions 345 13 9 16 wide 300 11 13 16 high 390 mm 18 1 4 deep U S A Weight 13 kg 28 5 8 lb main unit only Item Description ...

Page 244: ...Glossary 1 Glossary E ...

Page 245: ...ls First mode This is an operation mode for the MP tray Because the MP tray default setting is set to first mode priority printing from the MP tray if there is paper inserted in the MP tray the first paper will always feed from there even if another paper source is selected First mode is specified as the factory default but you can change this setting from the printer s operator panel IEEE1284 Thi...

Page 246: ...s interface data transfer between the printer and the computer takes place on 8 bit chunks The printer can perform IEEE1284 compatible bi directional communications Printer driver The printer driver makes it possible for you to print data created using application software The printer driver for either the printer is on the Kyocera Mita Digital Library CD ROM supplied with the printer Install the ...

Page 247: ...Index 1 Index ...

Page 248: ...Font A 1 Font list 1 59 G Grid cleaner 2 2 2 10 I Indicators 1 4 3 6 Interface viii 1 2 C 1 Internal font A 2 J Job retention ix K Keys 1 5 KIR 1 17 1 70 KM NET VIEWER ix Glossary 2 Kyocera Mita Digital Library ix Glossary 2 M Main circuit board B 3 D 22 Maintenance messages 3 7 Memory expansion B 3 Menu map 1 12 Menu selection system 1 6 Message display 1 2 Message language 1 119 Microdrive 1 85 ...

Page 249: ... 86 Glossary 3 Recycled paper 4 10 Registration roller 2 13 3 15 Resolution 1 74 Resource protection 1 128 B 2 RS 232C 1 42 C 5 cable C 9 pin assignment C 5 S Serial interface 1 42 C 5 protocol 1 42 C 7 Service status page 1 134 Side cover 2 6 2 9 Simple Network Management Protocol SNMP ix Glossary 3 Sleep mode viii 1 2 1 122 Glossary 3 Sleep timer 1 2 1 122 Sorter SO 60 1 108 3 18 D 9 Specificati...

Page 250: ...2002 2EC ...

Page 251: ...Printer Driver Guide Printer Driver Guide for FS 1800 FS 1800 ...

Page 252: ...r reproduction of all or part of this guide any copyrightable subject matter without the prior written consent of Kyocera Corporation is prohibited Any copies made of all or part of this guide any copyrightable subject must contain the same copyright notice as the material from which the copying is done Regarding Tradenames Microsoft and Windows are registered trademarks of Microsoft Corporation P...

Page 253: ...the following operating systems Microsoft Windows 95 Windows 98 and Windows ME Microsoft Windows NT 4 0 and Windows 2000 Apple Macintosh OS 7 or greater IBM OS 2 Version 2 0 or greater Linux The guide focuses on using the printer driver on Windows 95 and Windows 98 The latest Kyocera Mita printer drivers and utilities are readily available at the following web site http www kyocera com w2k For imp...

Page 254: ... 1 5 Installing the Microdrive Hard Disk 2 6 2 1 6 Selecting the Printer Description Language 2 7 Chapter 3 Printing through Application Software 3 1 3 1 Setting the Paper Size 3 1 3 1 1 Custom Size Settings 3 7 3 2 Using the Duplexer DU 60 3 9 3 3 Using the Sorter SO 60 3 11 3 4 e MPS 3 15 3 4 1 Using Job Retention 3 17 Quick Copy Printing 3 17 Proof and Hold Printing 3 20 Private Printing 3 23 S...

Page 255: ... the CD ROM drive must be activated This feature is activated by default for all Windows platforms For details refer to Windows Help To install proceed as follows 1 Insert Kyocera Mita Digital Library CD ROM in your CD ROM drive After a while the Kyocera Mita Digital Library splash screen appears 2 Click Install Drivers The Kyocera Mita Setup Wizard window begins 3 Click Next 4 In the Select a dev...

Page 256: ...he End user license agreement window check the contents and then click Accept 10 In the Select driver options window check the True Type screen fonts To use Kyocera Mita printer command language PRESCRIBE as module check the Prologue Epilogue Module if you use it and then click Next ...

Page 257: ...Installing the Printer Driver 1 3 11 Select the connection between Local and Network 12 Click Next 13 Continue to follow the rest of the wizard and complete the installation ...

Page 258: ...dding Optional Devices Setup The Device Settings tab enables you to setup optional devices such as paper feeders so that the printer can recognize them Each printer has a unique set of options that are listed in the Device Settings window If you have attached one or more printer options check that option 2 1 1 Installing the Paper Feeder PF 60 Check that the option paper feeder PF 60 is installed ...

Page 259: ...Paper Feeder Cassette 2 Paper Feeder Cassette 3 and Paper Feeder Cassette 4 sequentially 5 Click the OK button 2 1 2 Installing the Duplexer DU 60 Check that the option duplexer DU 60 is installed on the printer correctly 1 Browse through Windows Start Settings Printers 2 Right click on the Kyocera Mita FS 1800 KX icon and then click Properties The Properties dialog box is displayed Duplexer ...

Page 260: ...Setting the Defaults 2 3 3 Click the Device Settings tab 4 Click Duplex Unit in the Device Options list box 5 Click the OK button ...

Page 261: ...ed on the printer correctly 1 Browse through Windows Start Settings Printers 2 Right click on the Kyocera Mita FS 1800 KX icon and then click Properties The Properties dialog box is displayed 3 Click the Device Settings tab 4 Click Sorter Stacker in the Device Options list box 5 Click the OK button Sorter ...

Page 262: ...talled on the printer correctly 1 Browse through Windows Start Settings Printers 2 Right click on the Kyocera Mita FS 1800 KX icon and then click Properties The Properties dialog box is displayed 3 Click the Device Settings tab 4 Click Envelope Feeder in the Device Options list box 5 Click the OK button Envelope Feeder ...

Page 263: ...at the option Microdrive is installed in the printer correctly 1 Browse through Windows Start Settings Printers 2 Right click on the Kyocera Mita FS 1800 KX icon and then click Properties The Properties dialog box is displayed 3 Click the Device Settings tab 4 Click Hard Disk in the Device Options list box 5 Click the OK button ...

Page 264: ...PDL PostScript compatible When using the virtual mailbox function select PCL XL or PCL 5e The default setting is PCL XL 1 Browse through Windows Start Settings Printers 2 Right click on the Kyocera Mita FS 1800 KX icon and then click Properties The Properties dialog box is displayed 3 Click the Device Settings tab 4 Click the User button The User Settings dialog box is displayed ...

Page 265: ...Setting the Defaults 2 8 5 Select PCL XL PCL 5e or KPDL in the Page Description Language drop down list and click the OK button 6 Click the OK button ...

Page 266: ...paper of the size specified for the document in the application into the printer s paper cassette For details on how to set paper sizes refer to the Installation Guide Be sure that the document is correctly formatted with the paper size you intended to use To do this from the Word task bar select File Page Setup Paper Size and check the paper size 2 Browse File Print The Print dialog box will be d...

Page 267: ...2 6 Click the Options button The Print dialog box is displayed Select Use printer settings in the Default tray drop down list and click the OK button 7 Click the Properties button in the Print dialog box The Properties dialog box is displayed ...

Page 268: ... following example 9 Select the paper size for printing in the Print Size drop down list If the size for printing is the same as Page Size select Same as Page Size If a size other than Page Size is selected a magnification ratio will be displayed The image will be automatically enlarged or reduced in accordance with the selected size ...

Page 269: ...irectly in the combo box With Pages per Sheet images of multiple pages can be reduced and printed on a single sheet When printing using non standard size paper see 3 1 1 Custom Size Settings on page 3 7 10 Select Portrait or Landscape for Orientation If the Rotated check box is checkmarked the printed image will be turned upside down The icon will change depending on the selection ...

Page 270: ...rce Selection Then the paper will be fed from the paper feeder in which the paper with the selected Paper Size step 8 is installed 12 Select the desired media in the Media Type drop down list Paper will be fed from the paper feeder to which the selected Media Type is set ...

Page 271: ...splayed again Click the OK button to start printing Settings made from applications are not saved when the application is closed The default settings are restored when the application is opened the next time To change the printer driver default settings make printer settings from Windows Note ...

Page 272: ...in length The MP tray can accommodate sizes ranging from 70 to 216 mm in width and 148 to 297 mm in length The procedure for setting custom sizes from the printer driver is explained below 1 Display the printer driver s Properties dialog box from the application software then click Custom button 2 The Custom Page Size dialog box will appear then click the Add button The Edit Paper Size dialog box ...

Page 273: ...e 5 Click the OK button The custom paper size is added to the Customized Paper Sizes list 6 Click the OK button The Properties dialog box is displayed again 7 Select the Custom Size from the Paper Size drop down list 8 Click the OK button The Print dialog box is displayed again Click the OK button to start printing Name settings Paper size ...

Page 274: ...ant to print in the document All or Current page only in Page range To print part of the document enter page numbers separated by commas 4 Specify the number of pages you want to print in the Number of copies combo box in Copies 5 Click the Options button The Print dialog box is displayed Select Use printer settings in the Default tray drop down list and click the OK button 6 Click the Properties ...

Page 275: ...The graphic icon will change to illustrate your selection 9 Click the OK button To change the default setting to duplex printing make this setting from Windows 10 The Print dialog box is displayed again Click the OK button to start printing Portrait long edge Binding Landscape long edge Binding Portrait short edge Binding Landscape short edge Binding ...

Page 276: ...nt to print in the document All or Current page only in Page range To print part of the document enter page numbers separated by commas 4 Specify the number of pages you want to print in the Number of copies combo box in Copies 5 Click the Options button The Print dialog box is displayed Select Use printer settings in the Default tray drop down list and click the OK button 6 Click the Properties b...

Page 277: ...Printing through Application Software 3 12 8 Select Mailbox Face down as Output to drop down list To understand sorter modes see page 3 14 9 To use the collate mode check mark the Collate check box ...

Page 278: ...inting through Application Software 3 13 To use the group mode remove the check mark of Collate To use the mailbox mode check mark the Mailbox check box and select a mailbox in the Mailbox drop down list ...

Page 279: ...tput pages by page as shown in the example When multiple copies of a file are printed all copies of a single page are delivered together to a single tray The maximum number of copies is 200 If a tray becomes full 200 pages the printer pauses and indicates the Option tray paper full message Then you will need to remove all the printed pages from the tray indicated by in the message In the example w...

Page 280: ...anel There is no need to print from the computer again Proof and Hold When printing multiple copies this mode first prints only one copy for proofing allowing you to decide whether to continue printing the remaining copies or cancel printing at the operator panel In this way you can reduce the waste of paper Private Print Confidential print jobs can be printed out when you are at the printer This ...

Page 281: ... Temporary and Permanent Job Storage reduces the time to print multiple copies and enables the use of option barcode reader to print jobs stored on the Microdrive When printing select a type of code job at the printer driver The following two types of code jobs are available Permanent Code Job Temporary Code Job For how to make the settings see 3 4 3 Using Code Job on page 3 37 You can print out f...

Page 282: ...int proceed as follows 1 Browse through Windows File Print The Print dialog box will displayed 2 Click on the Name drop down list all the printers installed under Windows are listed Click the name of the printer you want to use 3 Select the range of the pages you want to print in the document All or Current page only in Page range To print part of the document enter page numbers separated by comma...

Page 283: ...ons button The Print dialog box is displayed Select Use printer settings in the Default tray drop down list and click the OK button 6 Click the Properties button The Properties dialog box is displayed Click the Output tab and then click the Job Settings button ...

Page 284: ...he Quick Copy 8 Click the OK button The Print dialog box is displayed again Click the OK button to start printing The print job will be saved to the Microdrive as it is printed If additional copies are required print using the Quick Copy menu in the e MPS menu at the printer operator panel For details see page 1 21 in the Operation Guide ...

Page 285: ...ugh Windows File Print The Print dialog box will displayed 2 Click on the Name drop down list all the printers installed under Windows are listed Click the name of the printer you want to use 3 Select the range of the pages you want to print in the document All or Current page only in Page range To print part of the document enter page numbers separated by commas 4 Specify the number of pages you ...

Page 286: ...ion button The Print dialog box is displayed Select Use printer settings in the Default tray drop down list and click the OK button 6 Click the Properties button The Properties dialog box is displayed Click the Output tab and then click the Job Settings button ...

Page 287: ...gain Click the OK button to start printing The print job will be stored to the Microdrive as it is printed The printer will first print only one copy if you set to print multiple number of copies allowing you to check the printouts If there is no problem resume printing the remaining copies using the Quick Copy menu in the e MPS menu at the printer operator panel For details see page 1 21 in the O...

Page 288: ...llows 1 Browse through Windows File Print The Print dialog box will displayed 2 Click on the Name drop down list all the printers installed under Windows are listed Click the name of the printer you want to use 3 Select the range of the pages you want to print in the document All or Current page only in Page range To print part of the document enter page numbers separated by commas 4 Specify the n...

Page 289: ...ons button The Print dialog box is displayed Select Use printer settings in the Default tray drop down list and click the OK button 6 Click the Properties button The Properties dialog box is displayed Click the Output tab and then click the Job Settings button ...

Page 290: ...Printing through Application Software 3 25 The Job Settings dialog box will appear 7 Check the Job Storage e MPS checkbox and then check the Private Print 8 ...

Page 291: ...int use the Private Stored menu in the e MPS menu at the printer operator panel For details see page 1 25 in the Operation Guide Stored Job Printing Job Storage Select this if you want to store frequently needed print jobs such as forms to print them later as required The print jobs will not be deleted when the printer is turned off To print proceed as follows 1 Browse through Windows File Print T...

Page 292: ...bers separated by commas 4 Specify the number of pages you want to print in the Number of copies combo box in Copies 5 Click the Options button The Print dialog box is displayed Select Use printer settings in the Default tray drop down list and click the OK button 6 Click the Properties button The Properties dialog box is displayed Click the Output tab and then click the Job Settings button ...

Page 293: ...Printing through Application Software 3 28 The Job Settings dialog box will appear 7 Check the Job Storage e MPS checkbox and then check the Job Storage ...

Page 294: ... numbers between 0 and 9 You must enter this number at the printer operator panel when printing 9 Click the OK button The Print dialog box is displayed again Click the OK button The print job will be stored to the Microdrive without printing To print use the Private Stored menu in the e MPS menu at the printer operator panel For details see page 1 25 in the Operation Guide ...

Page 295: ...tual mail boxes can be set up making it possible to allocate documents not just for individual departments or groups but even for individual people The print jobs will not be deleted when the printer is turned off Before Using VMB To use the VMB functions select PCL XL or PCL 5e emulation and then set the Mailbox Name and Virtual Output Tray beforehand Follow these procedures 1 Browse through Wind...

Page 296: ...inting through Application Software 3 31 4 Click the User button The User Settings dialog box is displayed 5 Select PCL XL or PCL 5e in the Page Description Language drop down list and click the OK button ...

Page 297: ...e Options list The Hard Disk Settings dialog box will be displayed 7 Enter the mailbox name in the Mailbox Name and the tray number in the Virtual Output Tray and then click the Save button Multiple virtual mailbox tray number can be specified at a time using commas and hyphen Note ...

Page 298: ...3 The mailbox name will be displayed in the Defined Names list box 8 Click the OK button to quit the Hard Disk Settings dialog box 9 Click the OK button Using VMB Printing 1 Browse through Windows File Print The Print dialog box will displayed ...

Page 299: ...he pages you want to print in the document All or Current page only in Page range To print part of the document enter page numbers separated by commas 4 Specify the number of pages you want to print in the Number of copies combo box in Copies 5 Click the Options button The Print dialog box is displayed Select Use printer settings in the Default tray drop down list and click the OK button 3 2 4 5 6...

Page 300: ...ing through Application Software 3 35 6 Click the Properties button The Properties dialog box is displayed Click the Output tab and then click the Job Settings button The Job Settings dialog box will appear ...

Page 301: ...ore mail boxes from the list of Defined Names 9 Click the OK button The Print dialog box is displayed again Click the OK button The print job will be stored to the Microdrive without printing To print use the Print VMB Data menu in the e MPS menu at the printer operator panel and specify the virtual mail box numbers You can also print the list of virtual mail box trays For details see page 1 29 in...

Page 302: ...umber can also be printed on the original document that is printed when the job is stored on the Microdrive This barcode can be printed on the first page as a code for the whole document or on every page so that each individual page of the document can be accessed with the barcode reader To print proceed as follows 1 Browse through Windows File Print The Print dialog box will displayed 2 Click on ...

Page 303: ...of copies combo box in Copies 5 Click the Options button The Print dialog box is displayed Select Use printer settings in the Default tray drop down list and click the OK button 6 Click the Properties button The Properties dialog box is displayed Click the Output tab and then click the Job Settings button ...

Page 304: ... box will appear 7 Check the Job Storage e MPS checkbox and then the Temporary or Permanent radio button 8 When using the option barcode reader click the Option button The Job Storage Options dialogbox will appear 9 Check the Barcode checkbox and then do the settings ...

Page 305: ...isplayed again 12 Click the OK button The Print dialog box is displayed again Click the OK button to start printing The print job will be stored to the Microdrive as it is printed The option barcode reader can be used to reprint the document by reading the barcode from the Job List or from the original document 1 2 3 4 5 6 7 8 Barcode Positions Lower right horizontal Lower right vertical Upper rig...

Page 306: ...2002 2EC ...

Reviews: