Funktionsbeschreibung
Functional description
5.
17
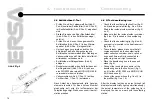
5.3 Wechseln der Entlötspitze
Die Entlötspitze (Abb. 4/Pos. 5) kann mit Hilfe
des am Ablageständer befindlichen Spitzen-
halters gewechselt werden. Positionieren Sie
dazu die Entlötspitze mit der radial verlaufenden
Nut in eine der Aussparungen des Spitzenhal-
ters. Fixieren Sie mit einer Hand den Spitzenhal-
ter und ziehen Sie mit der anderen den Entlötkol-
ben von der Spitze ab. Setzen Sie nun die von
Ihnen gewünschte Entlötspitze in umgekehrter
Reihenfolge in den Wärmespeicher (Abb. 4/Pos.
4) des Entlötkolbens ein.
5.4 Entlöten
Zum Entlöten führen Sie die Spitze des Entlötkol-
bens auf das zu entlötende Objekt, warten kurze
Zeit bis das Lot, welches den Bauelementean-
schluß mit dem Anschlußpad verbindet, vollstän-
dig geschmolzen ist und lösen dann mit Hilfe des
Fingertasters (Abb. 1/ Pos. 6) das bereits an der
Spitze anstehende Vakuum aus.
Dadurch wird das Lot schlagartig durch die
Lötspitze hindurch in den Restlotbehälter beför-
dert.
5.3 Changing the desoldering tip
The desoldering tip (fig. 4/no. 5) can be
changed using the tip holder fitted onto the
support stand. To do this, position the desolder-
ing tip with its radial slot in one of the holes in the
tip holder. Use one hand to hold the tip holder in
place and use your other hand to pull the desol-
dering iron off the tip. Now insert the desolde-
ring tip you require into the heat reservoir (fig. 4/
no. 4) of the desoldering iron by following the
above procedure in reverse order.
5.4 Desoldering
To perform a desoldering operation, guide the tip
of the desoldering iron onto the object in question
and wait for a short time until the solder fixing the
component connection to the connection pad has
completely melted. Then press the finger button
(fig. 1/no. 6) to release the vacuum already in
the tip.
This causes the solder to be suddenly sucked
through the soldering tip into the residual solder
container.


