background image

Summary of Contents for ADS Biotec QuickGene-Mini8L

Page 1: ...tion Device QuickGene Mini8L Extraction Flow Ver 1 1 Operation Manual Preparation Prepare lysate using the Isolation Kits Extraction with QuickGene Mini8L Page 14 to 25 Applying lysate Elution of DNA into the cartridges ...

Page 2: ......

Page 3: ...ights or other rights arising from the use of any information in this manual KURABO INDUSTRIES LTD assumes no liability for device failures or damages due to remodeling maintenance and repairs performed by parties other than KURABO INDUSTRIES LTD or agencies specified by KURABO INDUSTRIES LTD KURABO INDUSTRIES LTD assumes no liability for failures or damages due to use of third party products KURA...

Page 4: ...dicates a dangerous condition that may lead to death or serious injury BIOHAZARD indicates exposure to a biological agent or condition that may be infectious or harmful CAUTION indicates the possibility of danger that may lead to minor or moderate personal injury CAUTION may also indicate an accident of property damage Important Important shows the important notes for usage as well as prohibited a...

Page 5: ...因使用本手册中任何信息而导致侵犯第三方版权或其他权利的行为 KURABO INDUSTRIES LTD 恕不承担责任 对于由非 KURABO INDUSTRIES LTD 或其指定机构所进行的改装 维护及维修等事宜 KURABO INDUSTRIES LTD 恕不对因此而导致的设备故障或损坏承担责任 对于因使用第三方产品而导致的设备故障或损坏 KURABO INDUSTRIES LTD 恕不承担责任 对于使用非 KURABO INDUSTRIES LTD 所指定的正品作为维修部件而进行的改装 维护及维修等 事宜 KURABO INDUSTRIES LTD 恕不承担责任 对于因不遵守本手册中所述的注意事项和操作规程而导致设备出现故障或被损坏的情况 KURABO INDUSTRIES LTD 恕不承担责任 对于因设备工作环境 电源 安装环境等 不满足本手册中所述的操作要求而导致设备出现故障或被...

Page 6: ...的重要信息 请在使用QuickGene Mini8L之前仔细 阅读 然后再进行操作 安全注意事项的含义如下所述 WARNING BIOHAZARD CAUTION WARNING 指示发生时可导致死亡或严重伤害的危险情况 BIOHAZARD 指示暴露于生物制剂或是面对可能具有传染性或危害性的情况 CAUTION 指示发生时可导致轻微或中度人身伤害的潜在危险 CAUTION 还可指示意外财产损失 Important Important 指示重要的使用说明及严禁的操作 Note Note 指示注解信息 应遵守的操作规程及补充性的使用信息 ...

Page 7: ...ue contenue dans ce manuel KURABO INDUSTRIES LTD ne peut être tenu pour responsable d une défaillance ou de dommages de l appareil causés par la modification la maintenance et les réparations effectuées par des tiers autres que KURABO INDUSTRIES LTD ou des agences agréées par KURABO INDUSTRIES LTD KURABO INDUSTRIES LTD ne peut être tenu pour responsable d une défaillance ou de dommages dus à l uti...

Page 8: ... si elles n étaient pas évitées pourraient entraîner la mort ou des blessures graves BIOHAZARD indique l exposition à un agent biologique ou à une situation qui peut être infectieuse ou nocive CAUTION signale un danger possible qui s il n était pas évité pourrait entraîner des blessures corporelles mineures ou légères CAUTION pourrait aussi indiquer un risque de dommage matériel Important Importan...

Page 9: ...tehen können Die KURABO INDUSTRIES LTD übernimmt keine Haftung für Geräte Ausfälle oder Beschädigungen die durch Veränderungen Wartung oder Instandsetzung entstehen sofern diese nicht durch die KURABO INDUSTRIES LTD oder von der KURABO INDUSTRIES LTD genannte Auftragnehmer durchgeführt wurden Die KURABO INDUSTRIES LTD übernimmt keine Haftung für Ausfälle und Beschädigungen die durch Verwendung von...

Page 10: ...haften Verletzungen oder Verletzungen mit Todesfolge führen können BIOHAZARD kennzeichnet die Gefährdung durch biologische Agenzien oder Verhältnisse die infektiös oder gesundheitsschädlich sein können CAUTION weist auf gefährliche Betriebsbedingungen hin die zu leichten bis mittleren Verletzungen führen können CAUTION kann darüber hinaus das Risiko einer Sachbeschädigung kennzeichnen Important Im...

Page 11: ... to hold the power plug itself Do not pull the power cable For maintenance disconnect the power plug from the outlet Do not touch the power plug when you hear the crash of thunder Do not pour any liquid on QuickGene Mini8L Do not place any objects containing liquid on QuickGene Mini8L Doing so may cause a device failure fire or electric shock In the event the device overheats starts to smoke or sm...

Page 12: ...t Reagents Not Included in the Kits CAUTION When handling any reagent not included in the kits observe the safety information and precautions of the reagent Extraction should be performed in an appropriate laboratory or workplace Some reagents should be handled in a draft chamber About Cleaning Washing Solution CAUTION For handling any cleaning washing solution for the QuickGene Mini8L and accesso...

Page 13: ...regardless of the application It is the user s responsibility to validate the performance of the Isolation Kits and QuickGene Mini8L QuickGene Mini8L is a device for research and study only When you use QuickGene Mini8L read this manual thoroughly and follow the safety management regulations of your facilities laboratory ...

Page 14: ...得使用破损的插头或松垮的插座 如果在电源插头片或插座上有灰尘 请用干布将其去除 从插座上拔下插头时 务必握住插头本身 切勿扯拽电源线 维护时 应从插座上拔下电源插头 打雷时不要触碰电源插头 不要将任何液体泼溅到 QuickGene Mini8L 上 不要在 QuickGene Mini8L 上 放置任何含有液体的物品 否则可能导致设备故障 或者引起火灾或电击 如果设备过热 开始冒烟或发出异味 应立即拔下电源线 未经制造商允许 切勿试图改装 QuickGene Mini8L 否则可能引起火灾或电击 不要在 QuickGene Mini8L 上放置物品或者将物品丢到 QuickGene Mini8L 上 同时禁止撞击或敲打 QuickGene Mini8L 否则将可能导致其出现故障 如果设备内附着有液体 请用柔软的纸巾等进行擦拭 否则将可能损坏设备 更换压头时 请务必戴手套 如果有乙醇被洒到设...

Page 15: ...全血提取试剂盒 DB L 提取 DNA DNA 组织提取试剂盒 DT L 注意 以上试剂盒不包含在 QuickGene Mini8L 之中 请根据样品选择合适的试剂盒并单独订购 关于 QuickGene 专用试剂盒中未包含的一般试剂 CAUTION 使用专用试剂盒中未包含的其它试剂时 需遵守关于此类试剂的安全信息及注意 事 项 试剂的各项操作应在相应的实验室或者工作场所进行 某些特殊试剂按照标准在 通 风环境下进行操作 关于清洁 清洗用的洗涤剂 CAUTION BIOHAZARD 关于清洁 清洗装置及其附属品时使用的洗涤剂 需遵守各洗剂的使用安全注意 事项 乙醇类等易燃试剂 使用时需远离火源 清洁 清洗装置时 需穿戴合适的手套 面具以及护目镜 关于样品 处理任何可能具有感染性的样品时 请务必按照相应规定穿戴合适的手套 面具 BIOHAZARD 和护目镜 ...

Page 16: ... QuickGene Mini8L Operation Manual 使用上的限制 无论使用目的或应用情况如何 KURABO INDUSTRIES LTD 不对结果承担任何责任 对于各种样品的样品条件 性能的确认 需使用者自行负责测试与验证 QuickGene Mini8L 为科研目的的设备 使用 QuickGene Mini8L 时 请仔细阅读本手册并遵守所在单位 实验室 的安全管理规程进 行各项操作 ...

Page 17: ...ites le en tenant fermement la prise Ne tirez pas le câble Pour tout entretien débranchez la fiche de la prise murale Ne touchez pas la fiche lorsque le tonnerre gronde Ne versez aucun liquide sur le QuickGene Mini8L Ne placez aucun objet contenant du liquide sur le QuickGene Mini8L Vous risquez en le faisant de provoquer une panne un incendie ou une décharge électrique En cas de surchauffe de l a...

Page 18: ...us manipulez l un des réactifs non inclus dans les kits respectez les consignes de sécurité et les précautions relatives aux réactifs L extraction doit être effectuée dans un laboratoire ou un lieu approprié Certains réactifs doivent être manipulés dans une enceinte pare vent À propos de la solution de nettoyage CAUTION Pour manipuler une solution de nettoyage du QuickGene Mini8L et de ses accesso...

Page 19: ...ication Il est de la responsabilité de l utilisateur de valider les performances des Kits d isolation et QuickGene Mini8L QuickGene Mini8L est un appareil uniquement destiné à la recherche et l étude Lors de l utilisation du QuickGene Mini8L lisez d abord ce manuel entièrement et respectez les règlements de gestion de risque de votre lieu de travail laboratoire ...

Page 20: ...dische Modelle geeignete Netzkabel nicht für andere Produkte Betreiben Sie QuickGene Mini8L ausschließlich mit der am Gerät angegebenen Netzspannung Überlasten Sie die Steckdose nicht durch Anschließen von zu vielen Geräten Verwenden Sie QuickGene Mini8L nicht mit einem beschädigten Netzstecker oder einer lockeren Steckdose Falls die Kontakte des Netzsteckers oder die Steckdose staubig sind entfer...

Page 21: ...he Flüssigkeiten zurückbleiben wischen Sie es mit einem weichen Papiertuch aus Andernfalls kann es zu einer Beschädigung von QuickGene Mini8L kommen Tragen Sie beim Auswechseln der Druckmessköpfe stets Handschuhe Falls Ethanol in das Gerät verschüttet wird ziehen Sie sofort das Netzkabel ab Reparaturarbeiten an QuickGene Mini8L sollten nur von Firmen ausgeführt werden die von der KURABO INDUSTRIES...

Page 22: ...eagenzien CAUTION Beim Umgang mit einem Reagens das nicht in den Kits enthalten ist sind die Sicherheitsinformationen und Vorsichtsmaßregeln des jeweiligen Reagens zu befolgen Die Extraktion sollte in einem geeigneten Laboratorium oder an einem entsprechenden Arbeitsplatz durchgeführt werden Mit einigen Reagenzien sollte in einer Abzugskammer gearbeitet werden ÜberReinigungs Waschlösung CAUTION Be...

Page 23: ...ig von der Anwendung Es liegt in der Verantwortung des Anwenders die Eignung des Isolations Kits und QuickGene Mini8L zu überprüfen QuickGene Mini8L ist nur für den Einsatz in Forschung und Lehre vorgesehen Wenn Sie QuickGene Mini8L einsetzen lesen Sie diese Anleitung sorgfältig durch und befolgen Sie die Sicherheitsbestimmungen Ihrer Einrichtung Labor ...

Page 24: ...22 QuickGene Mini8L Operation Manual ...

Page 25: ... Mini8L This chapter explains the extraction procedures This chapter explains how to maintain QuickGene Mini8L This chapter describes the procedures that should be taken when you suspect device failures 1 Setting Up 1 2 Operation 2 3 Maintenance 3 4 Troubleshooting 4 5 Main Specifications ...

Page 26: ...24 QuickGene Mini8L Operation Manual This chapter describes the basic specifications of QuickGene Mini8L This chapter describes after sales services and points to note for transportation 5 Appendix A A ...

Page 27: ...25 QuickGene Mini8L Operation Manual ...

Page 28: ...ge 2 Operation p 11 2 1 Turning the Power ON or OFF 2 2 Preparation 2 3 Extraction 3 Maintenance p 27 3 1 Cleaning QuickGene Mini8L 3 2 Cleaning the Parts 3 3 How to Clean Replace the Pressure Adapter 3 4 How to Clean Replace the Pressure Heads 4 Troubleshooting p 31 5 Main Specifications p 33 Appendix A p 35 A 1 Optional Parts Replacement A 2 Product Guarantees A 3 About Services A 4 Contact Us A...

Page 29: ...QuickGene Mini8L Operation Manual 1 Setting Up xxvi ...

Page 30: ......

Page 31: ...t may cause injury or device failure Do not use QuickGene Mini8L in direct sunlight or close to a heating device It may shorten the life of QuickGene Mini8L or cause a trouble For correct and safe use of QuickGene Mini8L use it in a location that meets the following conditions The space shown in the following figure must be allocated A location where power can be provided This is a ClassⅡ device B...

Page 32: ... strong magnetic fields motors transformers TV audio speakers magnets etc Bringing QuickGene Mini8L close to any type of magnetic field may cause a malfunction Use conditions Items Specifications Temperature During operation 15 30 During downtime 15 30 Humidity During operation 30 80 During downtime 10 80 Max wet bulb temperature During operation 29 non condensing During downtime 29 non condensing...

Page 33: ...ckGene Mini8L and Accessories Check that the following are included in the package Contact the local representative if you notice any missing part s QuickGene Mini8L Operation Manual AC Adapter Power Cable US Canada Cartridge Holder Tube Holder Pressure Seal Plate 2 ...

Page 34: ... descriptions below US Canada Use the power cable included in the package Other countries The power cable is not included in the package Prepare the power cable that meets your country s standard The specification of the power cable for QuickGene Mini8L is as follows 100 120V area Power Voltage 100 to 120 V 1 ...

Page 35: ...g connector AC 125 V 1A Requirements for the cable SJT 2 x 18 AWG 60 C 200 240V area Power Voltage 200 to 240 V Requirements for the plug connector AC 250 V 1 A Requirements for the cable CENELEC 2 x 0 75 mm2 70 C 1 3 Remove the Packing Materials Refer to the attached file 1 ...

Page 36: ...tting Up 1 4 Overall view This section explains the name and function of each part in QuickGene Mini8L Front view Rear view Inlet Pressure Control Switch Product name plate Rotary Switch Lamp LED Handle Handle Pressure Adapter Pressure Head 1 ...

Page 37: ...7 QuickGene Mini8L Operation Manual 1 Setting Up Plug AC Adapter ...

Page 38: ...ing Up Waste Tube Holder 1 Pressure seal plate Surface Back side Packing Cartridge Holder Tube Holder 1 5 ml microtube Waste Tube Not supplied with QuickGene Mini8L Not supplied with QuickGene Mini8L Cartridge Not supplied with QuickGene Mini8L ...

Page 39: ...Mark finishes pressure application Pressure Control Switch Switch Pressure value Switch Name Description Switch Press to lower the pressure value Switch press to raise the pressure value Pressure value About the setting range refer to 1 5 Pressure Parameters Biohazard Risk Symbol Label This caution symbol indicates a possible biohazard risk from patient specimen contamination Biohazard Risk Symbol...

Page 40: ... a sensor for detecting start stop of pressure application and a circuit for controlling the duration of pressure application Pressure Unit Put pressurized air into the Cartridges through the pressure heads When the rotary switch is turned on the pressure heads move down to the Pressure Seal Plate to put pressurized air into Cartridges Holder Unit The holder unit is comprised of the Cartridge Hold...

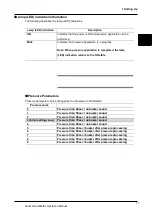
Page 41: ...c no buzzer sound 4 Pressure time 80sec no buzzer sound 5 Pressure time 40sec buzzer after pressure processing 6 Pressure time 50sec buzzer after pressure processing 7 Pressure time 60sec buzzer after pressure processing 8 Pressure time 70sec buzzer after pressure processing 9 Pressure time 80sec buzzer after pressure processing Lamp LED indication Description ON Indicates that the power is ON and...

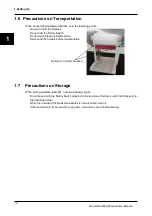
Page 42: ...tion Remove all the holders before transportation Be sure to hold the handles 1 7 Precautions on Storage When storing QuickGene Mini8L note the following points Do not keep it with the Rotary Switch adjusted to the position of turning on with Cartridges set in the Cartridge Holder When the outside of the QuickGene Mini8L is heavily soiled clean it If the machine will not be used for a long time cl...

Page 43: ...ation from preparing samples to extraction completion be careful not to contaminate the samples with sweat saliva etc 2 1 Turning the power ON and OFF This section explains how to turn the power of QuickGene Mini8L on and off Note Since QuickGene Mini8L is not equipped with a power switch the power is turned on off by connecting disconnecting the power cable Turning on the power Plug 1 Make sure t...

Page 44: ...12 QuickGene Mini8L Operation Manual 2 Operation Plug ...

Page 45: ...e power 1 Disconnect the plug of the power cable from the outlet The lamp LED turns off then the QuickGene Mini8L turns off Plug Note Do not place any objects near the outlet so that the plug of the power cable can be disconnected immediately in case of emergency 2 ...

Page 46: ...Mask Safety Goggles 1 5 ml microtubes Waste Tubes WT Cartridges CA Buffer Wash Buffer Elution Buffer Lysate Samples For the preparation of samples refer to the handbook of each kit Provided with QuickGene Isolation Kits Preparation of lysate Make lysate using the specified kit for each target samples For details refer to the handbook of the Isolation Kits 2 ...

Page 47: ...ion Operation 1 Turn on the power by connecting the power cable and then make sure the lamp LED lights Lamp LED ON 2 Prepare the Cartridge Holder Tube Holder Pressure Seal Plate 3 Set the Waste Tubes and 1 5 ml microtubes into the Tube Holder in order Important Keep the Holder Handle of the Tube Holder toward the front side when setting the Waste Tubes and 1 5 ml microtubes as shown in below figur...

Page 48: ... the correct position of the Tube Holder Insert the bottom bulges of Cartridge Holder into the side notches of the Tube Holder Important Make sure the bulges of Cartridge Holder are inserted into the side notches of the Tube Holder If their positon does not correspond Buffer and or lysate may spill This results in an extraction failure and Buffer and or lysate becoming waste 2 ...

Page 49: ...tch of Cartridge Holder and then push into the bottom position If the Cartridge is not inserted in correct position it may cause the pressure leakage Iftheirpositondoesnotcorrespond Bufferand or lysate may spill This results in an extraction failure and Buffer and or lysate becoming waste Make sure they are in relative position microtubes No 5 No 6 No 7 No 8 No 5 No 6 No 7 No 8 No 1 No 2 No 3 No 4...

Page 50: ...dges Important Keep the stainless steel side up the silicone rubber Packing side down and the Packing towards to the Cartridges while setting the Pressure Seal Plate Check the position of Pressure Seal Plate to make sure the both ends of Pressure Seal Plate are inserted in the notches of Cartridge holder Note Do not use the soiled Pressure Seal Plate If the Pressure Seal Plate gets dirty clean it ...

Page 51: ...e application automatically stops in about 70 seconds Pressuring time can be changed through the Pressure Mode Switch Refer to p 7 6 Make sure that the lysate does not remain in the Cartridges Important Make sure that no liquid remains in the Cartridges Before pressurizing After pressurizing Note If any solution remains in the Cartridges even after about 70 seconds has elapsed return the rotary sw...

Page 52: ...raise Rotate up to here 8 Repeat the pressure process for the other rows of the Cartridges Note Refer to step 3 to 7 9 Pull out the Cartridge Tube Holder the pressure heads Note Do not pull out the Holder unit while the pressure heads are lowered Important Use both hands to rotate the rotary switch 2 ...

Page 53: ......

Page 54: ...the plate into the notches at the top of the cartridge holder and add the Wash Buffer In this operation take care not to touch the Cartridge or the packing back of the pressure seal plate with the pipette Once the Washing Buffer has been added to the Cartridges rotate the pressure seal plate 90 to return to the original condition Note If any Wash Buffer is left on the Pressure Seal Plate wipe it o...

Page 55: ... heads 2 Important Use both hands to rotate the rotary switch Make sure that no liquid remains in the Cartridges Make sure that the Pressuring time of the last wash process for at least 70 seconds If the Pressuring time was changed return to original setting 70 seconds through the Pressure Mode Switch Refer to page 7 Pressure Control Switch and 9 Pressure Parameters Note Do not pull out the Holder...

Page 56: ...be Holder In this operation correct position means that the tip of Cartridge is on the 1 5 ml microtubes Note Use both hands to move the Cartridge Holder Set here 16 Insert the Cartridge Holder into the side notches of the Tube Holder Insert the bottom Bulges of Cartridge Holder into the side notches of the Tube Holder Note Use both hands to set the Cartridge Holder Set the Cartridge Holder gently...

Page 57: ... Elution Buffer In this operation take care not to touch the Cartridge or the packing back of the pressure seal plate with the pipette Once the Elution Buffer has been added Pressure seal plate to the Cartridges rotate the pressure seal plate 90 to return to the original condition packing back notches Important Make sure that apply the Elution Buffer after setting the Cartridge Holder onto the Tub...

Page 58: ...eturn the rotary switch to the OFF position to raise the pressure heads Important Use both hands to rotate the rotary switch Make sure that no liquid remains in the Cartridges Note Do not pull out the Holder unit while the pressure heads are lowered 20 Pull out the Cartridge Tube Holder 2 ...

Page 59: ...fectious waste according to your biological safety manuals Use both hands microtubes Waste Tube 2 After disposing of all cartridges lift and separate the Cartridge Holder from Tube Holder Note Use both hands to remove the Cartridge Holder 3 Remove 1 5 ml microtubes and put caps on them 4 Remove the Waste Tubes from the Tube Holder and dispose of them Note Dispose of the Waste Tubes and waste solut...

Page 60: ...26 QuickGene Mini8L Operation Manual 2 Operation safety manuals ...

Page 61: ...27 QuickGene Mini8L Operation Manual 3 Maintenance 2 ...

Page 62: ...d disconnect the power plug from the outlet Otherwise it may cause an electric shock Parts to clean Cleaning methods Body outside Remove dust gently with a dry soft cloth If the outside of the device is heavily soiled or if any samples that may cause infection are adhered to the outside of the QuickGene Mini8L wipe with a soft paper tissue soaked with 0 1 sodium hypochlorite solution or ethanol Bo...

Page 63: ...ium hypochlorite solution Next wash the solution out with DEPC water and then dry the parts Tube Holder Pressure Seal Plate 3 3 How to replace the Pressure Adapter 1 Turn off the power Disconnect the plug of the power cable from the outlet Plug 2 Pull out the Cartridge Holder and Tube Holder 3 Hold the pressing type knobs of both sides of the Pressure Adapter as shown in the figure and then press ...

Page 64: ...Do not use excessive force otherwise it may cause the Pressure Adapter failures Upper protruding parts 5 Take out the lower protruding parts of Pressure Adapter in the direction as shown Lower protruding parts 6 Set the Pressure Adapter in the reverse order to removal 3 5 Note Do not use excessive force otherwise it may cause the Pressure Adapter failures 3 ...

Page 65: ......

Page 66: ... lying the device face up spread a cloth etc on the table to avoid damaging the body 3 3 While holding the QuickGene Mini8L by one hand remove the Pressure Heads 4 While holding the QuickGene Mini8L by one hand insert new Pressure Heads Note Set the Pressure Heads in the direction shown in the figure and push them completely into the body 5 Rotate the Rotary Switch to retract the Pressure Heads 6 ...

Page 67: ...n and Waste Tubes corresponding to the position of the Cartridge to be inserted p 16 Pressure heads pressure adapter pressure seal plate are incorrectly installed Install the pressure heads pressure adapter pressure seal plate correctly p 17 p 28 30 Pressure heads pressure adapter pressure seal plate have become deformed or hardened Replace the pressure heads pressure adapter pressure seal plate w...

Page 68: ...32 QuickGene Mini8L Operation Manual 4 Troubleshooting 4 ...

Page 69: ...33 QuickGene Mini8L Operation Manual 4 Troubleshooting 4 ...

Page 70: ...temperature and relative humidity Temperature 15 30 Humidity 30 80 non condensing Power supply conditions AC Adapter Item Specifications Rated input voltage AC100V 240V Voltage fluctuation range 10 Phase Single Power frequency 50 60Hz Rated input current 1A Output voltage DC12V Main unit Item Specifications Rated voltage DC12V 5 Rated current 0 5A Environmentalconditions Item Specifications Usage ...

Page 71: ...35 QuickGene Mini8L Operation Manual 5 Main Specifications 5 ...

Page 72: ......

Page 73: ...ement Optional Parts Name Cartridge Holder Name Collection Holder Name Pressure Seal Plate 2pcs P N 40321301410 P N 40321301411 P N 40321301413 Name Pressure Adapter Set Name Pressure Heads 8pcs Name AC Adapter P N 40321301412 P N 40321300451 P N 40321301406 A ...

Page 74: ...customer support A 4 Manufacturer Information KURABO INDUSTRIES LTD Advanced Technology Division Bio Medical Department Kurabo Neyagawa Techno Center 3F 14 5 Shimokida Cho Neyagawa Osaka 572 0823 Japan TEL 072 820 3079 FAX 072 820 3095 URL http www kurabo co jp bio A 5 Notes for Transfer QuickGene Mini8L When transferring the QuickGene Mini8L perform the following tasks Before carrying QuickGene M...

Page 75: ...37 QuickGene Mini8L Operation Manual A 6 Disposal of Device Do not put in the trash Recycle or dispose of according to local state or federal laws A ...

Page 76: ......
Page 77: ...al may be updated without notice KURABO INDUSTRIES LTD assumes no liability for damages to third party copyrights or other rights arising from the use of any information in this manual Contents of this manual are not to be reproduced without permission from KURABO INDUSTRIES LTD Manuals with missing or wrongly collated pages will be replaced free of charge ...

Page 78: ...83 5967 Email support adsbiotec com E mail support adsbiotec com Registered in England and Wales Registered Office Birketts LLP 22 Station Road Cambridge CB1 2JD Registration No 03257373 ADS BIOTEC INC and ADS BIOTEC LIMITED are authorized by Kurabo Industries as distributors of the Kurabo equipment and consumables ADS BIOTEC and YOUR PATH TO DISCOVERY are trademarks of ADS BIOTEC INC All other tr...

Reviews: